Documentation Index
Fetch the complete documentation index at: https://docs.flowx.ai/llms.txt
Use this file to discover all available pages before exploring further.
New in 5.4.0
Email Trigger is a data source type that enables process instances to be automatically started when emails are received via IMAP, bringing event-driven automation to your email workflows.
Email Trigger vs Microsoft Outlook
| Email Trigger + Email Sender | Microsoft Outlook | |
|---|---|---|
| Protocol | IMAP (read) + SMTP (send) | MS Graph API |
| Authentication | Username + password / app password | Azure AD (client credentials) |
| Read + Send | Two separate data sources | Single data source (Read & Send scope) |
| Reply threading | Manual — requires Message-ID header forwarding | Native — uses MS Graph message ID to maintain conversation threads |
| Provider support | Any IMAP/SMTP-compatible mail server | Microsoft 365 / Outlook only |
| Best for | Gmail, on-premise mail servers, or mixed environments | Organizations using Microsoft 365 |
Overview
Email Trigger is a data source type in Integration Designer that allows FlowX.AI processes to be triggered automatically when emails arrive in a monitored mailbox. This enables use cases such as:- Customer support automation: Automatically create support tickets when emails arrive
- Document processing: Trigger document workflows when emails with attachments are received
- Request handling: Start approval processes based on incoming email requests
- Notification workflows: Process automated alerts from monitoring systems
How it works
The Email Trigger system follows a straightforward flow:Configure Email Connection
Set up an IMAP connection to your email server as a Data Source in Integration Designer.
Link to Message Start Event (Start Catch Message)
Connect the Email Trigger to a Message Start Event node in your process definition.
Creating an email trigger data source
Prerequisites
Before configuring an Email Trigger, ensure you have:- Access to Integration Designer with appropriate permissions
- IMAP server credentials (host, port, username, password)
- Knowledge of the mailbox folder to monitor (defaults to
INBOXif not specified)
Step 1: Access Integration Designer
Navigate to Data Sources
Navigate to FlowX Designer → Workspaces → Your workspace → Projects → Your project → Integrations → Data Sources
Step 2: Configure connection settings
Configure the IMAP connection with the following fields:The email protocol to use. Currently only IMAP is supported.
The hostname or IP address of your IMAP server.Examples:
imap.gmail.comoutlook.office365.commail.yourcompany.com
The port number for the IMAP connection. The default value updates automatically based on the SSL/TLS setting.
| SSL/TLS | Default Port |
|---|---|
| ON | 993 |
| OFF | 143 |
The email account username or full email address used for authentication.
The password or app-specific password for the email account.
Turn on secure connection using SSL/TLS encryption. Recommended: ON.
The SSL/TLS setting determines the default port value. Change this setting before adjusting the port.
Step 3: Test the connection
Click the Test Connection button to verify your settings:| Result | Message | Action |
|---|---|---|
| ✅ Success | ”Established connection” | Proceed to save |
| ❌ Error | ”Failed to establish connection” | Check credentials and server settings |
When you click Create, another authentication test is performed. If the test fails, you’ll be redirected to the Authorization tab with an error message, but the Email Trigger will still be created.
Step 4: Configure basic information
A unique, descriptive name for the Email Trigger.Validation rules:
- Required field
- Must be unique within the project
- Only letters, numbers, and these characters allowed:
[],(),.,_,- - Minimum 3 characters, maximum 50 characters
Optional description explaining the purpose of this Email Trigger.
Configuring email trigger settings
After creating the Email Trigger, configure monitoring and validation settings in the Settings tab.Filtering criteria
Define which emails should trigger processes:The mailbox folder to monitor for incoming emails.Default:
INBOXExamples:INBOXSupportOrders/New
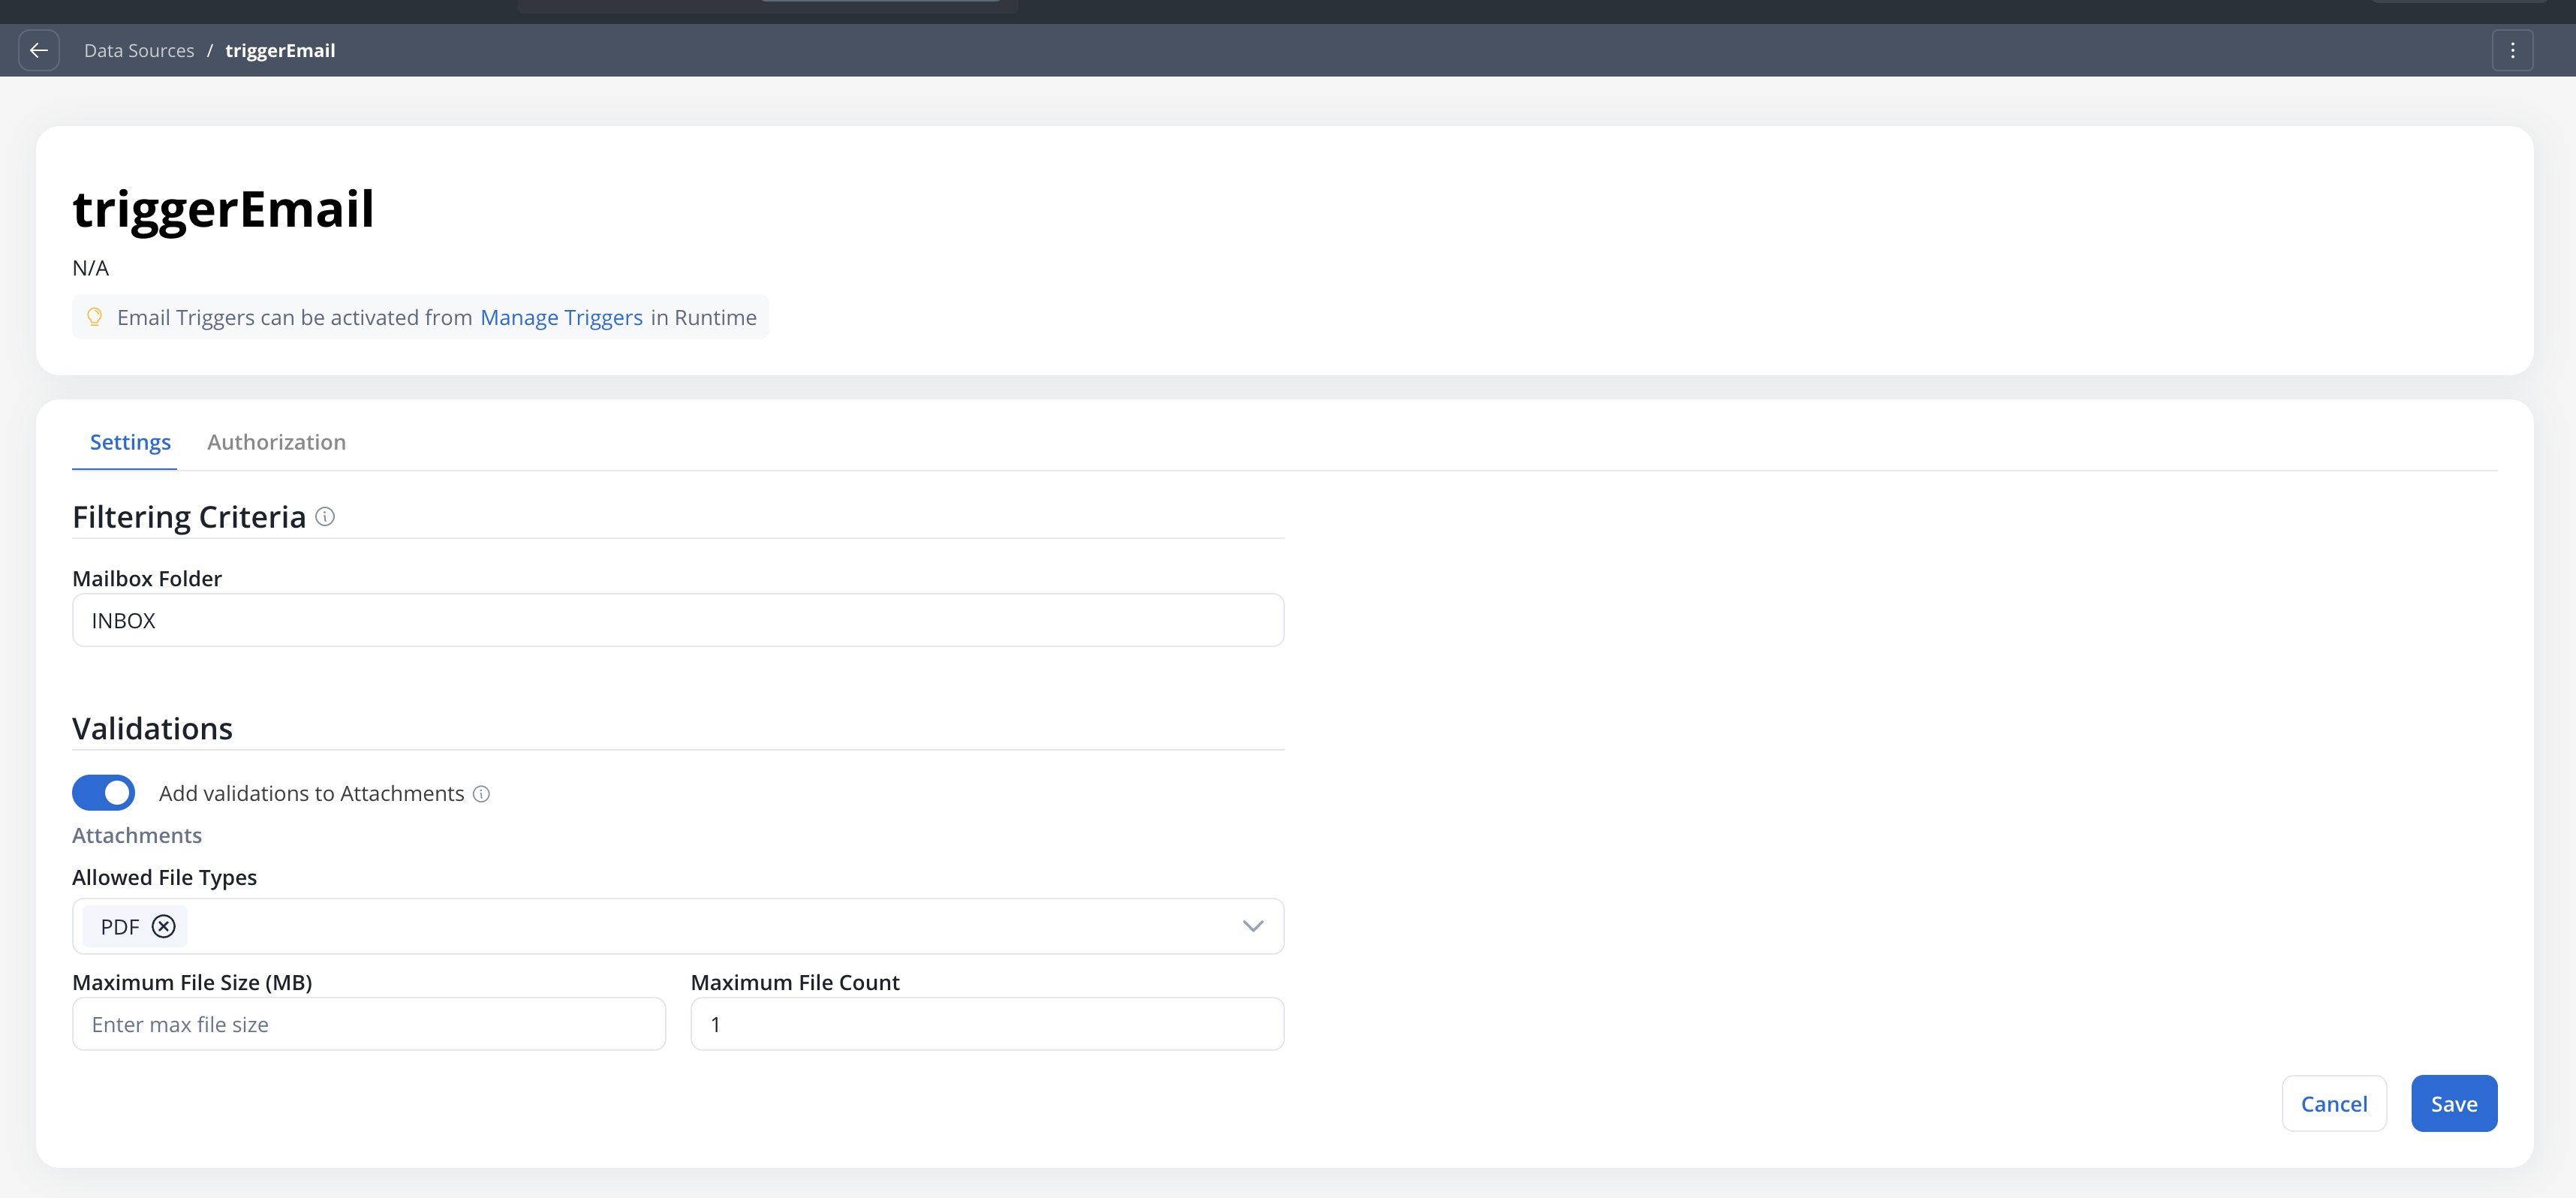
Validations
Configure validation rules for incoming emails. If any validation fails, the email will not be processed and a warning will appear in the Failed Triggers section.Toggle attachment validation on or off. When turned OFF, no attachment validation is applied and all attachments are accepted. When turned ON, the fields below become available.Default: OFF
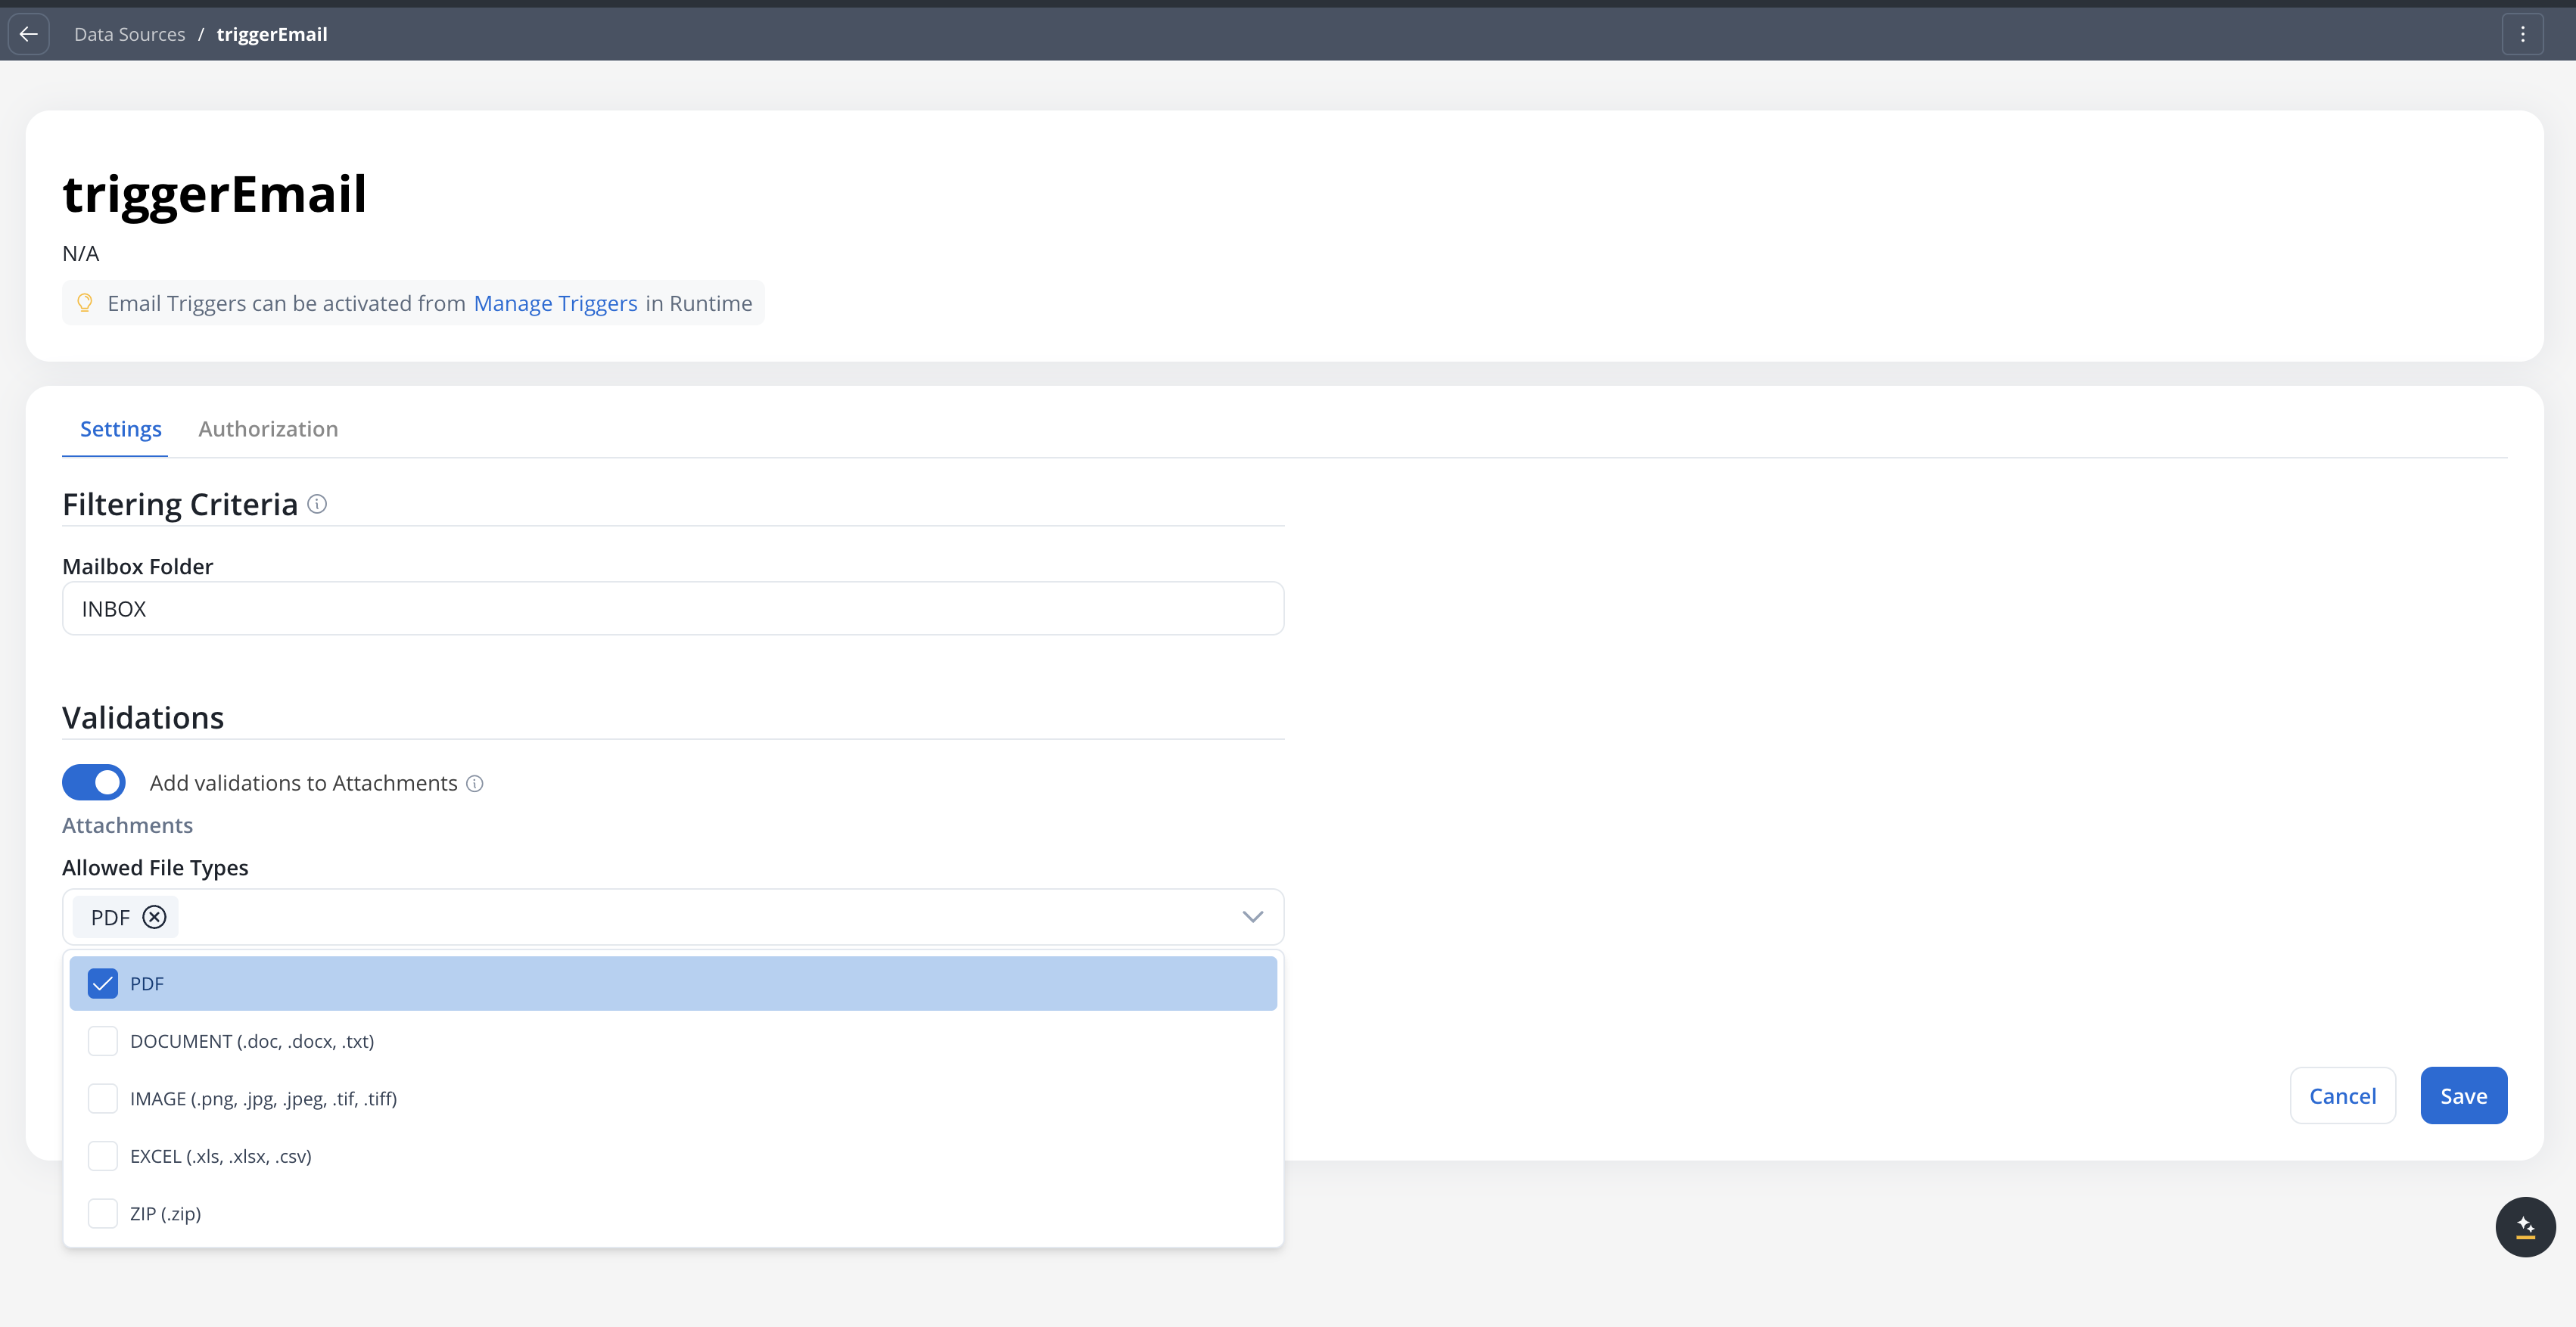
Restrict which attachment file types are accepted:
| Type | Extensions |
|---|---|
.pdf | |
| DOCUMENT | .doc, .docx, .txt |
| IMAGE | .png, .jpg, .jpeg, .tif, .tiff |
| EXCEL | .xls, .xlsx, .csv |
| ZIP | .zip |
Leave empty to accept all file types.
Maximum allowed size per attachment file, in megabytes.Maximum allowed value: 25 MB
Leave empty to apply no per-file size limit beyond the 25 MB hard cap.
Maximum number of attachments allowed per email. Leave empty for no limit.
Polling interval
The Email Trigger polls for new emails every 30 seconds by default. This interval can be configured at the environment level but is not user-configurable in the UI.
Connecting to a Message Start Event
To use the Email Trigger, connect it to a Message Start Event node in your process definition.Configuring the Message Start Event
Select the trigger type:
- Internal Throw Message - Traditional message-based triggering
- Email Trigger - Email-based triggering
- Incoming Webhook - Webhook-based triggering (see the Incoming Webhooks data source)
Select the Email Trigger data source to use. Only Email Triggers created in the current project are available.
Tooltip: “The email connection that will be triggered”
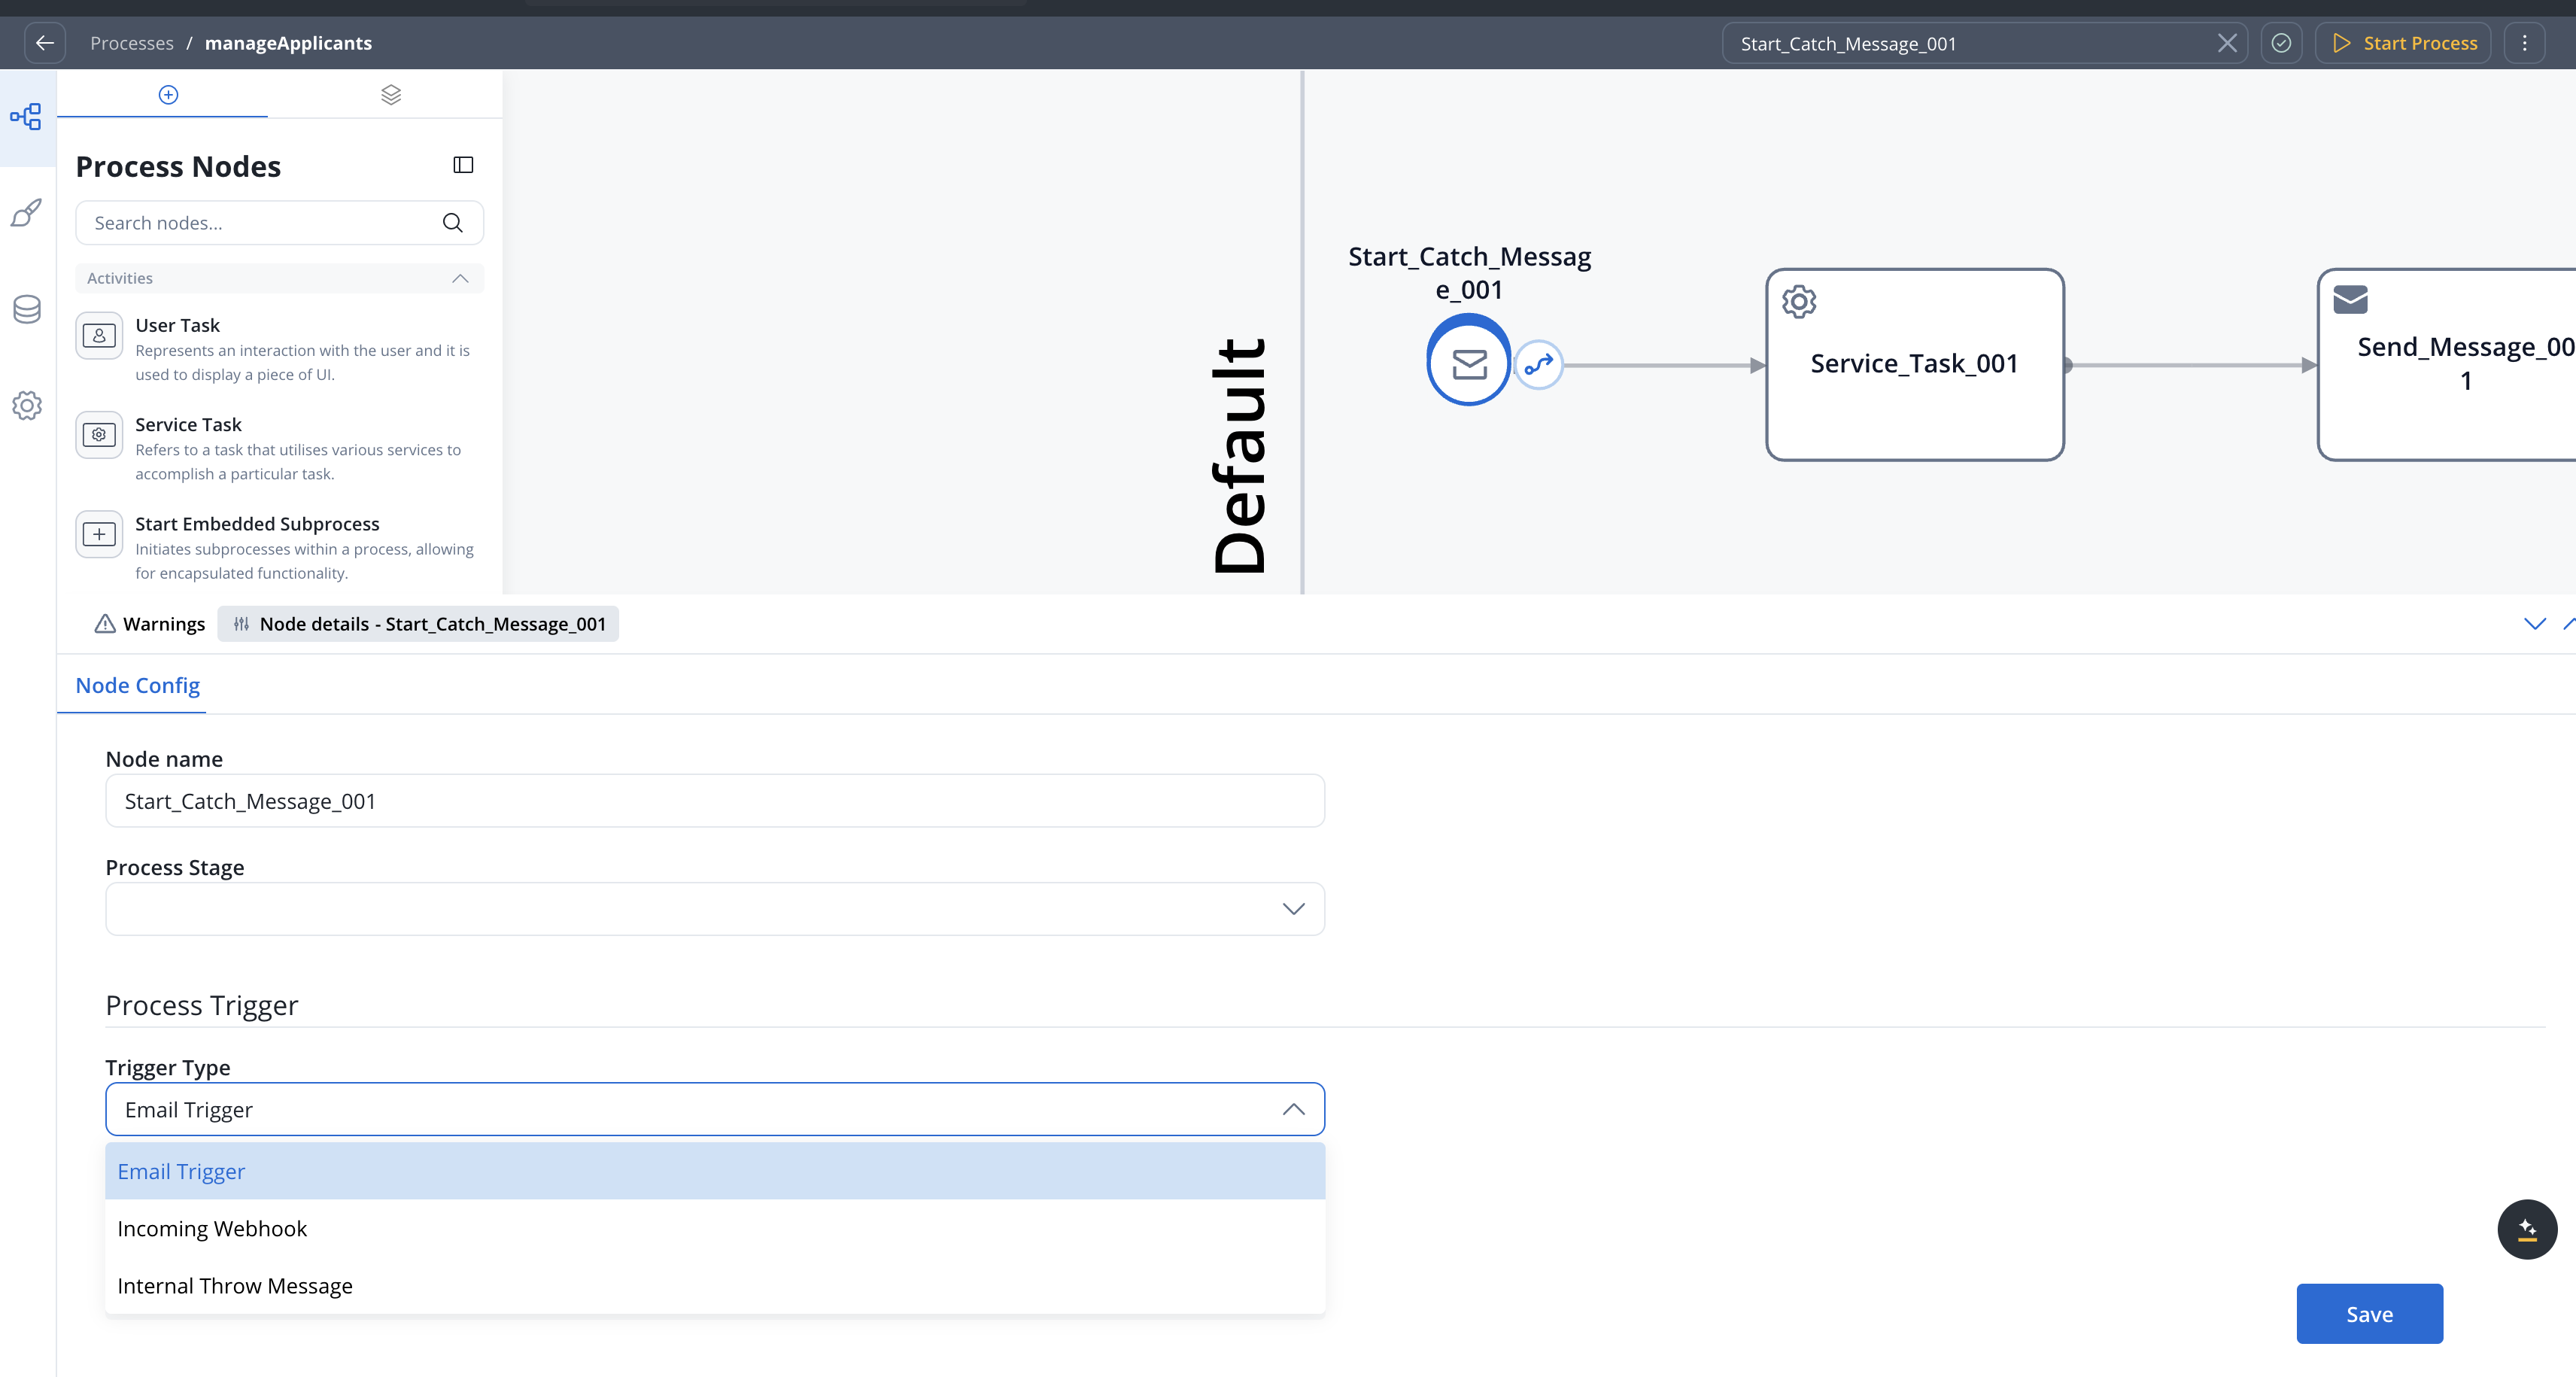
To start monitoring, you must activate the trigger from Manage Triggers in Runtime Settings.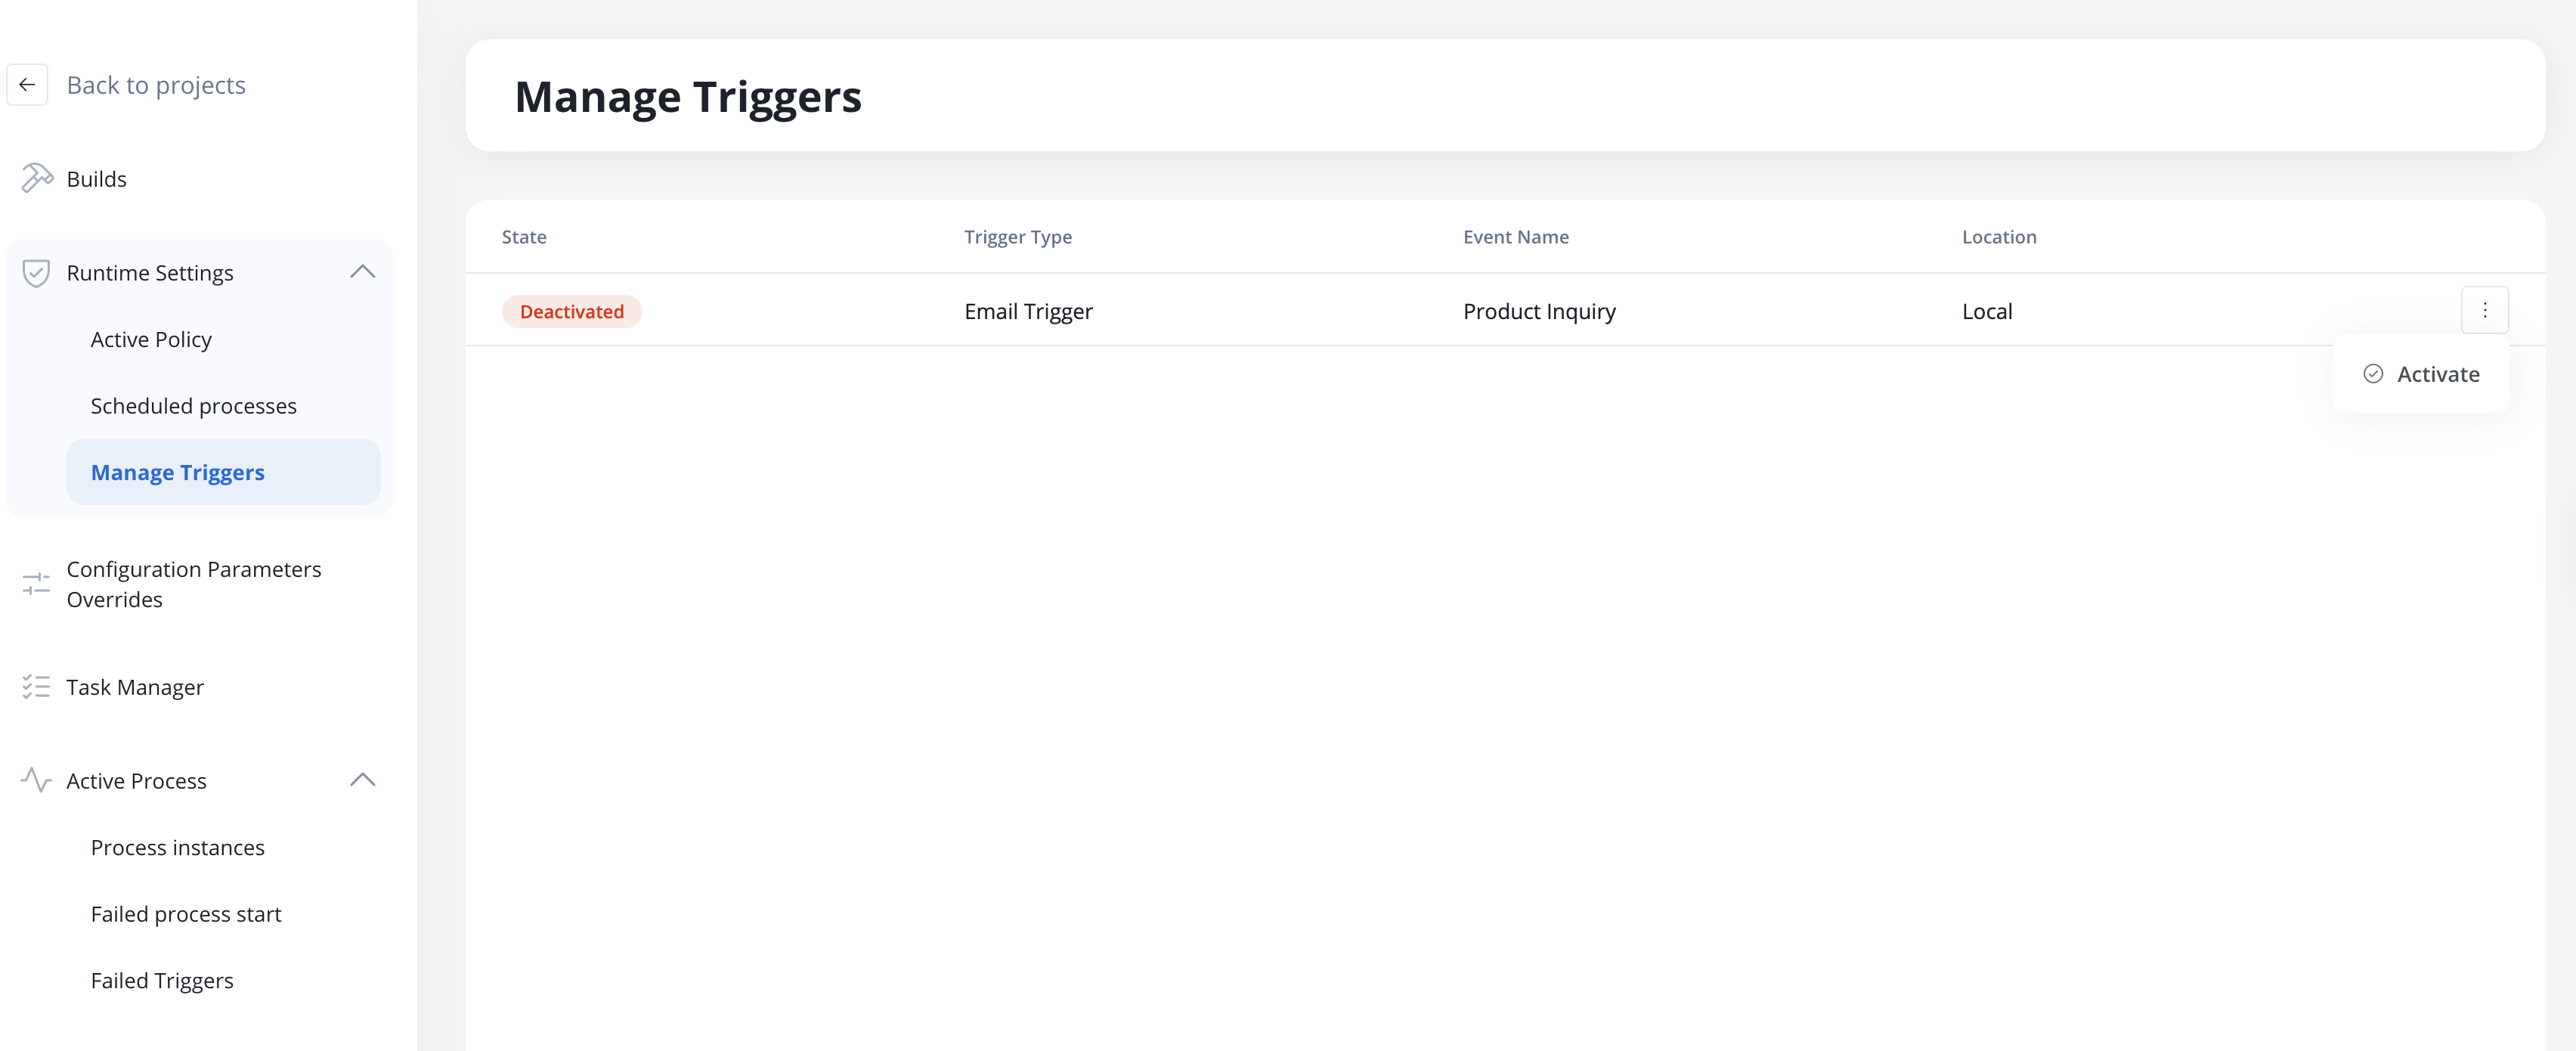
Email data schema
When an email triggers a process, the following data structure is available in your process variables: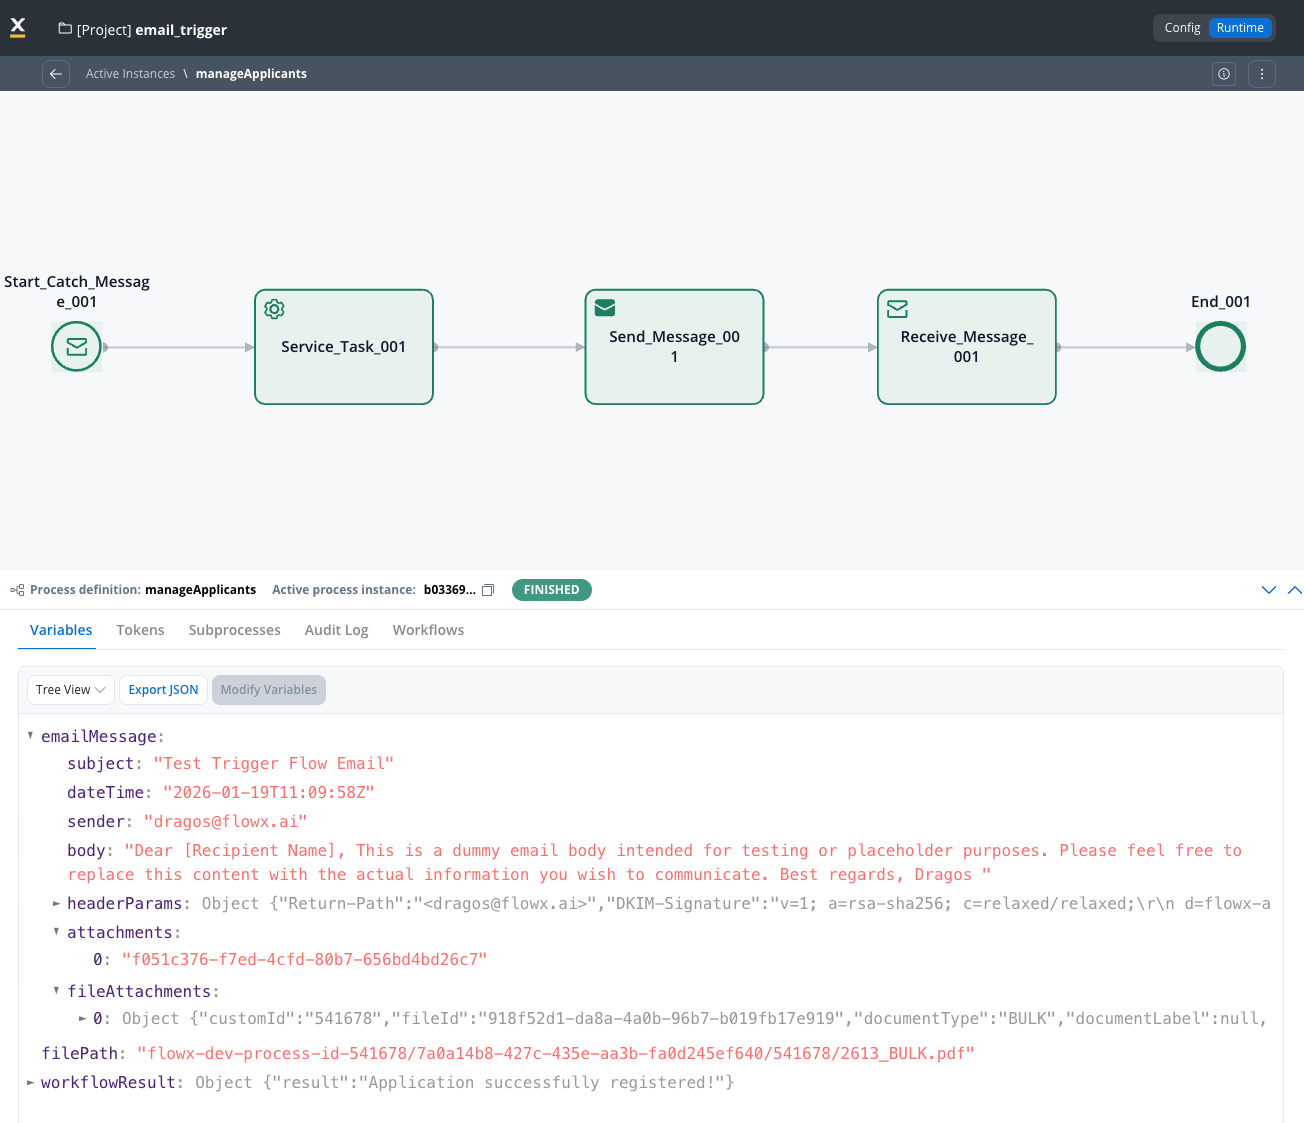
Schema fields
| Field | Type | Description |
|---|---|---|
subject | string | Email subject line |
dateTime | string (ISO 8601) | Timestamp when email was received |
sender | string | Sender’s email address |
replyTo | array of strings | Reply-To addresses from the email header. Use these when sending a reply via the Email Sender or Send Notification Action |
body | string | Email body content (plain text) |
attachments | array | List of attachment metadata objects |
fileAttachments[].filePath | string | Storage path in Document Plugin |
fileAttachments[].downloadPath | string | API path to download the file |
headerParams.Message-ID | string | Unique email message identifier |
Attachment handling
Email attachments are automatically:- Uploaded to the Document Plugin as temporary files
- Copied to permanent storage linked to the process instance
- Referenced in the
fileAttachmentsarray with download paths
Forwarding incoming attachments to a reply
The inboundfileAttachments[] shape (filePath, downloadPath) differs from the outbound shape expected by the Send Notification action’s Attachments field (path, filename).
To forward original attachments on a reply, transform emailMessage.fileAttachments into the Send Notification shape — typically in a Script node — and pass the result through a process variable:
${replyAttachments}) in the Send Notification action’s Attachments field.
Managing triggers at runtime
Accessing Manage Triggers
Navigate to Runtime Settings → Manage Email Triggers to view and control all configured Email Triggers.Trigger list columns
| Column | Description |
|---|---|
| State | Current status: Active or Inactive |
| Trigger Type | Always “Email Trigger” for email-based triggers |
| Event Name | The Email Trigger data source name |
| Location | Dependency application name, or Local for the current build |
Activation requirements
For an Email Trigger to appear in Manage Triggers:- ✅ Email Trigger must be created as a Data Source
- ✅ Email Trigger must be added to a Message Start Event node
- ✅ The process must be part of a build in the Active Policy
When the Active Policy changes, Email Triggers retain their previous state (Active/Inactive). If an Email Trigger is deleted from the latest build, it will be automatically deactivated.
Enhanced in FlowX.AI 5.6.0All Email Trigger configuration changes and runtime actions (activation, deactivation, trigger events) are now recorded in the audit trail for compliance and debugging purposes.
Activating and deactivating triggers
Use the toggle in the State column to activate or deactivate monitoring:- Active: The system monitors the mailbox and creates process instances for incoming emails
- Inactive: Monitoring is paused; no new process instances are created
Testing with mock email content
Available starting with FlowX.AI 5.6.0Test email-triggered processes using mock email data without configuring a live IMAP connection.
- Testing process logic before connecting to a live mailbox
- Verifying attachment handling and validation rules
- Debugging email-triggered workflows in development
How to test with mock email
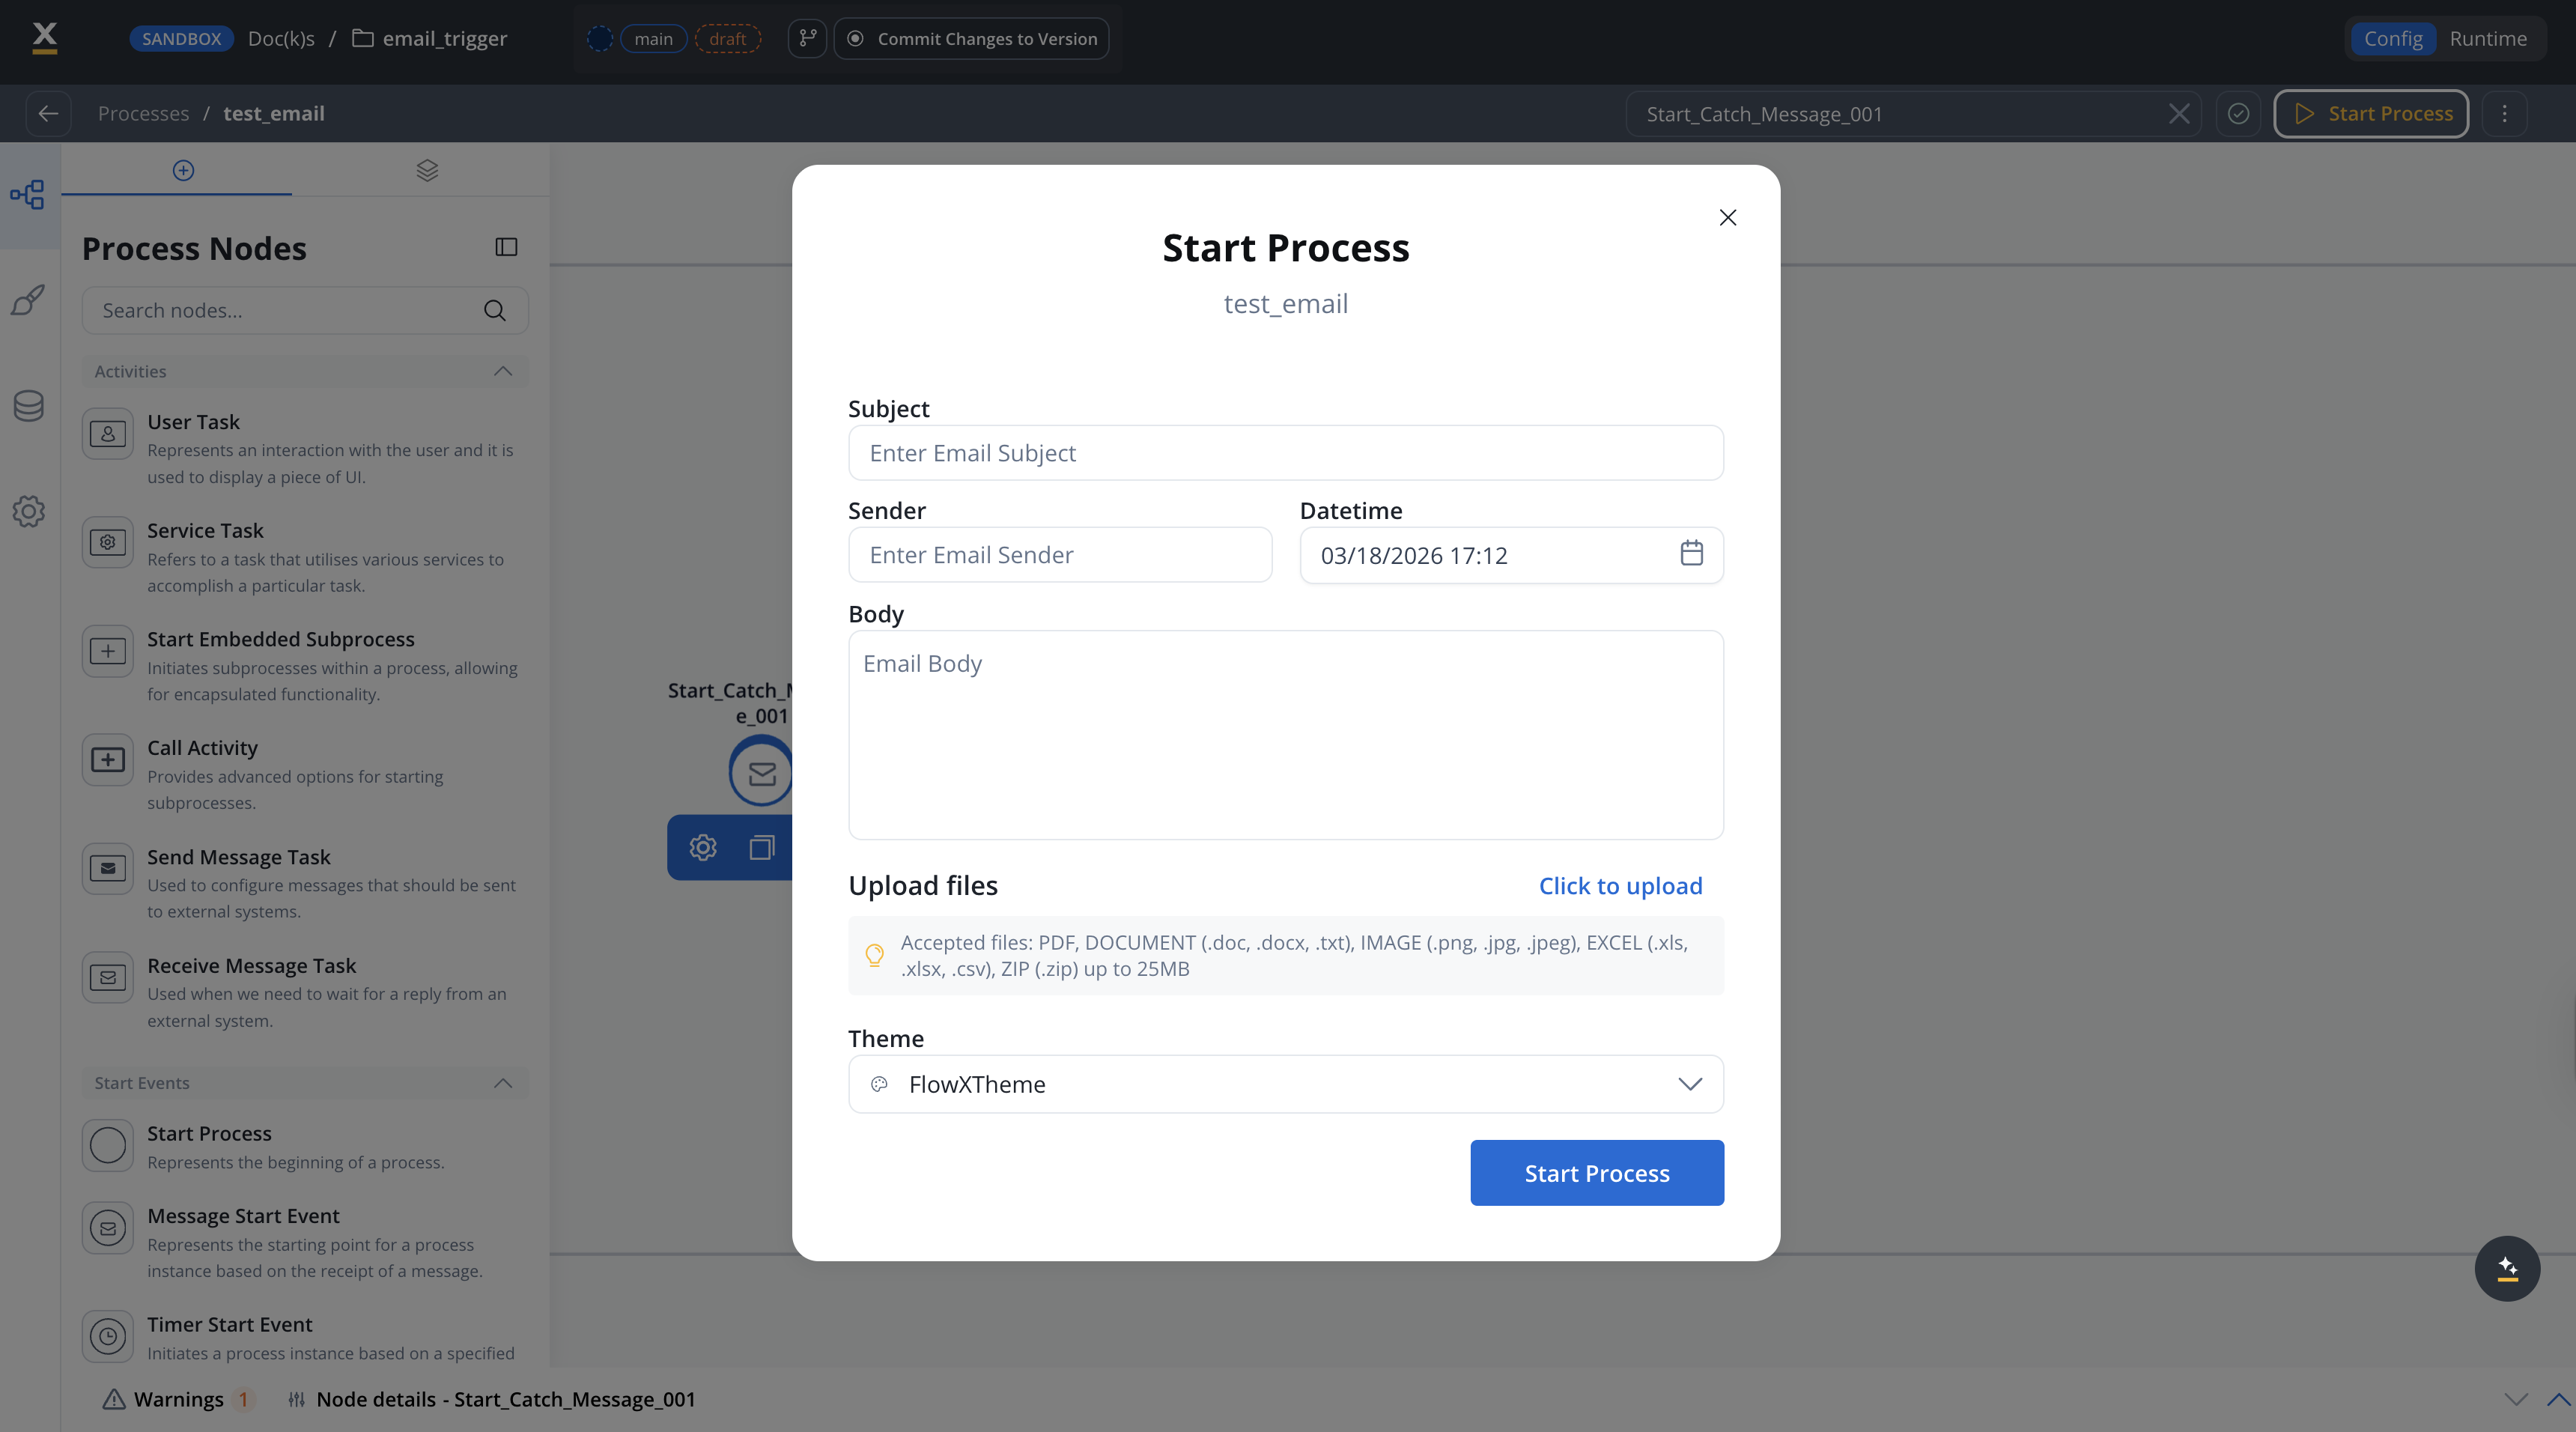
Open the start process dialog
Navigate to your process definition and click Start Process. If the process has a Message Start Event configured with an Email Trigger, the dialog displays a mock email form instead of the standard start parameters.
Fill in the mock email fields
Complete the form fields to simulate an incoming email:
| Field | Description |
|---|---|
| Subject | The email subject line |
| Sender | The sender email address |
| Datetime | When the email was “received” (defaults to the current date and time) |
| Body | The email body content |
| Upload files | Attach files to simulate email attachments. Accepted types: PDF, DOCUMENT (.doc, .docx, .txt), IMAGE (.png, .jpg, .jpeg), EXCEL (.xls, .xlsx, .csv), ZIP (.zip), up to 25 MB |
| Theme | Select the theme to use for the process instance |
Handling failed triggers
When emails fail validation or processing errors occur, they appear in the Failed Triggers section.Accessing Failed Triggers
Navigate to Runtime Settings → Failed Triggers to view failed email processing attempts.Failed Triggers list
| Column | Description |
|---|---|
| Timestamp | Date and time (localized) |
| Trigger Type | ”Email Trigger” |
| Trigger Name | The Email Trigger data source name |
| Cause Type | Type of failure |
| Context | Additional info, e.g., “Sender: customer@example.com” |
Cause types
- File type not permitted
- File size exceeded
- File count exceeded
- Unable to connect to email server
Message: “The file
{filename} could not be uploaded because it is not on the list of permitted file types.”Resolution: Update the Allowed File Types in the Email Trigger settings, or ask the sender to use an accepted format.Failed trigger details page
Enhanced in FlowX.AI 5.5.0 — Failed triggers now have a dedicated details page with breadcrumb navigation and expanded information.
| Field | Description |
|---|---|
| Email Subject | Subject line of the failed email |
| Email Sender | Sender address |
| Timestamp | When the email was received |
| Cause Type | Failure classification |
| Error Details | Detailed error description, displayed in a code editor for easy reading |
| Build Status | Whether the associated build is WIP or Committed |
| Monitored Email Address | The email account being monitored |
| Monitored Inbox Folder | The mailbox folder being monitored |
| Process Definition | Link to navigate to the process definition (requires config rights) |
| Build | Build identifier |
| Project/Library | Source project or library |
| Build Created From | Branch name |
| Project/Library Version ID | Version identifier |
If an email fails for multiple reasons, all failure causes are listed in the details view.
Use cases
Customer support ticket creation
Configure Email Trigger
Create an Email Trigger connected to your support email (e.g.,
support@company.com).Design the process
Create a process that:
- Extracts customer information from the email
- Creates a ticket in your CRM
- Assigns to the appropriate team
- Sends an acknowledgment email
Document processing workflow
Best practices
Use Configuration Parameters
Store server credentials and environment-specific settings in configuration parameters for easy management across environments.
Set Appropriate Validations
Configure file type, size, and count limits to prevent processing of unwanted or malicious content.
Monitor Failed Triggers
Regularly review the Failed Triggers section to identify issues with email processing.
Handle Attachments Async
Remember that attachment processing is asynchronous. Design your process to handle potential delays in file availability.
Troubleshooting
Email Trigger not appearing in Manage Triggers
Email Trigger not appearing in Manage Triggers
Ensure all requirements are met:
- Email Trigger is created as a Data Source
- Email Trigger is linked to a Message Start Event
- The process is included in an Active Policy build
Connection test fails
Connection test fails
Common causes:
- Incorrect credentials: Verify username and password
- Wrong port: Use 993 for IMAP with SSL/TLS
- Firewall: Ensure outbound connections to the mail server are allowed
- 2FA enabled: Generate an app-specific password for the email account
Emails not triggering processes
Emails not triggering processes
Check:
- Is the trigger Active in Manage Triggers?
- Is the correct mailbox folder configured?
- Do incoming emails pass validation rules?
- Review Failed Triggers for error details
Attachments not available in process
Attachments not available in process
Attachment processing is asynchronous. If you need immediate access:
- Add a wait step or message catch event after the start node
- Verify the email passed file validation rules
- Check Document Plugin connectivity
Related documentation
Email Sender
Configure SMTP connections to send and reply to emails from processes
Microsoft Outlook
Connect to Outlook via MS Graph API for reading and sending emails
Send Notification Action
Send emails and reply to received emails directly from process nodes
Integration Designer
Learn about other data source types and workflow creation
Message Start Event
Configure message-based process triggers
Document Plugin
Manage files and attachments in FlowX.AI
Configuration Parameters
Use environment variables for flexible configurations