

- Define a data source with a tested REST endpoint
- Build a workflow from REST API Call, Script, and End nodes and run it
- Start a workflow from a process and map data in and out of it
- Find the result in the finished process instance
Time required: about 45 minutesPrerequisites:
- Access to FlowX Designer
- A workspace and project set up (create one here)
- Outbound internet access from your FlowX environment, so the workflow can reach the public API
What you’ll build
A currency lookup. A process holds the currency a customer picked, starts a workflow with it, and waits. The workflow calls the Frankfurter exchange-rates API (free, no API key), extracts the USD rate, and returns it. The process stores the result underexchangeResult.
The API is a stand-in. Swap in any REST API you have access to and the steps stay the same.
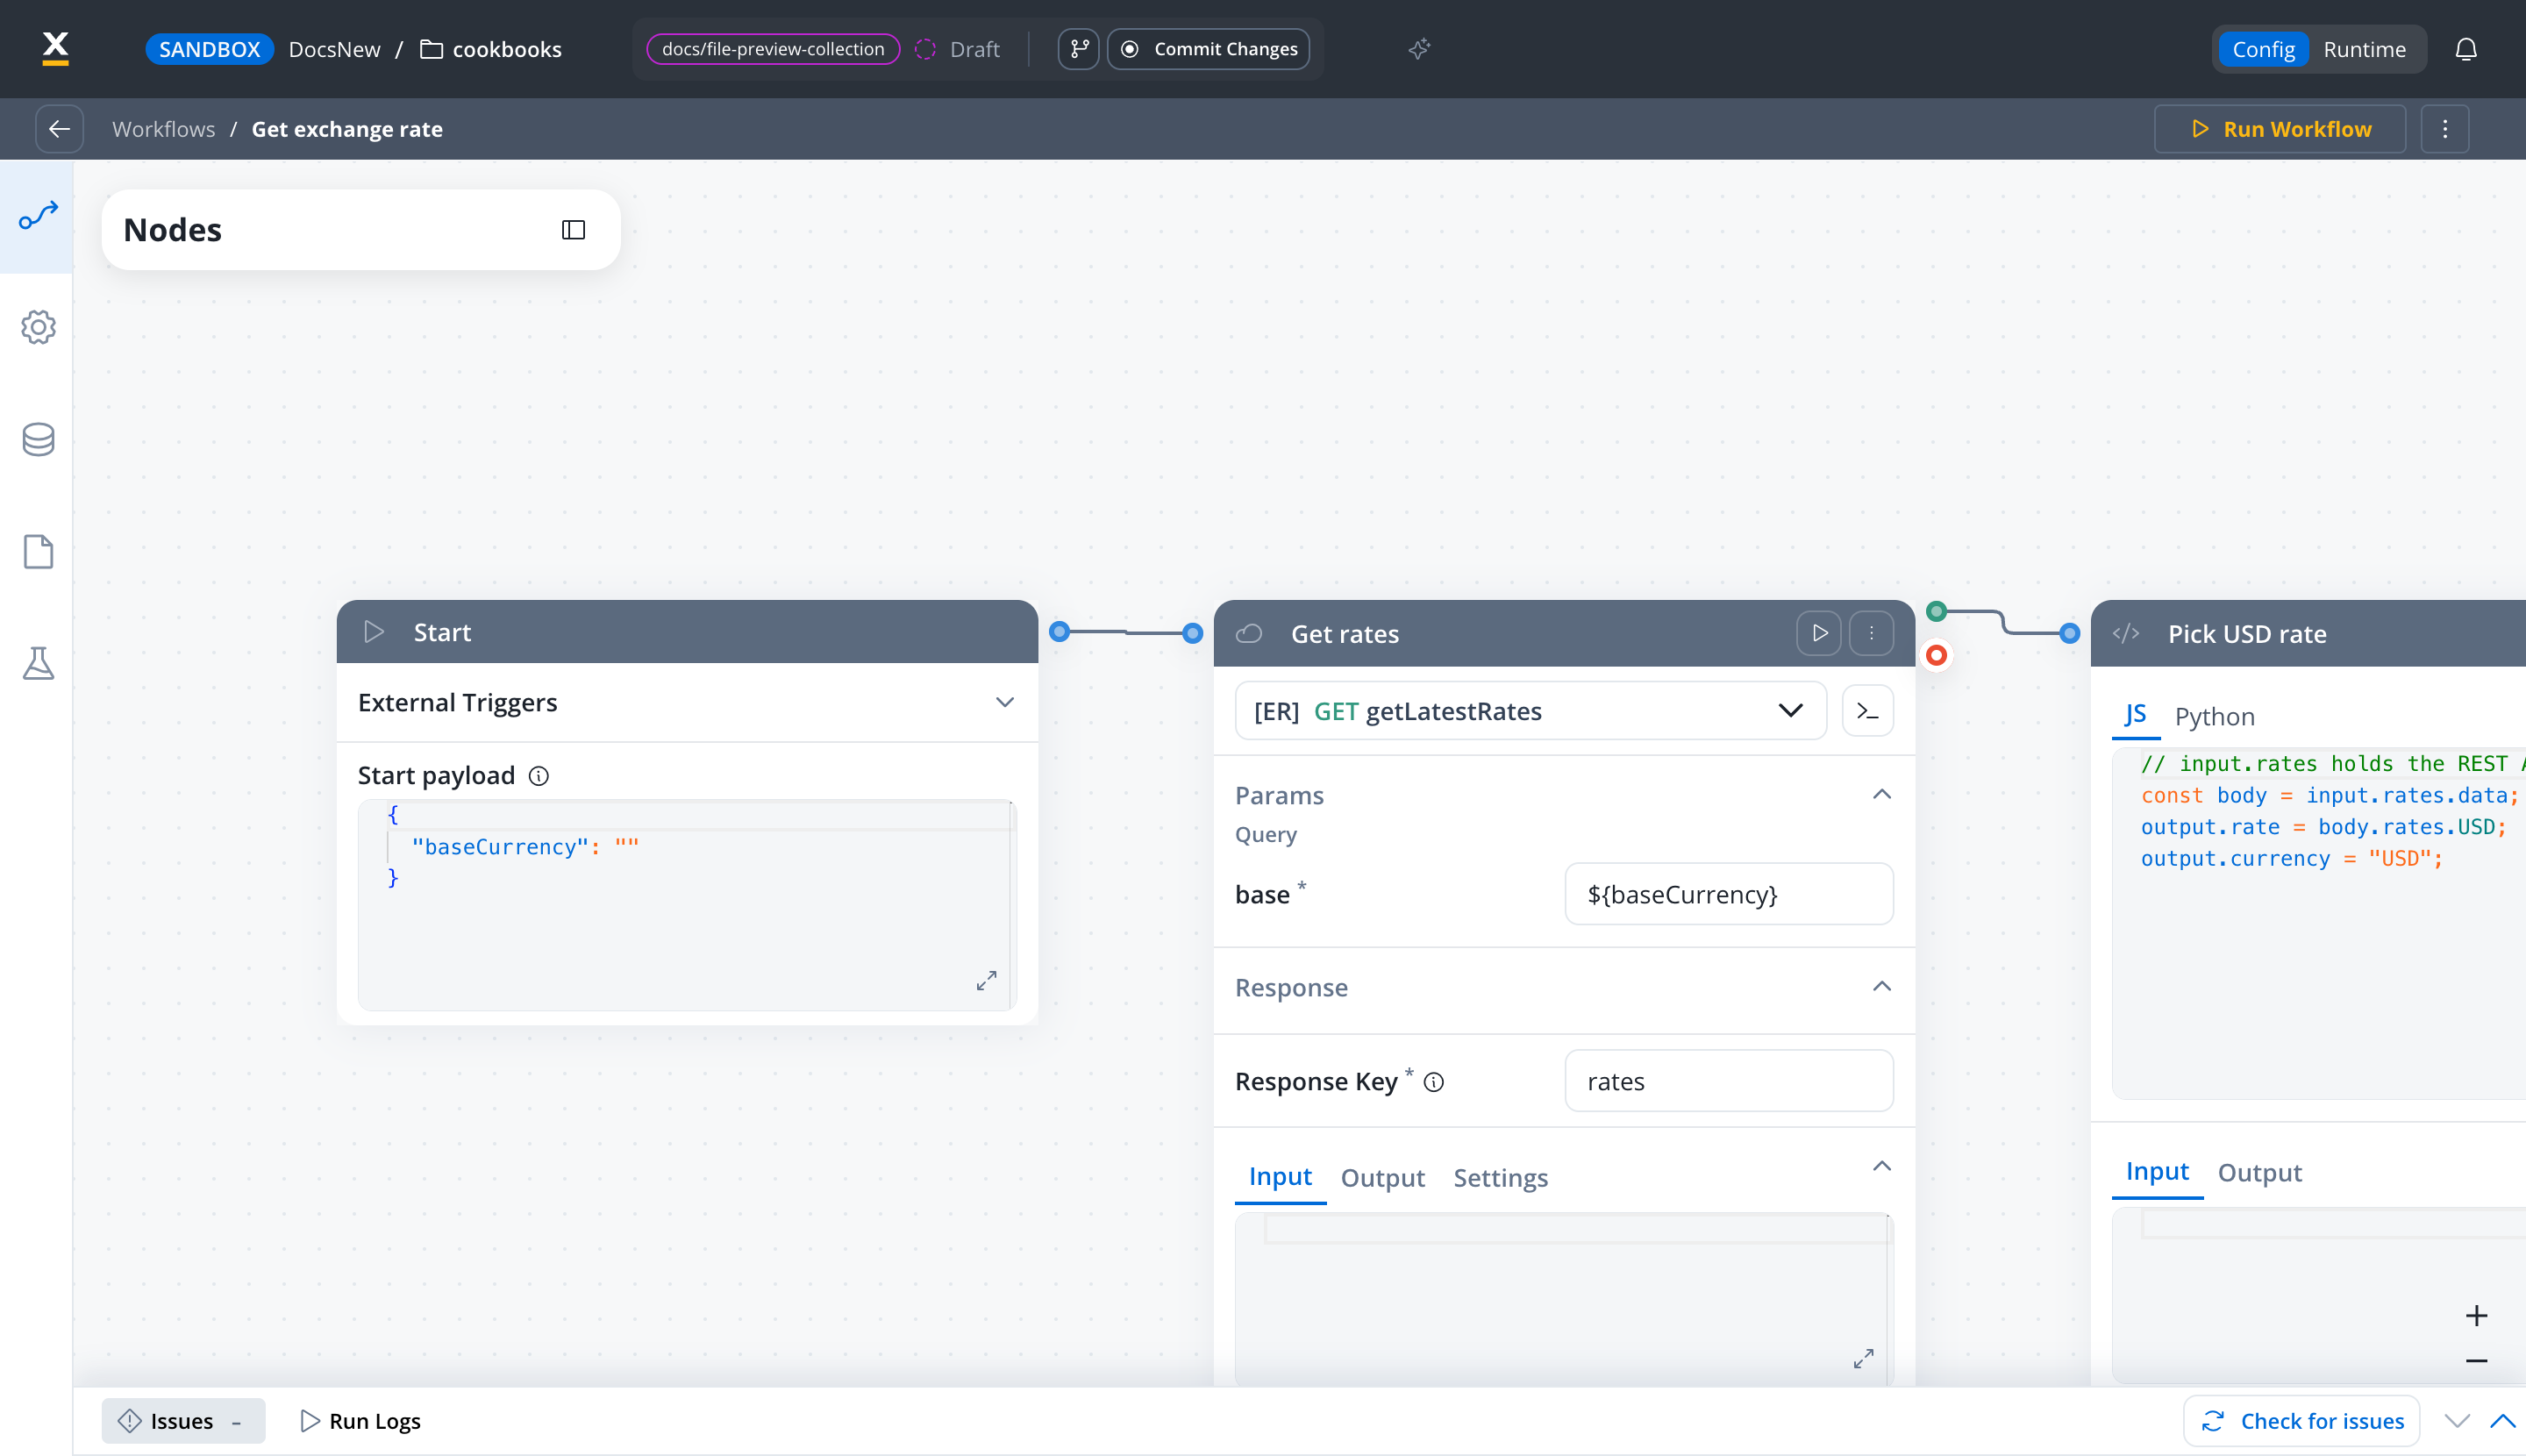
This is how the finished workflow looks in the Integration Designer:
Step 1: Create the data source
A data source is a reusable connection to an external system: its base URL, authorization, and the endpoints you call on it. Every workflow in the project can use it.1
Create a RESTful system
In FlowX Designer, go to Workspaces → your workspace → Projects → your project → Integrations → Data Sources. Click +, and in the Add Data Source modal pick Restful System. Fill in:
- Name:
Exchange Rates - Description:
Frankfurter exchange-rates API
2
Set the base URL
In the Base URL card on the system page, enter
https://api.frankfurter.dev/v1.3
Check the authorization
Open the Settings tab. Under Authorization, the Auth Type options are
NO_AUTH, BEARER, BASIC, SERVICE_ACCOUNT, PRIVATE_KEY, and ACCESS_KEY. Frankfurter needs no credentials, so leave NO_AUTH. For a real API, pick what it requires. Token values are best defined here at system level and overridden per environment.4
Add an endpoint
Open the Endpoints tab and click Add Endpoint. Pick the 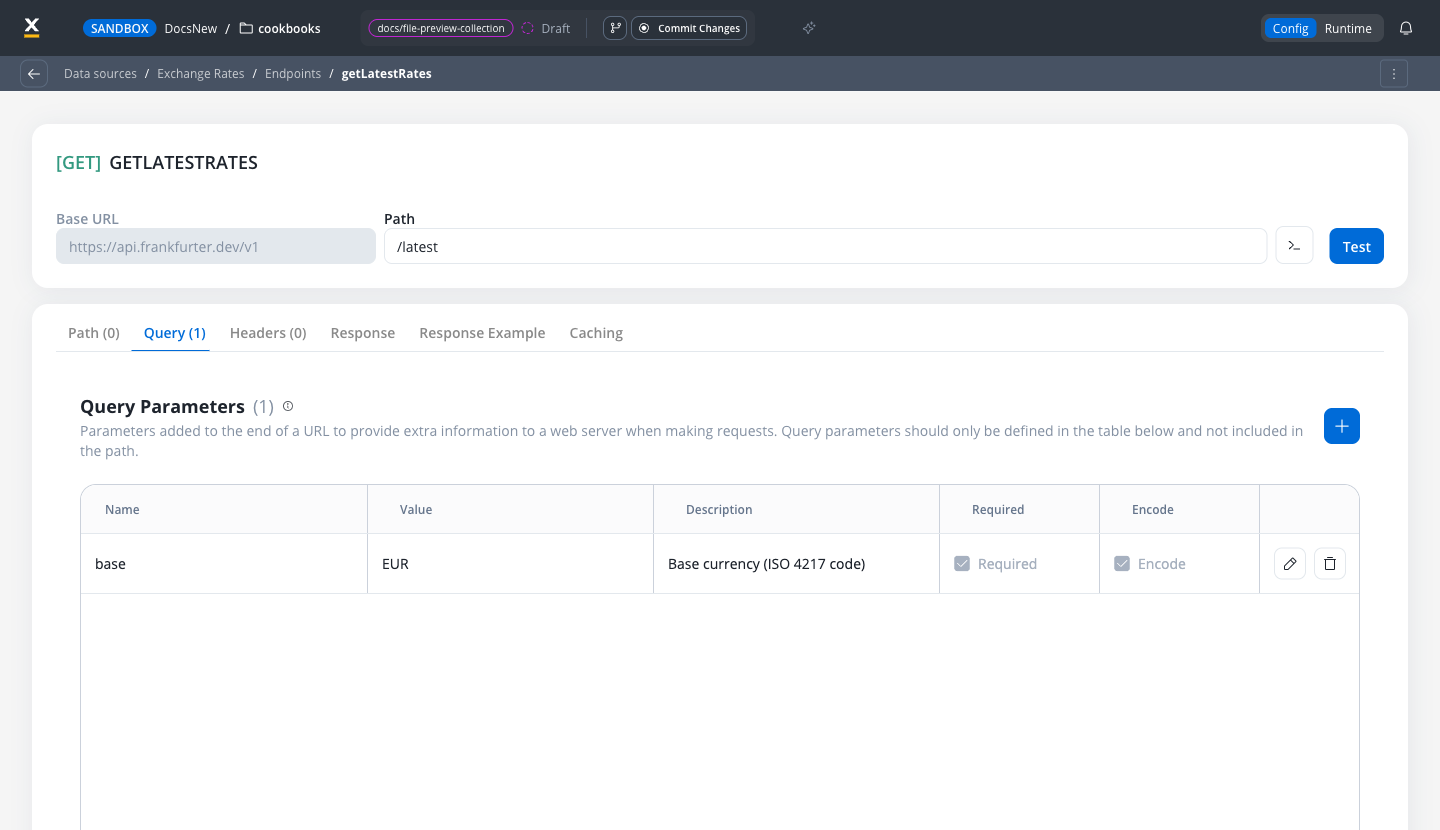 Back on the system page, the Endpoints tab now lists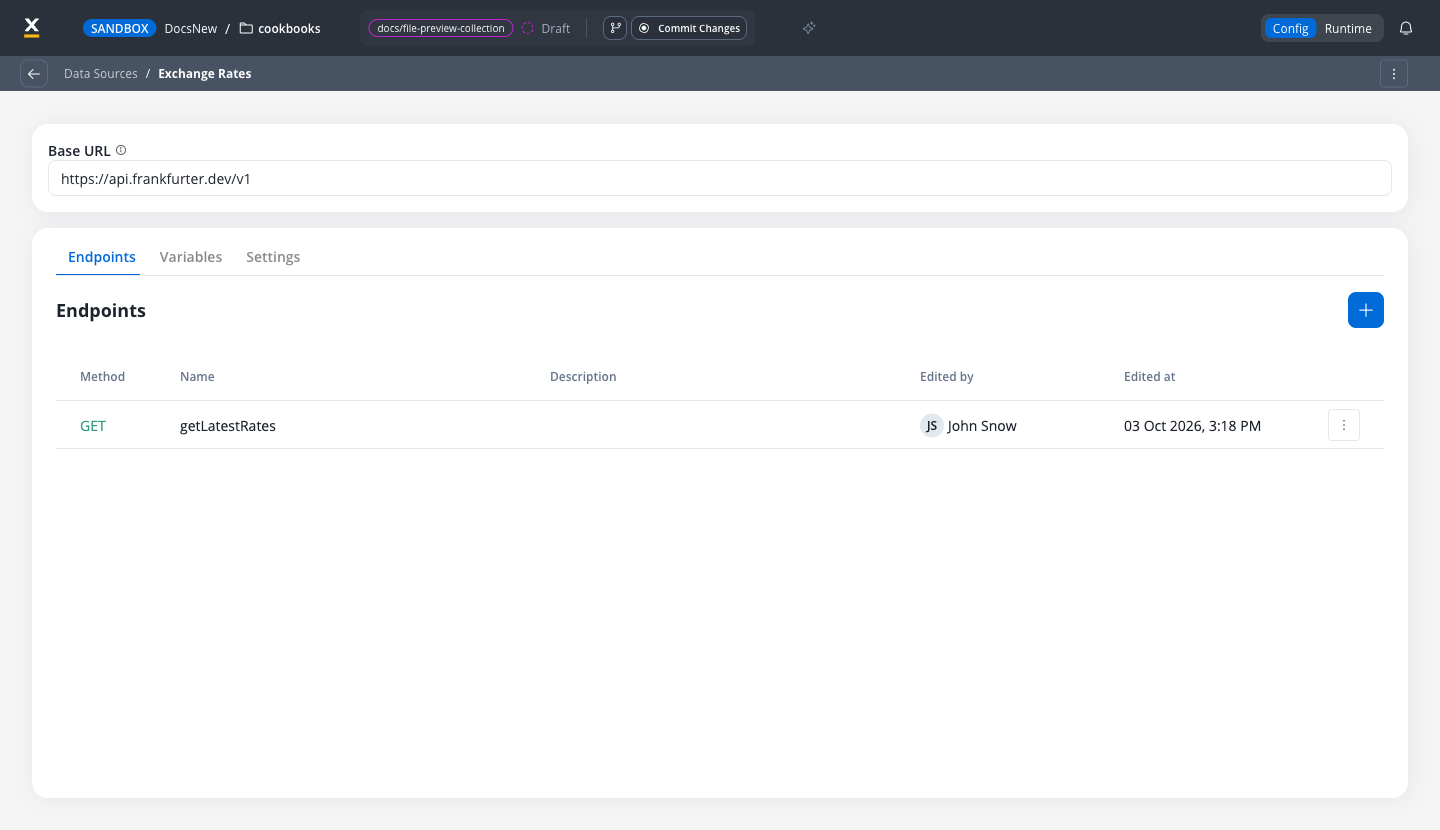
GET method and set the Name to getLatestRates, then confirm. On the endpoint page:- Path:
/latest - On the Query tab, add one parameter: Name
base, ValueEUR. The value is the default the endpoint test uses; the workflow overrides it at runtime.
getLatestRates.5
Test the endpoint
Click Test on the endpoint page. The Test GET getLatestRates modal shows the resolved URL and the query parameter. Click Test in the modal and read the response:The real response lists about 30 currencies; the rate values change daily. Click Use as Response Example to store the shape on the endpoint’s Response Example tab.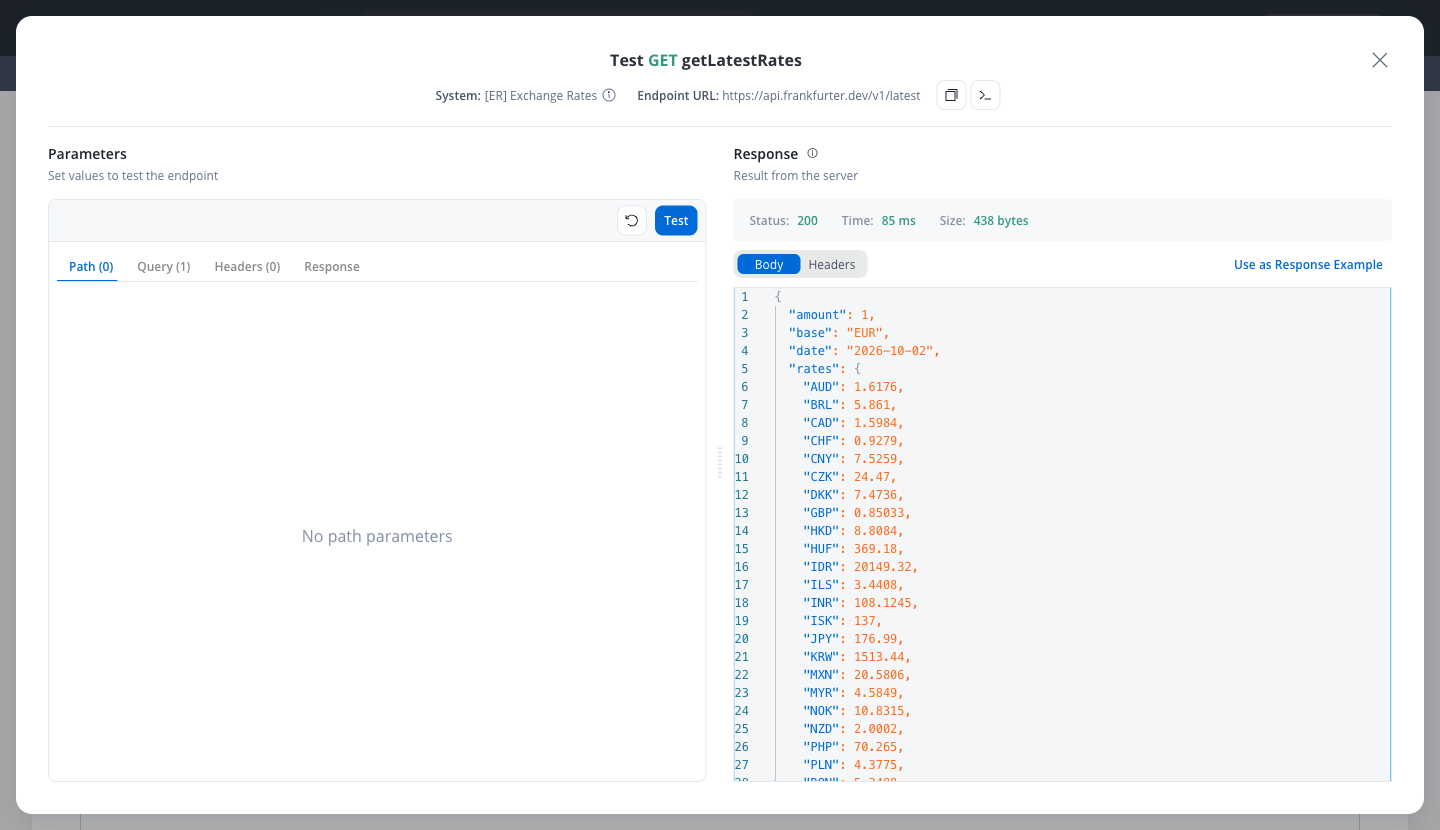
The test returns status 200 and a JSON body whose
rates object contains USD. If it does, the data source is ready for the workflow.Step 2: Build the workflow
1
Create the workflow
Go to Projects → your project → Integrations → Workflows and click Add Workflow. Set the Name to
Get exchange rate, add a description, and under Set Workflow Type keep Output Focused. The workflow editor opens with a Start node already on the canvas.2
Declare the input and output
Open the workflow’s Data Model page from the left rail and add three attributes:
baseCurrency (String), rate (Number), and currency (String). Then add baseCurrency under Input Parameters, and rate and currency under Output Parameters.This is what makes the process able to talk to the workflow in Step 3: the input mapper offers only declared input parameters, and the End node exposes only declared output parameters.3
Set the Start node sample input
Back in the editor, the Start node carries the input every run begins with, as JSON. Set it to:At runtime the process supplies this value. The sample is what Run Workflow uses inside the editor.
4
Add the REST API Call node
Drag a REST API Call node from the palette, connect Start to it, and name it 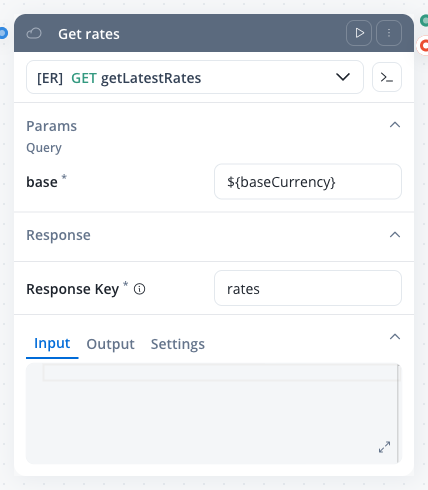 The Response Key is where the next node finds the call result: the node writes the whole HTTP response under
Get rates. Configure it:- Endpoint: pick
GET getLatestRatesunder the Exchange Rates system (the dropdown groups endpoints by system). - Query Parameters →
base: enter${baseCurrency}in the field that reads Add value or variable. This replaces the test default with the workflow input. - Response Key:
rates
input.rates, and the JSON body sits at input.rates.data.5
Pick the rate with a Script node
Drag a Script node after Scripts read the previous nodes’ data from 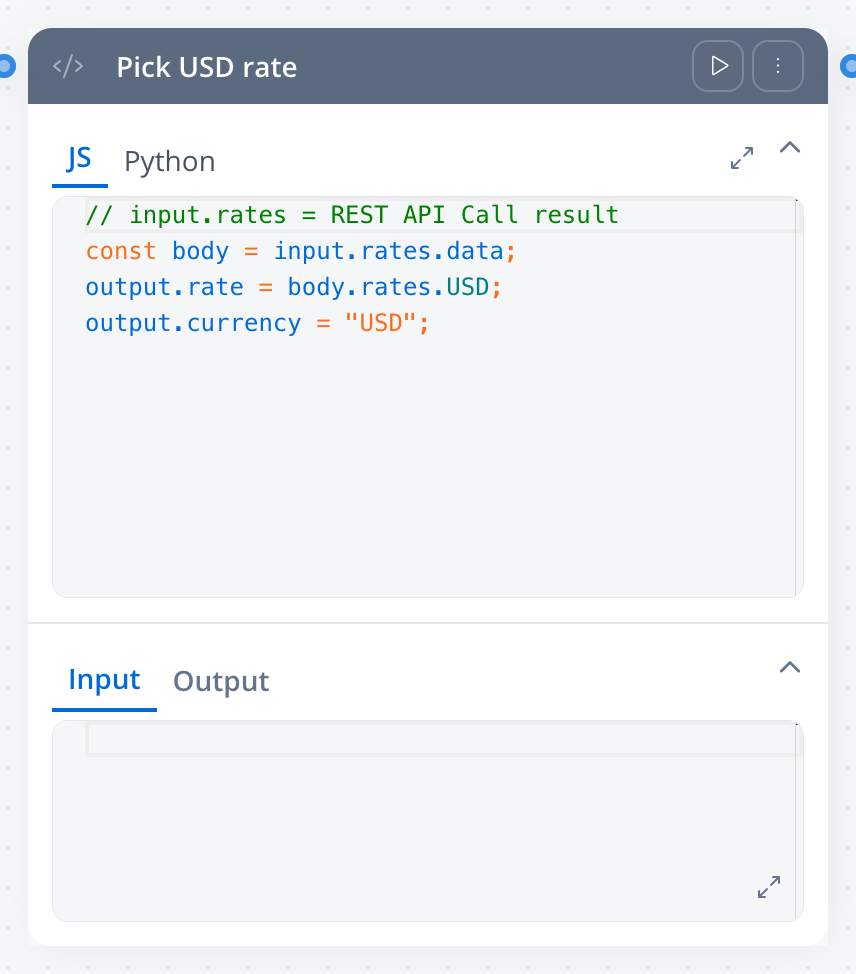
Get rates, connect the two, and name it Pick USD rate. Keep the JS language tab and paste:input and publish their result by assigning keys on output. There is no return statement.6
Add the End node
Drag an End Flow node after the script and connect it. Its card shows an Output Schema with 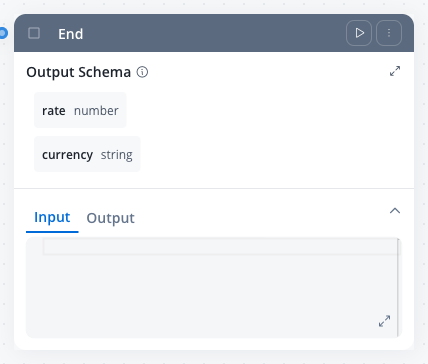
rate and currency, taken from the output parameters you declared. Whatever the previous nodes wrote under those keys is the workflow’s output, and it is what the calling process receives.7
Run the workflow
Click Run Workflow in the top-right corner. On a draft project version the run starts immediately with the Start node’s JSON, and the Run Logs panel opens at the bottom: a Nodes list with the time each node took, and Logs, Input, and Output tabs. Open Output:Each node card also gains Input and Output tabs with that run’s data, which is the quickest way to see what the REST call returned.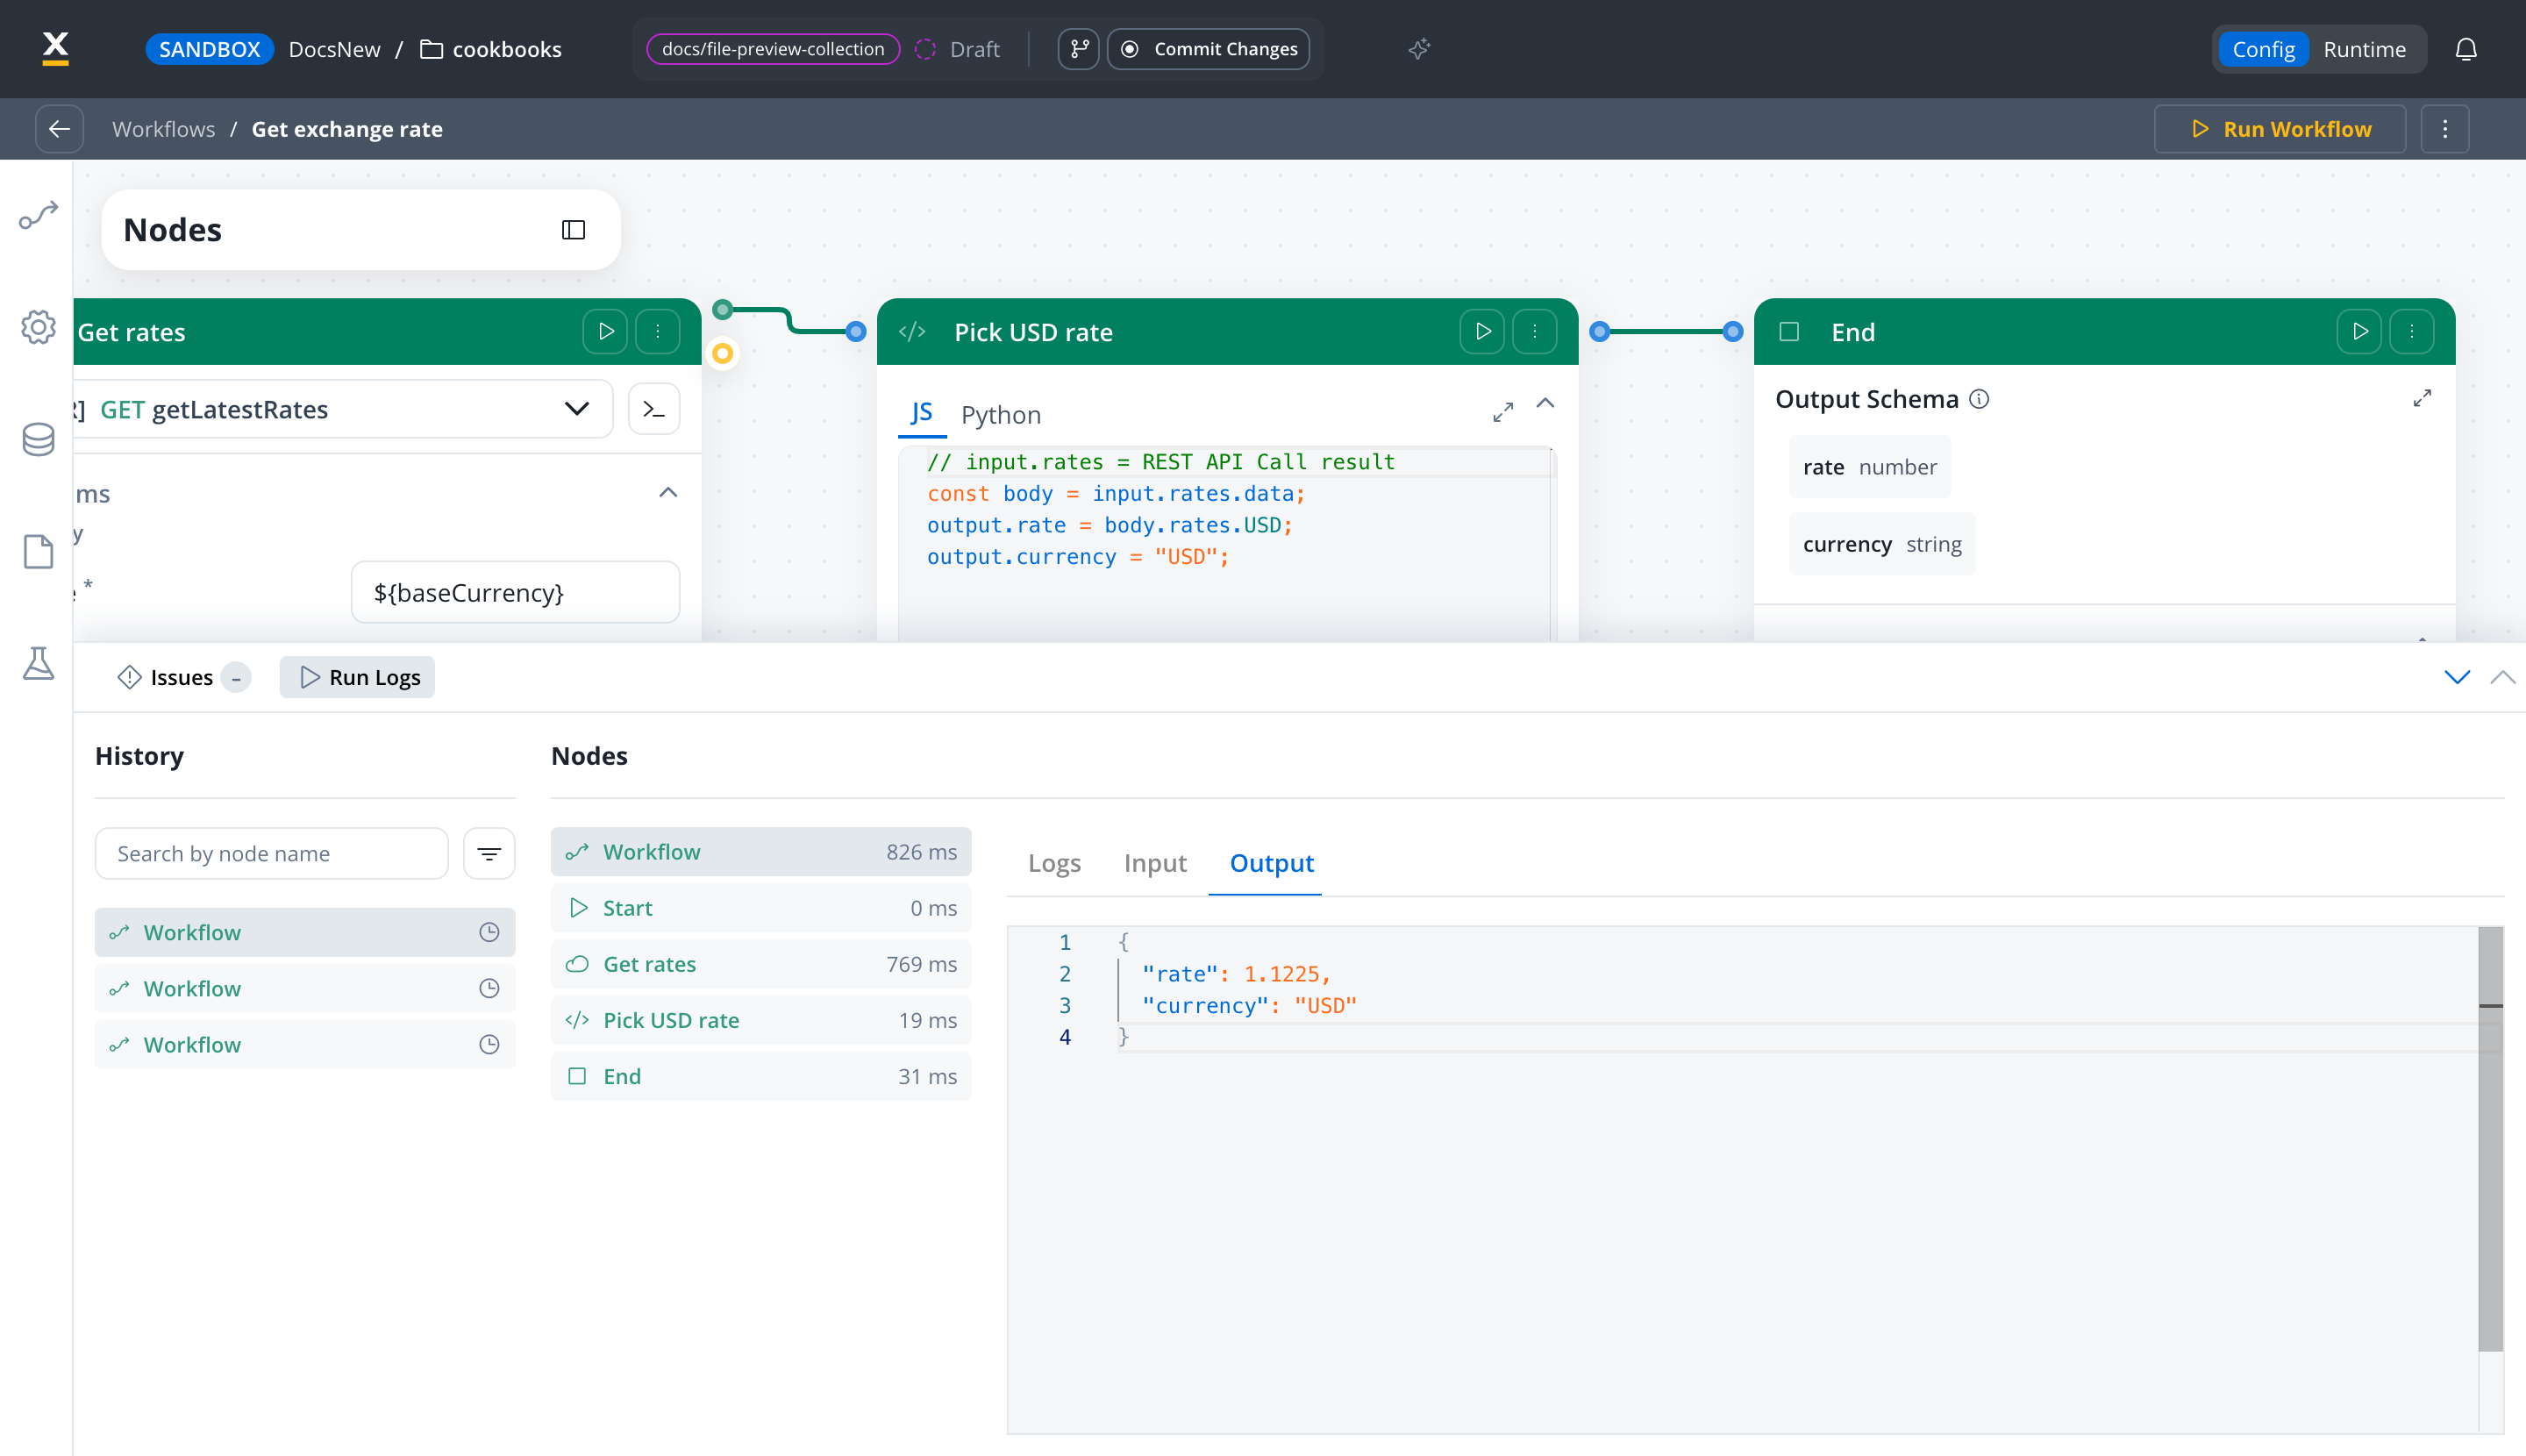
On a committed project version, Run Workflow opens a Test Workflow dialog first, where you edit the Test Input before running.
The run finishes with no errors and the Output tab shows a numeric
rate and "USD". The rate differs from the one above, because the API publishes new rates every working day.Step 3: Call the workflow from a process
The process needs two things: a place to keep the input and the result, and a pair of nodes that start the workflow and wait for its answer.1
Create the process and its data model
Go to Processes and create a process named
currencyLookup. Open its Data Model page from the left rail and add:selectedCurrency(String): the input the process passes to the workflowexchangeResult(Object) with two attributes,rate(Number) andcurrency(String): where the workflow’s output lands
2
Add the nodes
On the canvas, build: Start → Send Message Task named 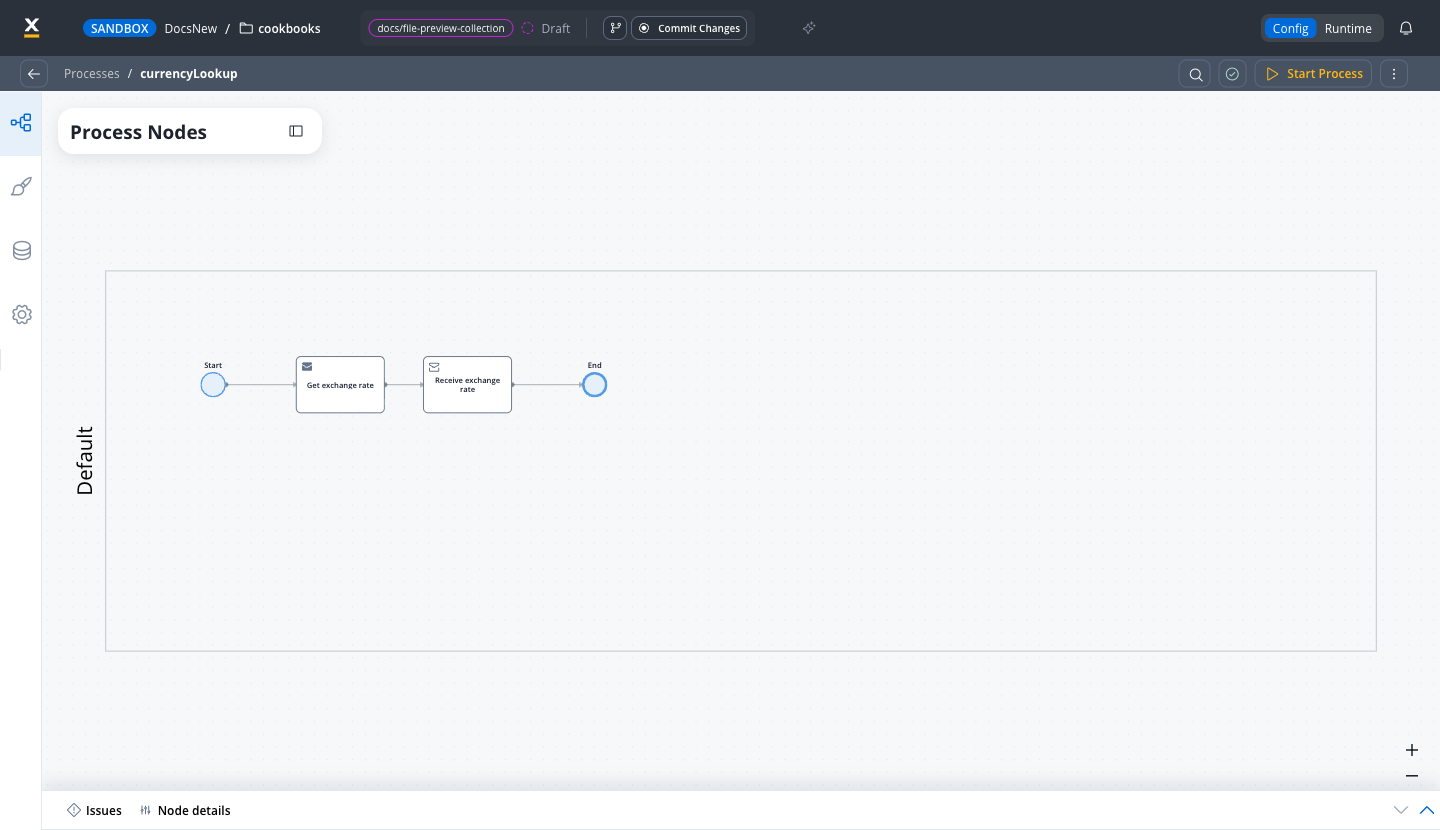 The Start Integration Workflow action also works on Task and User Task nodes. The send-and-receive pair is the plain form: the send node fires the workflow, the receive node parks the token until the output arrives.
Get exchange rate → Receive Message Task named Receive exchange rate → End. Connect them in that order.3
Add the Start Integration Workflow action
Select 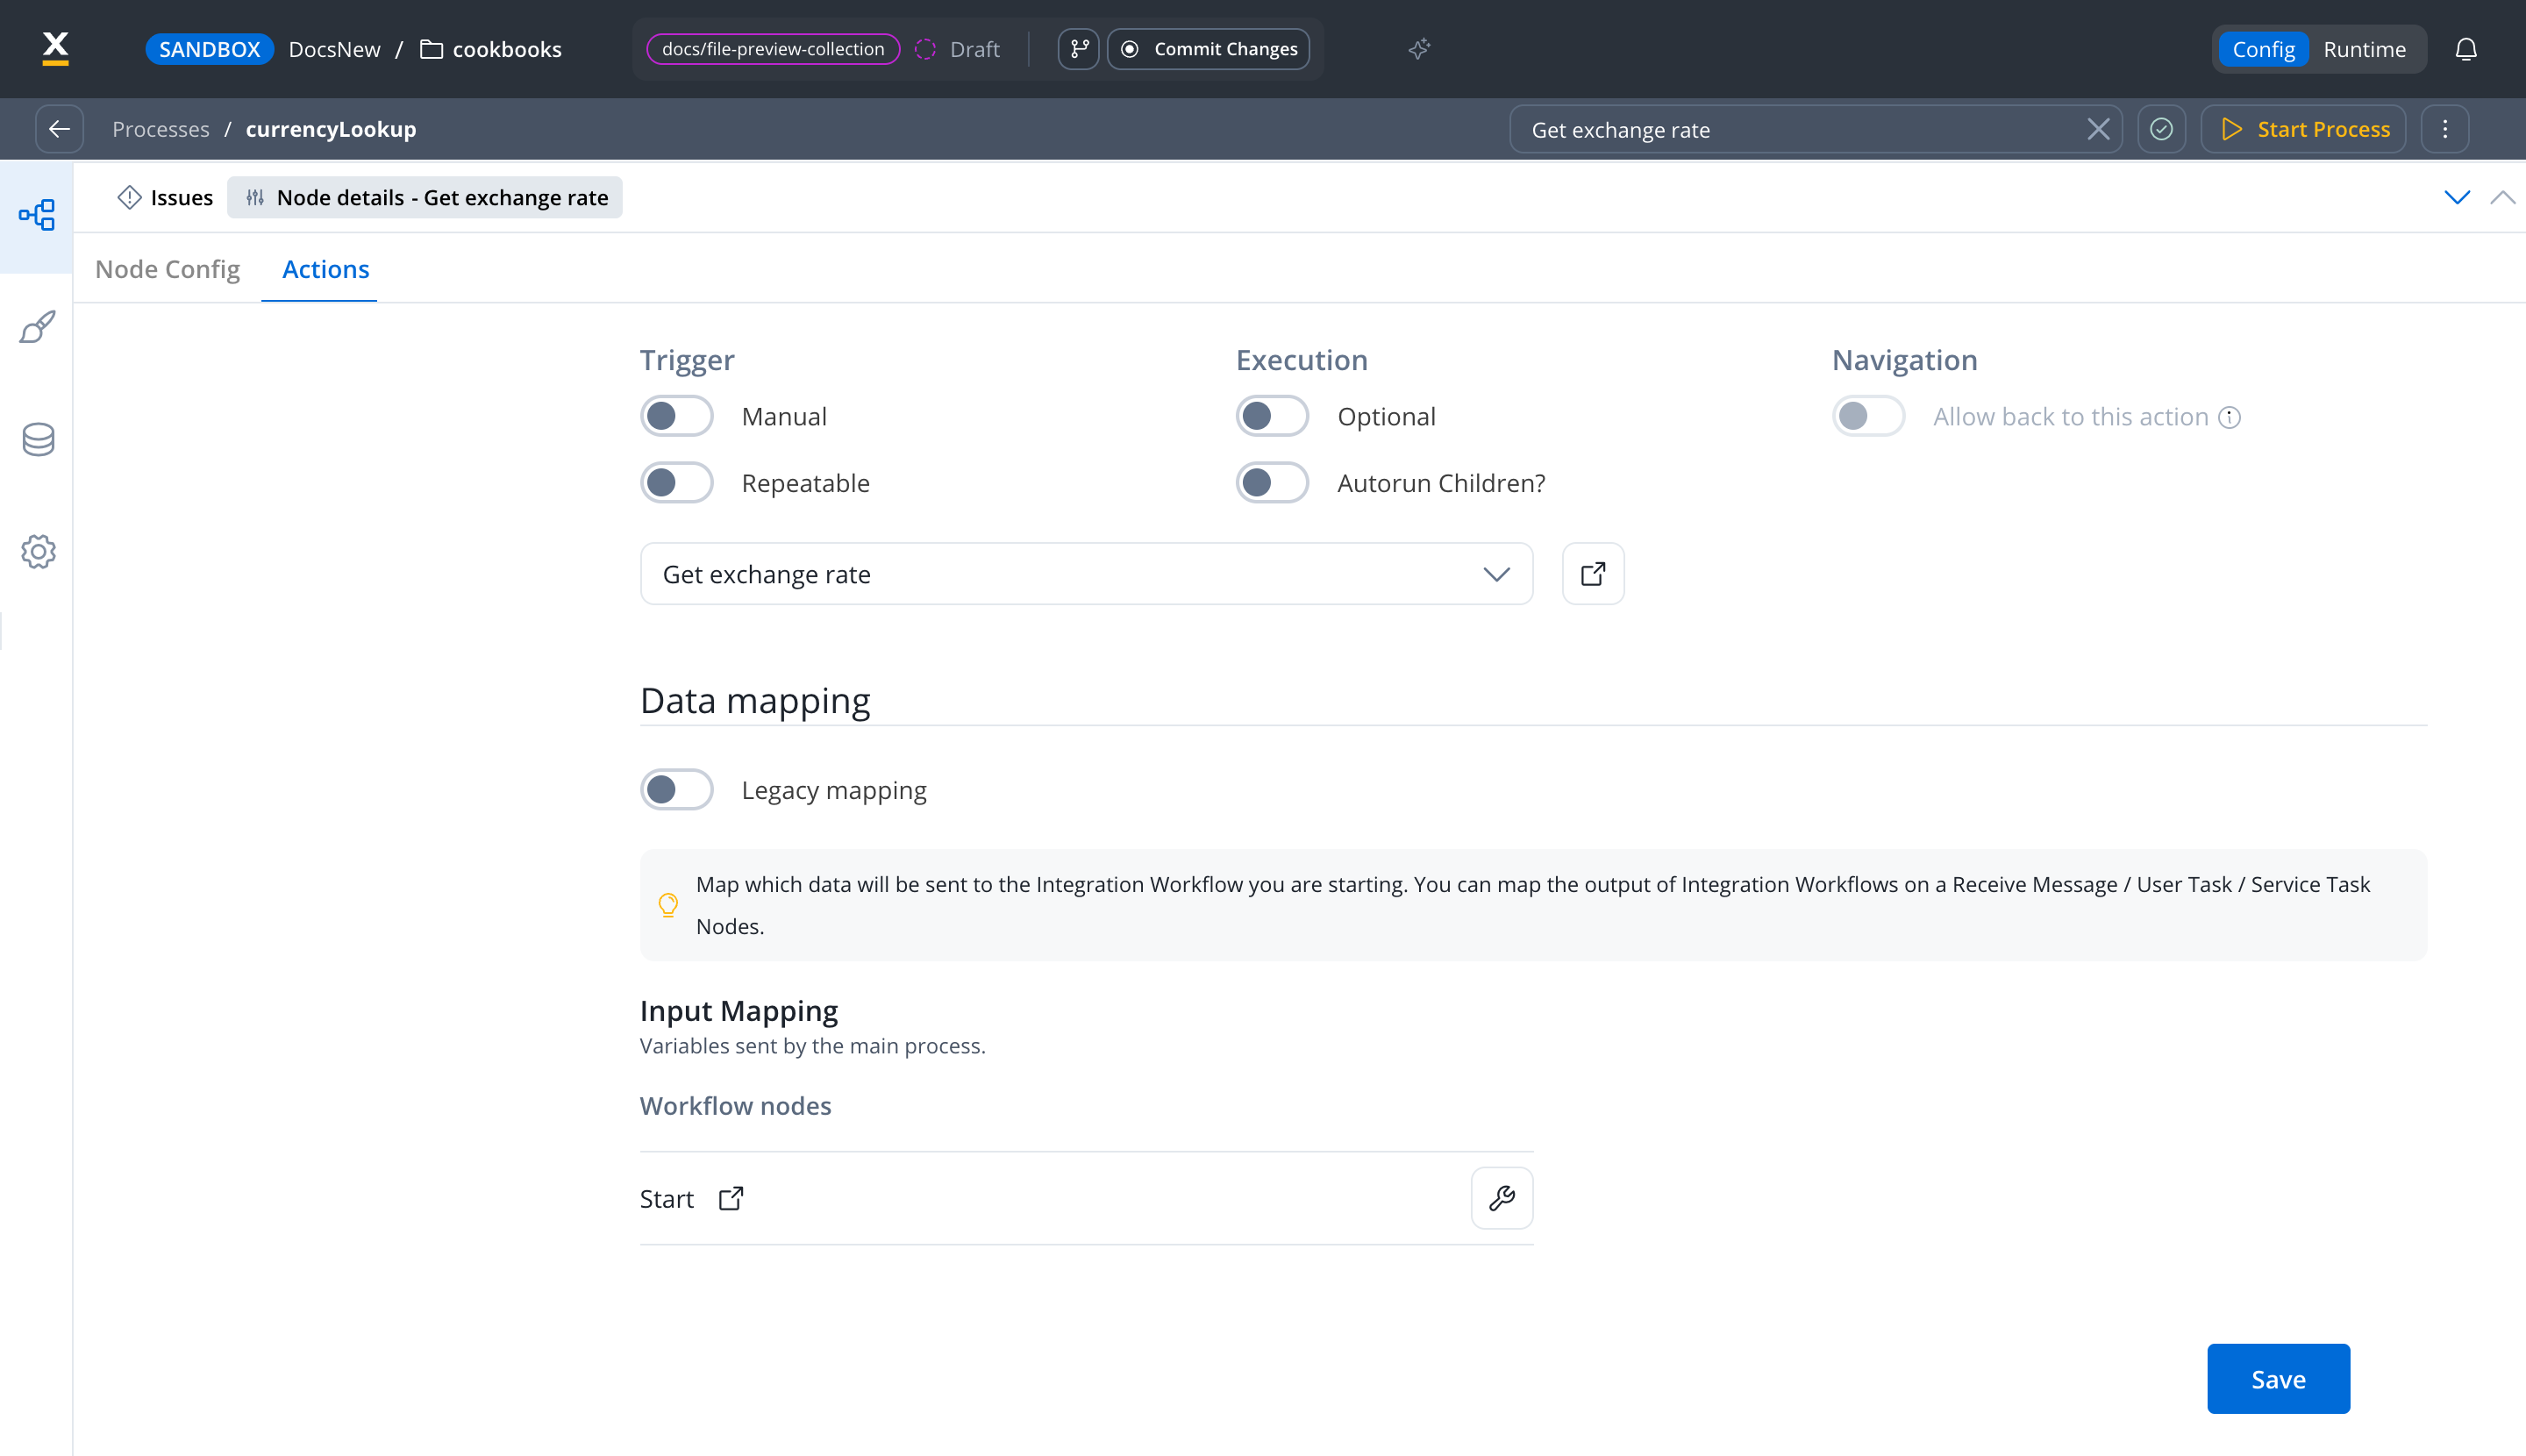
Get exchange rate, open Node details → Actions, and click +. Give the action a name, set Action Type to Start Integration Workflow, and leave Trigger, Execution, and Navigation at their defaults, so the action runs on its own when the token arrives.In the workflow field (Search workflow by name), pick Get exchange rate. Under Data mapping, leave Legacy mapping off. The Input Mapping section lists the Workflow nodes that take input: click the wrench on the Start row.4
Map the process data to the workflow input
The Data Mapping Integration Start Node Start modal opens. The left pane lists the process attributes sent to the workflow; the right pane lists the workflow’s input parameters.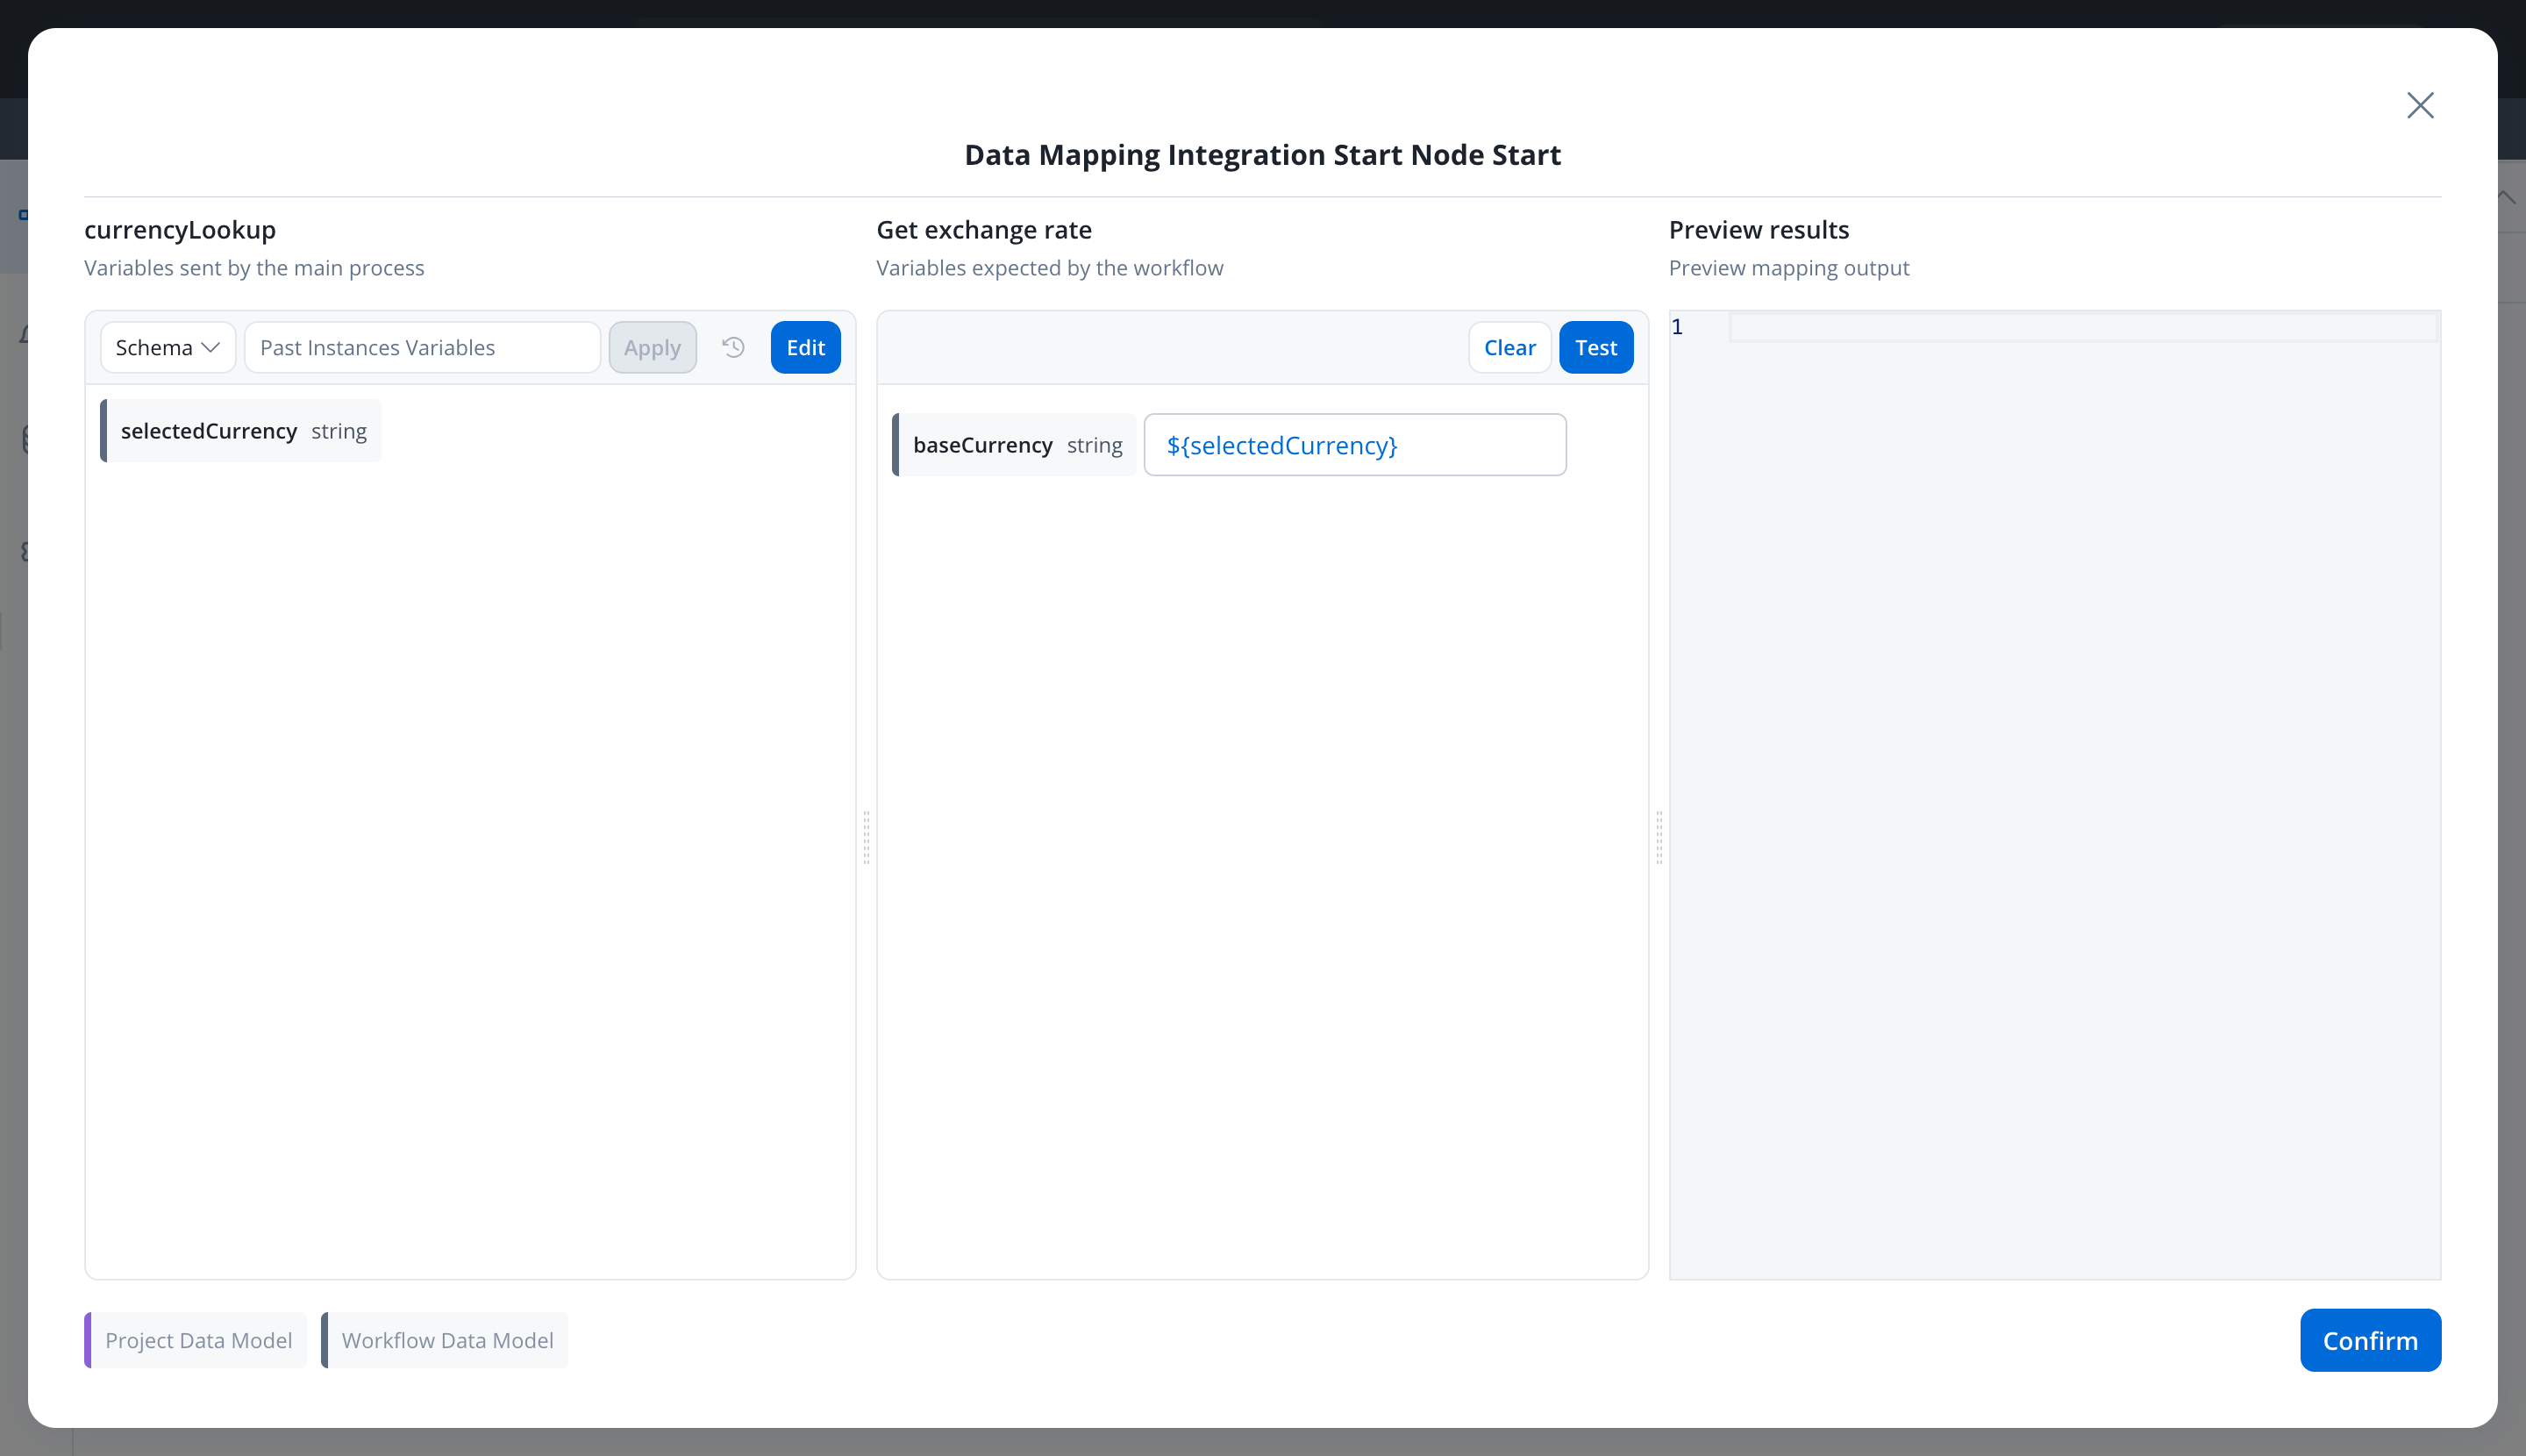
- If the left pane says No process Parameters, click Define parameters, tick
selectedCurrency, and click Done. - In the right pane, click the field next to
baseCurrency, type${selectedCurrency}, and pick the suggestion that appears. - Click Confirm, then Save on the action form.
5
Receive the workflow output
Select 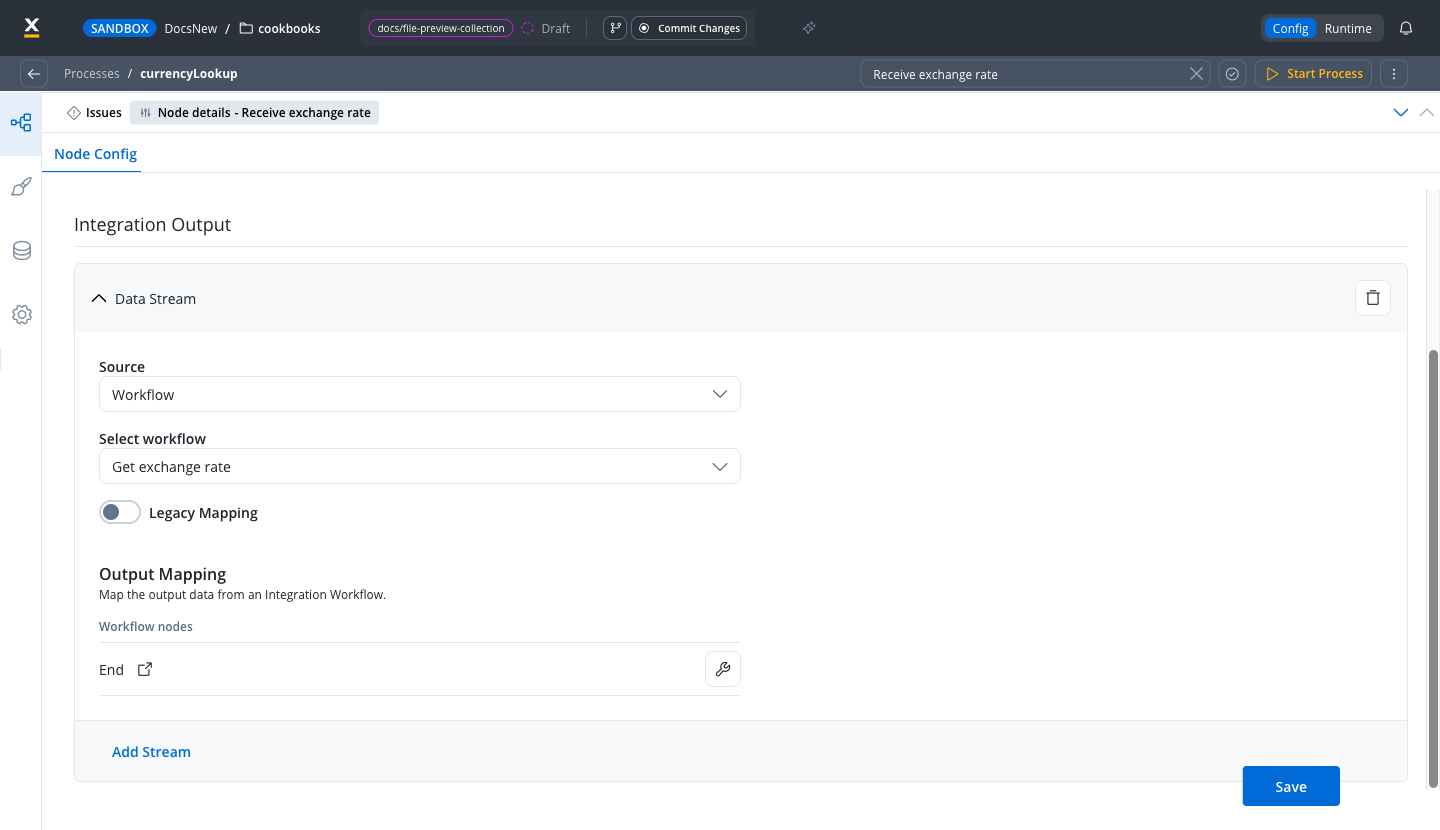
Receive exchange rate and open Node details → Node Config. Under Integration Output, click Add Stream and configure the Data Stream:- Source: Workflow
- Select workflow:
Get exchange rate - Legacy Mapping: leave off
6
Map the workflow output to the process
The Data Mapping Integration End Node End modal opens, mirrored: the workflow’s output parameters on the left, the process attributes on the right.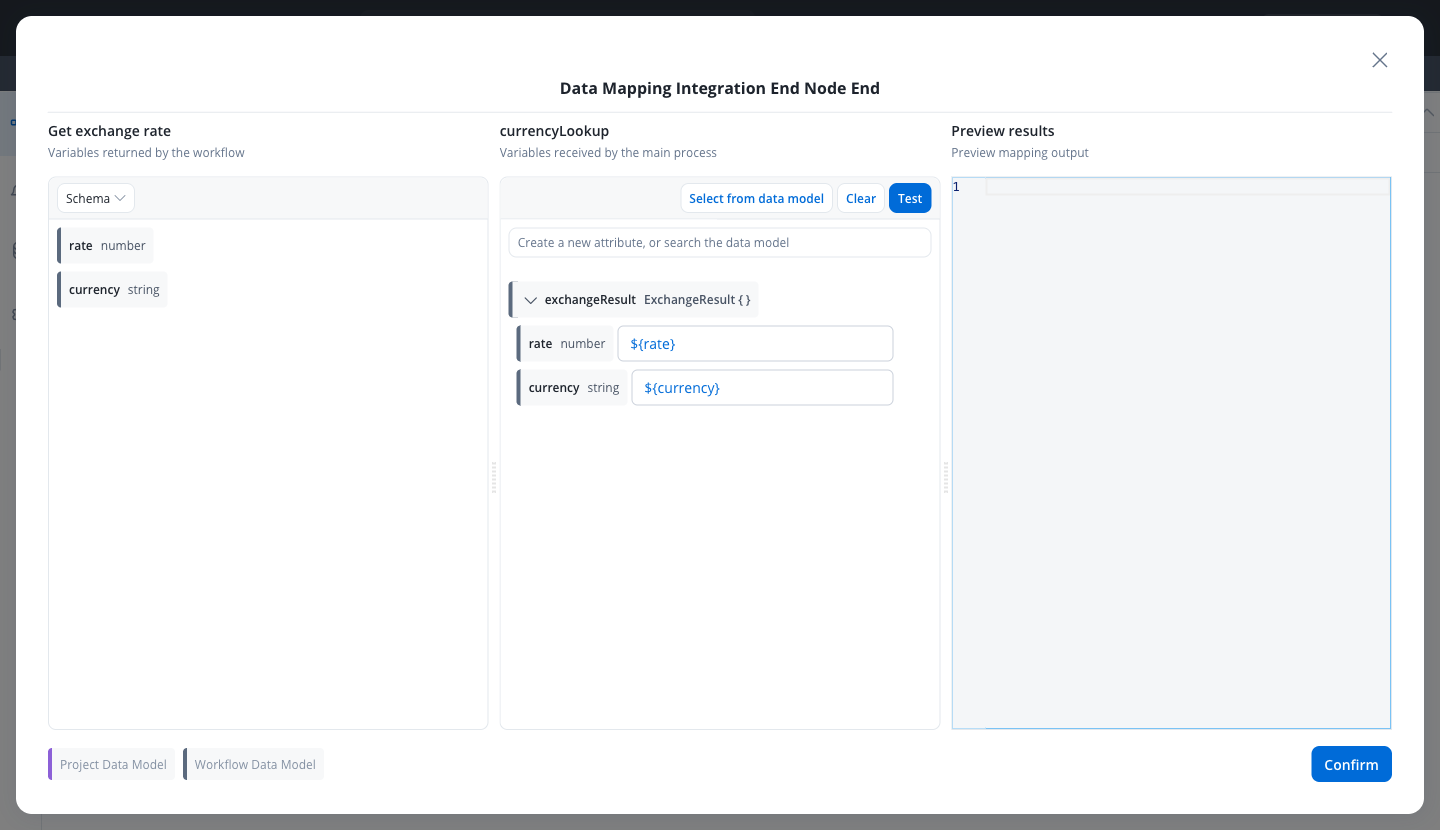
- Add the targets to the right pane: click Update, tick
rateandcurrencyunderexchangeResult, and confirm. - Next to
exchangeResult.ratetype${rate}and pick the suggestion; next toexchangeResult.currencytype${currency}and pick the suggestion. - Click Confirm, then Save on the node.
Legacy Mapping is the alternative: turn it on and set a single Key Name, and the whole workflow output lands under that key without per-attribute mapping. The mapper is the default because it keeps the process data model explicit.
Step 4: Run it end to end
1
Start the process
Click Start Process in the top-right corner. In the dialog, set JSON data to:and click Start Process. There is no screen to fill in: the token runs through the four nodes on its own.
2
Inspect the instance
Switch to Runtime and open Process Instances. The newest 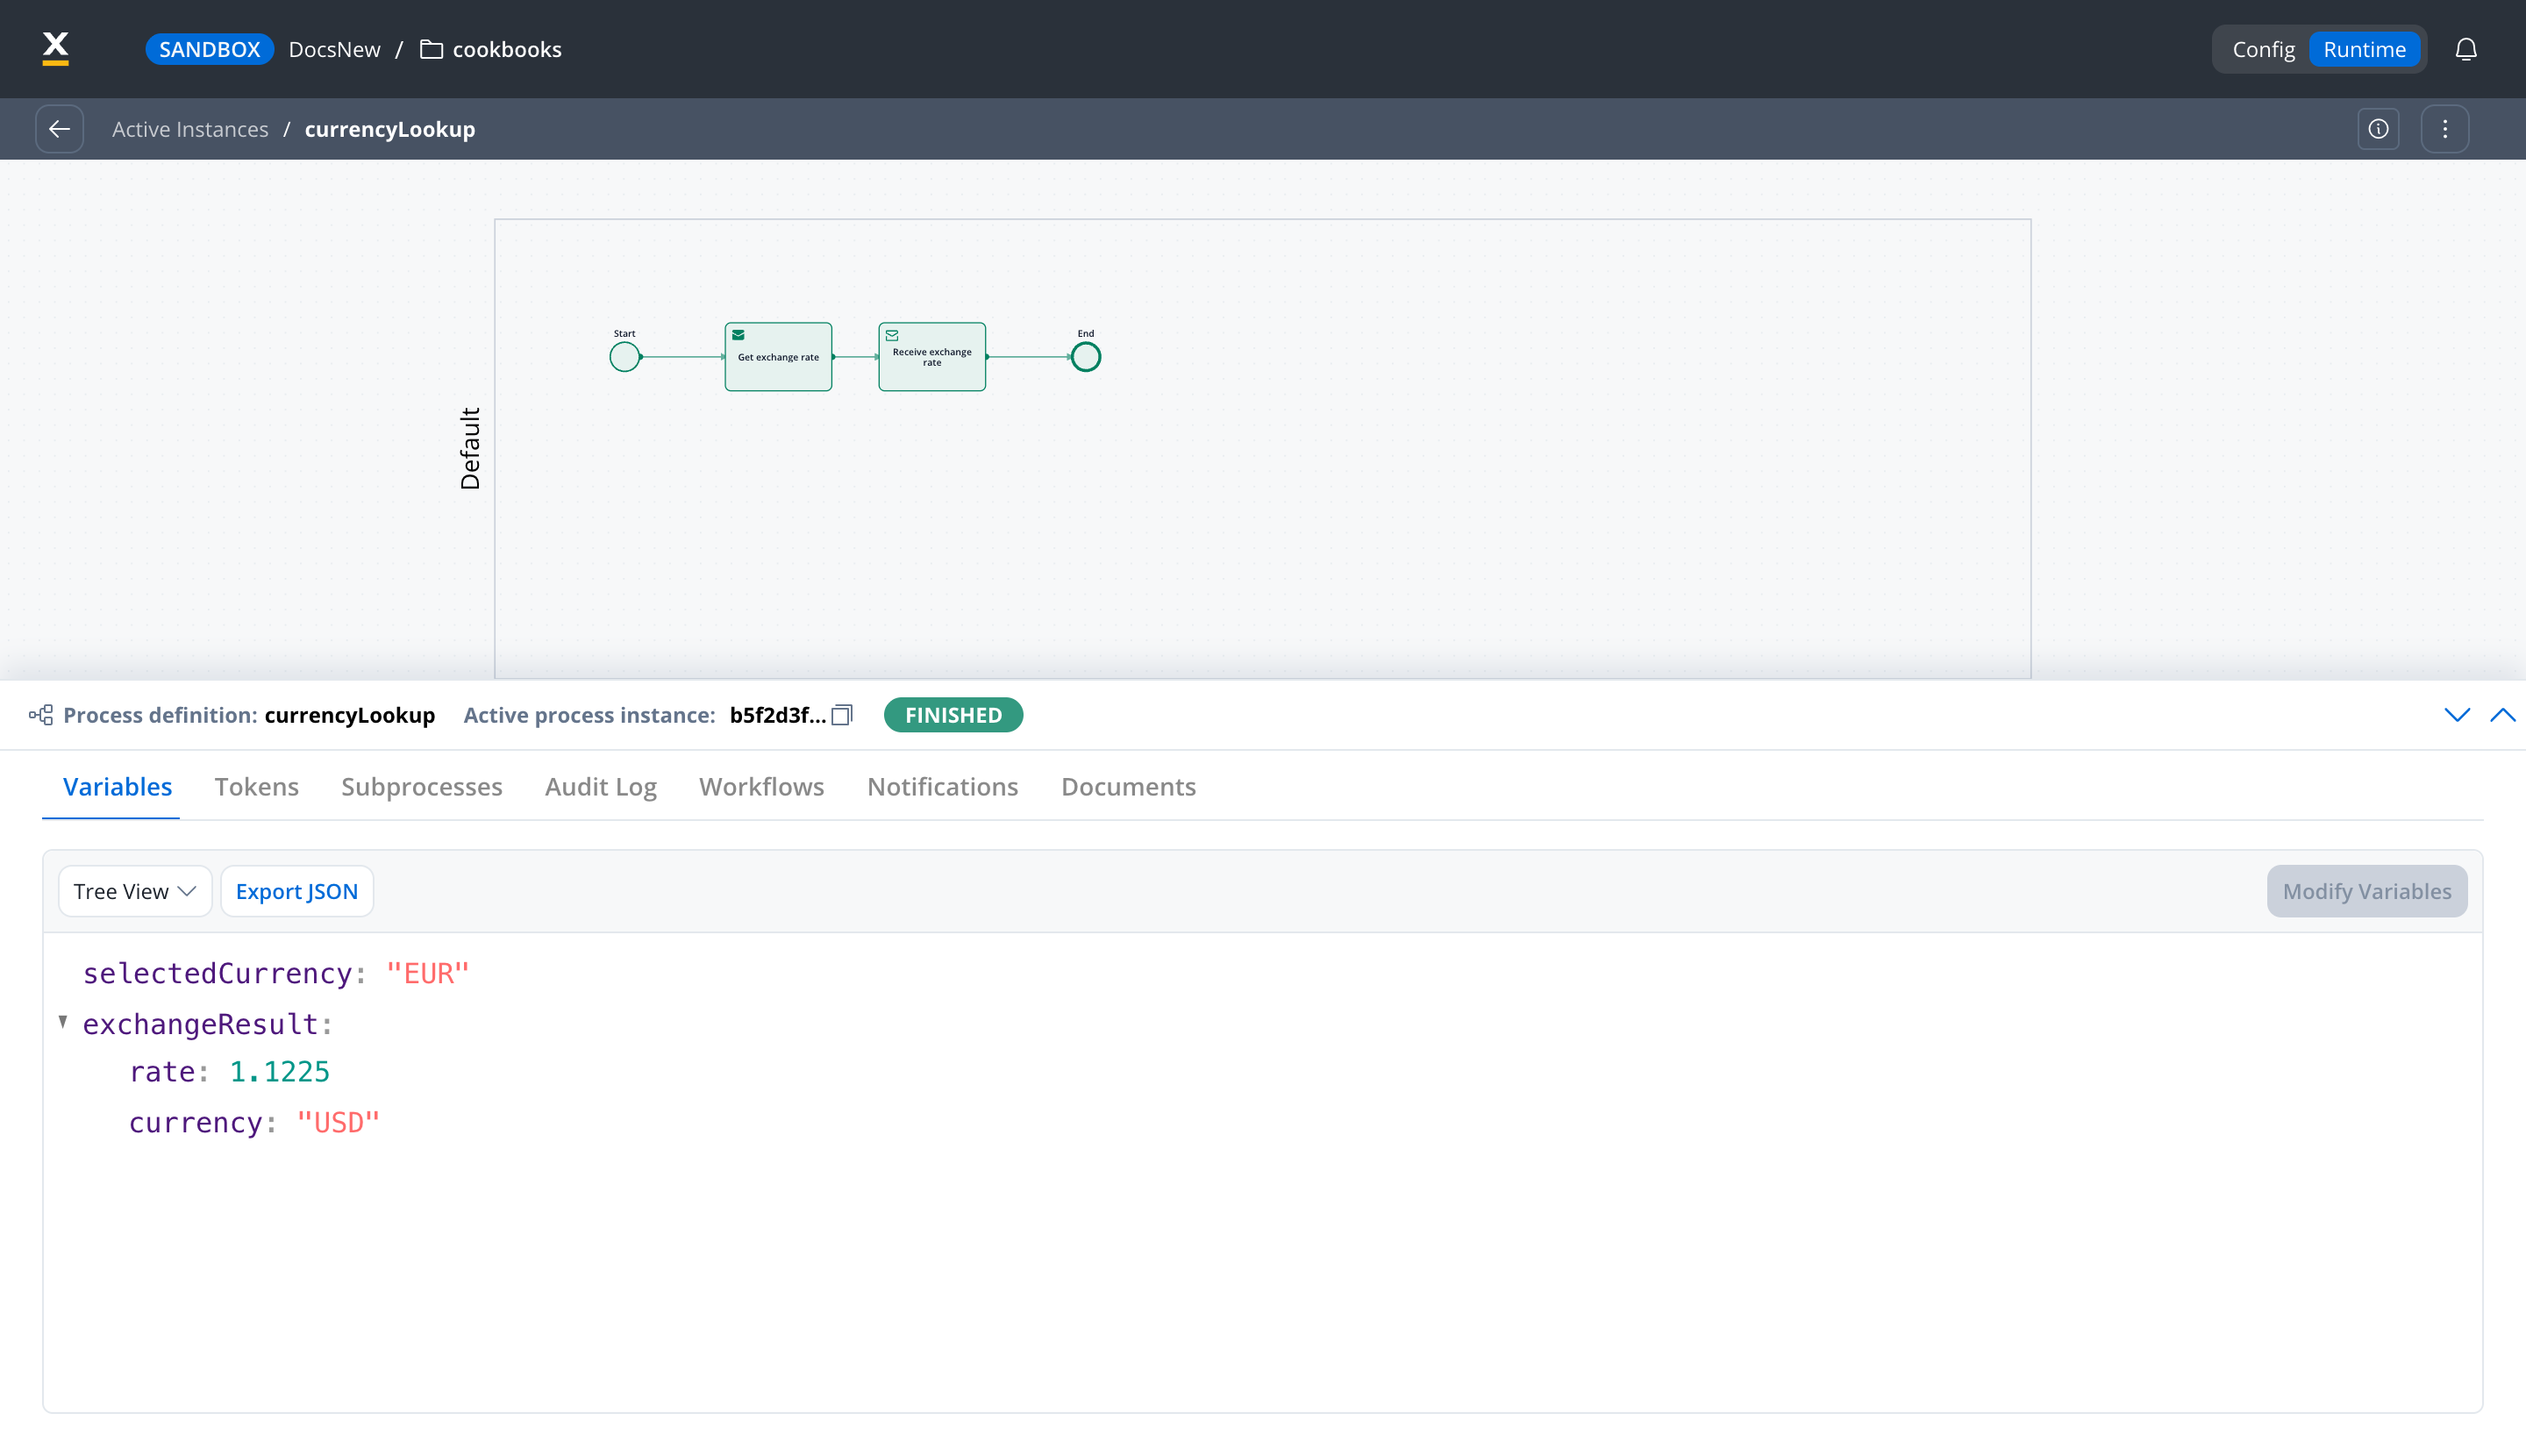
currencyLookup instance is FINISHED with End as its current node. Open it: the Variables tab shows the data, and the Tokens tab shows the path Start → Get exchange rate → Receive exchange rate → End.exchangeResult.rate holds a number and exchangeResult.currency holds USD. That round trip, process to workflow to external API and back into the process data, is the pattern behind most FlowX integrations.Troubleshooting
The input mapper's left pane says No process Parameters
The input mapper's left pane says No process Parameters
The action does not know yet which process attributes to offer. Click Define parameters in the left pane, tick
selectedCurrency, and click Done. The attribute then appears and can be mapped.The input mapper's right pane is empty
The input mapper's right pane is empty
The workflow has no input parameters declared, so there is nothing to map to. Open the workflow’s Data Model page and add
baseCurrency under Input Parameters, then reopen the mapper.Typing the attribute name only offers Add new attribute
Typing the attribute name only offers Add new attribute
The mapper matches the expression form, not the bare name. Type the full
${selectedCurrency} (with the dollar sign and braces) and pick the suggestion that appears below the field.The script fails reading rates
The script fails reading rates
The Script node reads
input.rates.data, so the REST API Call node’s Response Key must be exactly rates. If you used another key, change either the key or the first line of the script to match. Open the Get rates node’s Output tab after a run to see the exact shape it produced.What you learned
Where to go next
Integration Designer
The full reference: endpoint parameters, authorization, caching, file handling, and every workflow node.
Workflow data models
Typed inputs and outputs for workflows, with automatic Start-node pre-fill.
Start integration workflow action
Everything about calling workflows from processes, including when to use subprocesses instead.
Cookbook: call an external API
Your next build: send data to a workflow, call a real API, and map the reply back into the process.
Cookbooks
Tutorials, guides, and patterns to build on what you just learned.