

Available on SaaS with FlowX.AI 5.11. This feature is live on managed (SaaS) deployments now. Self-hosted deployments will receive it with the next LTS release family.
- Four small tool workflows that read a document’s text and extract structured fields per document type
- A verification agent that classifies each document, picks the right extraction tool, and reconciles the result
- A summary generation workflow that writes the verification report
- A BPMN process with a file upload UI, business rules that aggregate the per-document verdicts, and a human review task
The verification agent needs workflow tools. If your deployment doesn’t have them yet, see Explicit pipeline alternative for the same verification built from explicit classification, routing, and comparison steps.
Architecture overview
The pipeline processes documents in four phases: upload, verify each document, aggregate, and review. Workflow breakdown:Prerequisites
Before starting, make sure you have:- Access to a FlowX Designer workspace with AI Platform enabled
- An AI model available to your project. The AI nodes use the project default unless you override the model on the node.
- A project with the Documents Plugin configured (for file uploads)
- Sample documents to test with: an ID card, a proof of address (for example, a utility bill), and a salary slip, as PDF files
- Familiarity with creating processes, workflows, and UI flows in FlowX, including workflow input and output parameters
Data model
Define the following keys in your process data model. They hold the application data submitted by the customer, the agent’s verdict per document, and the results of the later steps.Step 1: Build the tool workflows
The agent doesn’t extract fields itself. It calls four small workflows as tools: one that returns the document’s raw text, and one extractor per document type. Every tool workflow follows the same contract:- On the Data Model Input Parameters tab, add
filePath(STRING). A workflow with no input parameters can’t be attached as a tool. - On the Output Parameters tab, add the fields the tool returns. Without output parameters, the tool returns nothing useful to the agent.
- Set the workflow Description. The agent sees it, together with the “when to use” hint you add in Step 2, when it chooses a tool.
- On the AI node, set Document Source to Document Plugin and reference the file as
${filePath}. The workflow’s input parameters resolve by name, whether you run the workflow on its own or the agent calls it as a tool.
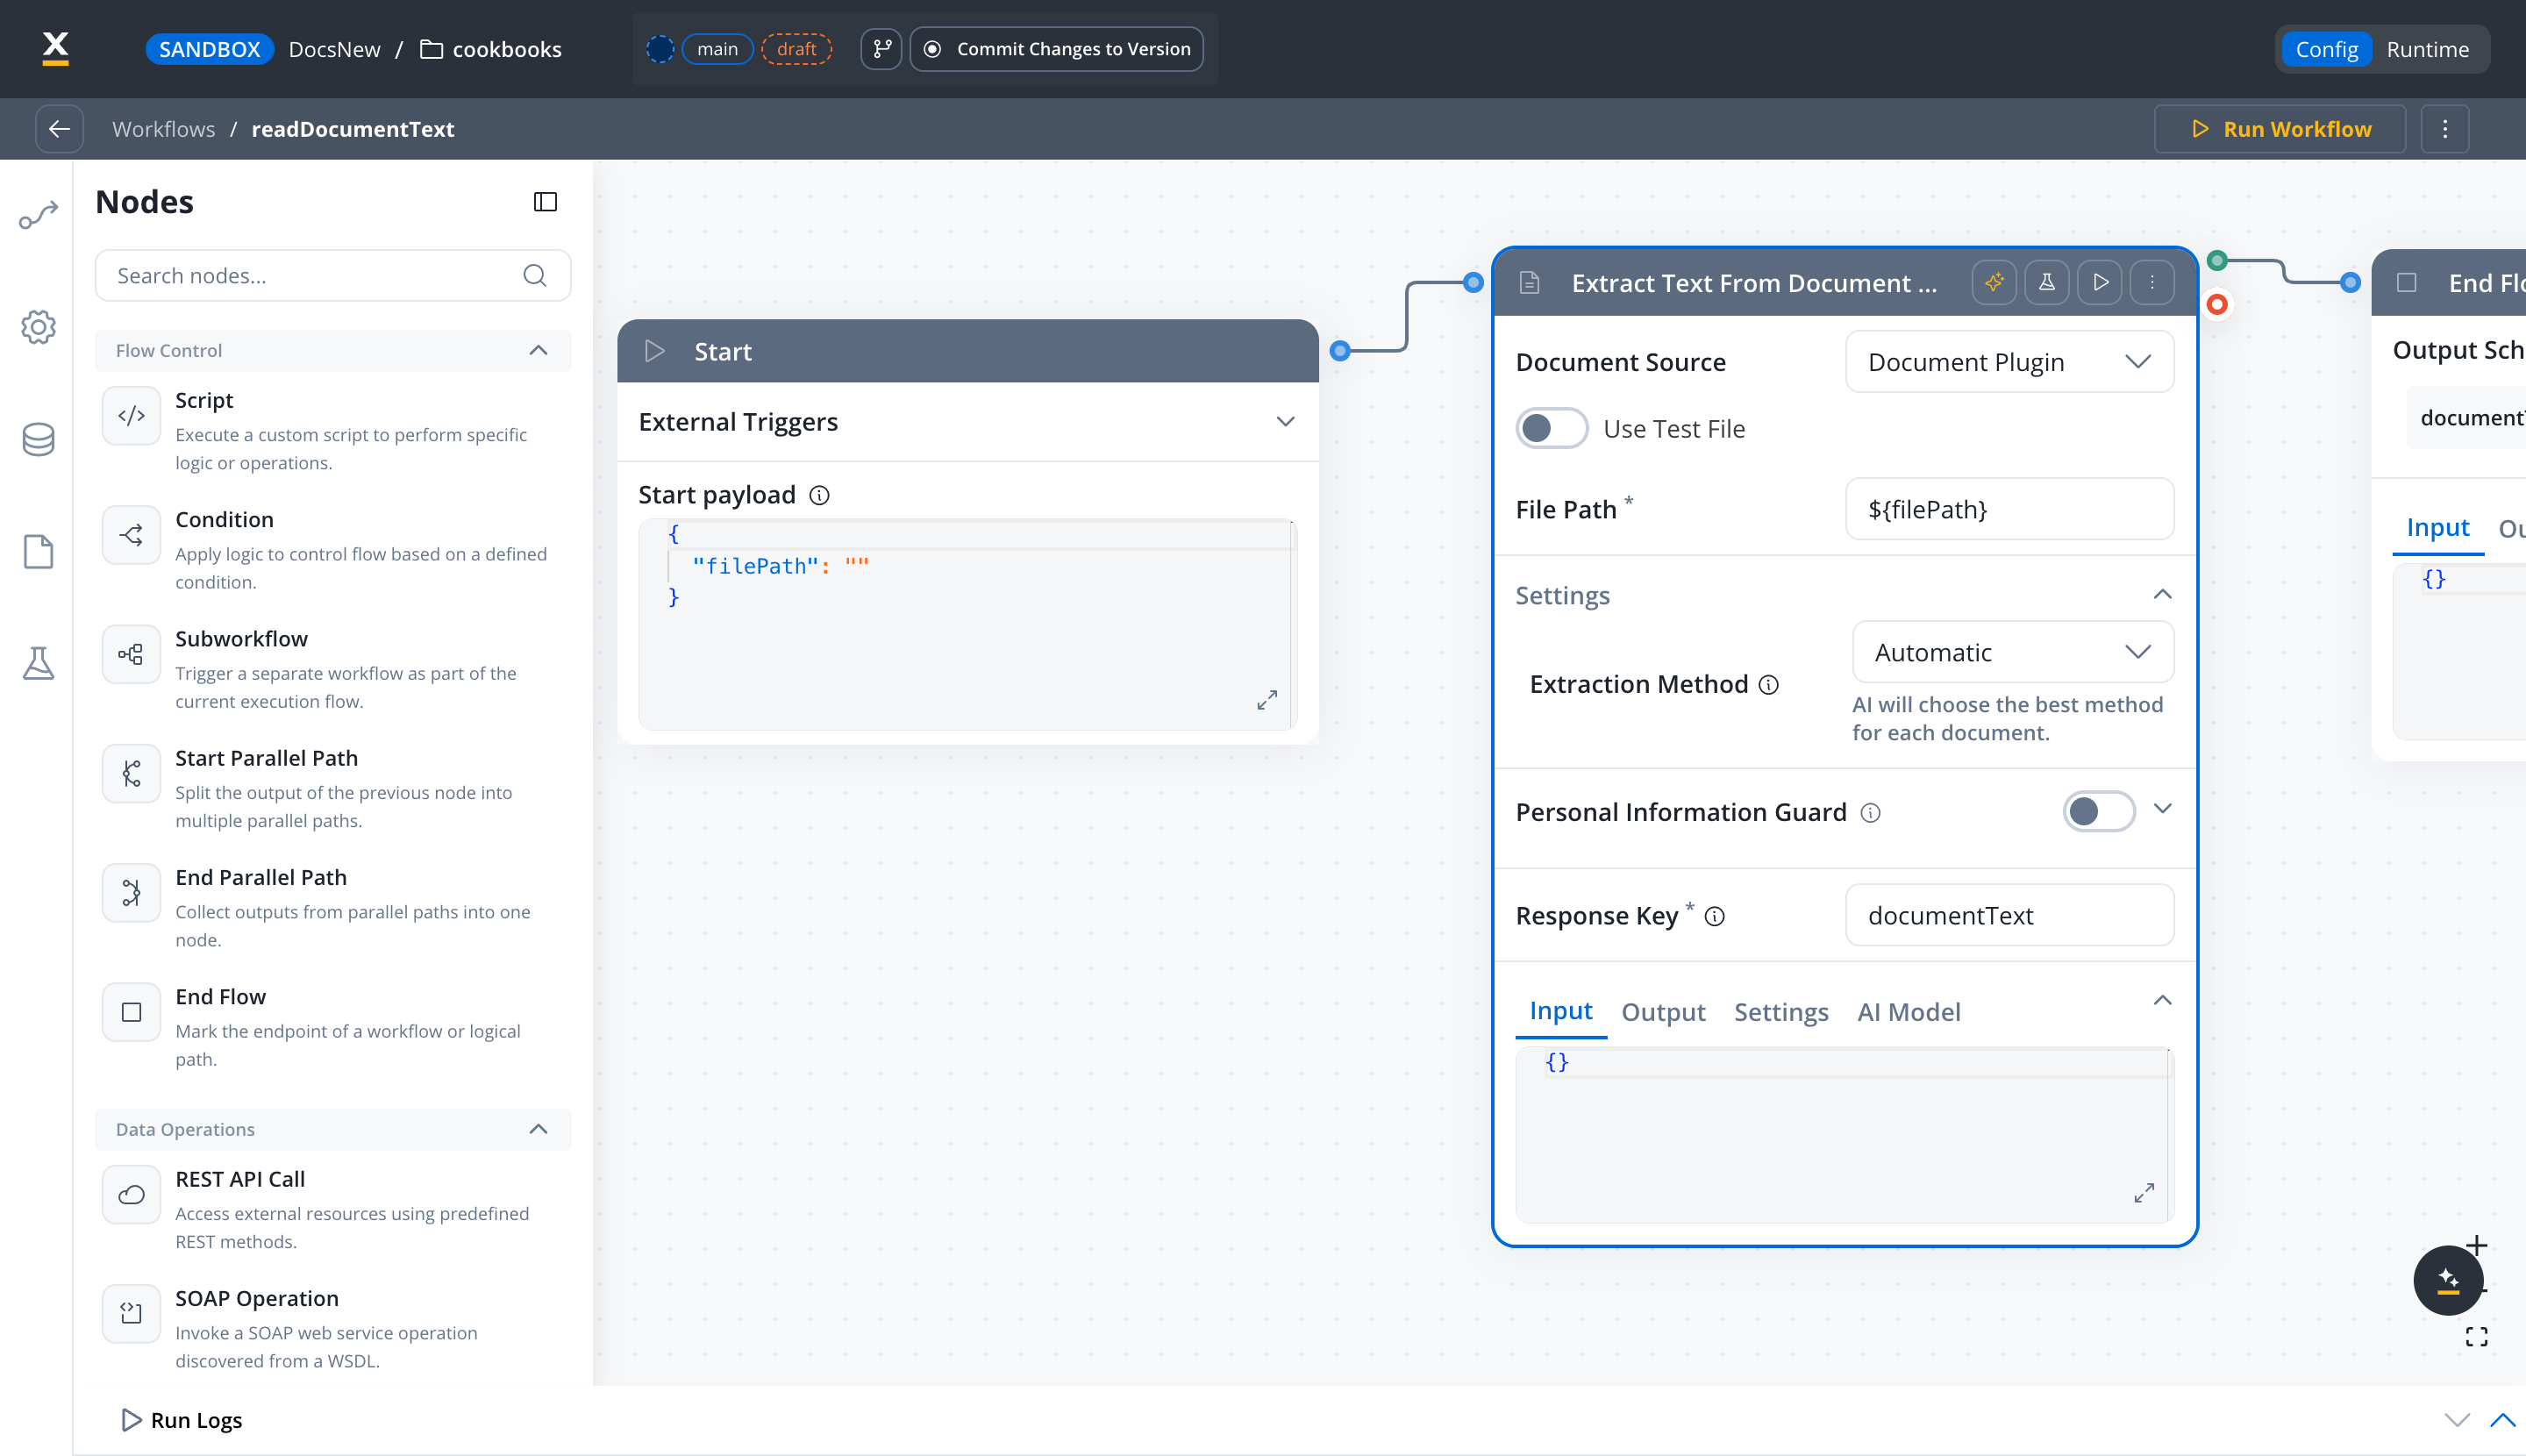
1.1 Build readDocumentText
Create a workflow namedreadDocumentText with one Extract Data from File node:
- Extraction Method: Automatic. The format varies per upload in a mixed document set like this one, so let the node pick a strategy per file.
- Response Key:
documentText - Output parameter:
documentText - Description:
Return the raw text of an uploaded document so the agent can classify it. Uses the Automatic extraction method.
1.2 Build the three extraction workflows
Create one workflow per document type:extractIdCard, extractProofOfAddress, and extractSalarySlip. Each contains a Document Extraction node with the instructions and response schema for its type, followed by a Script node that lifts the fields into the output parameters.
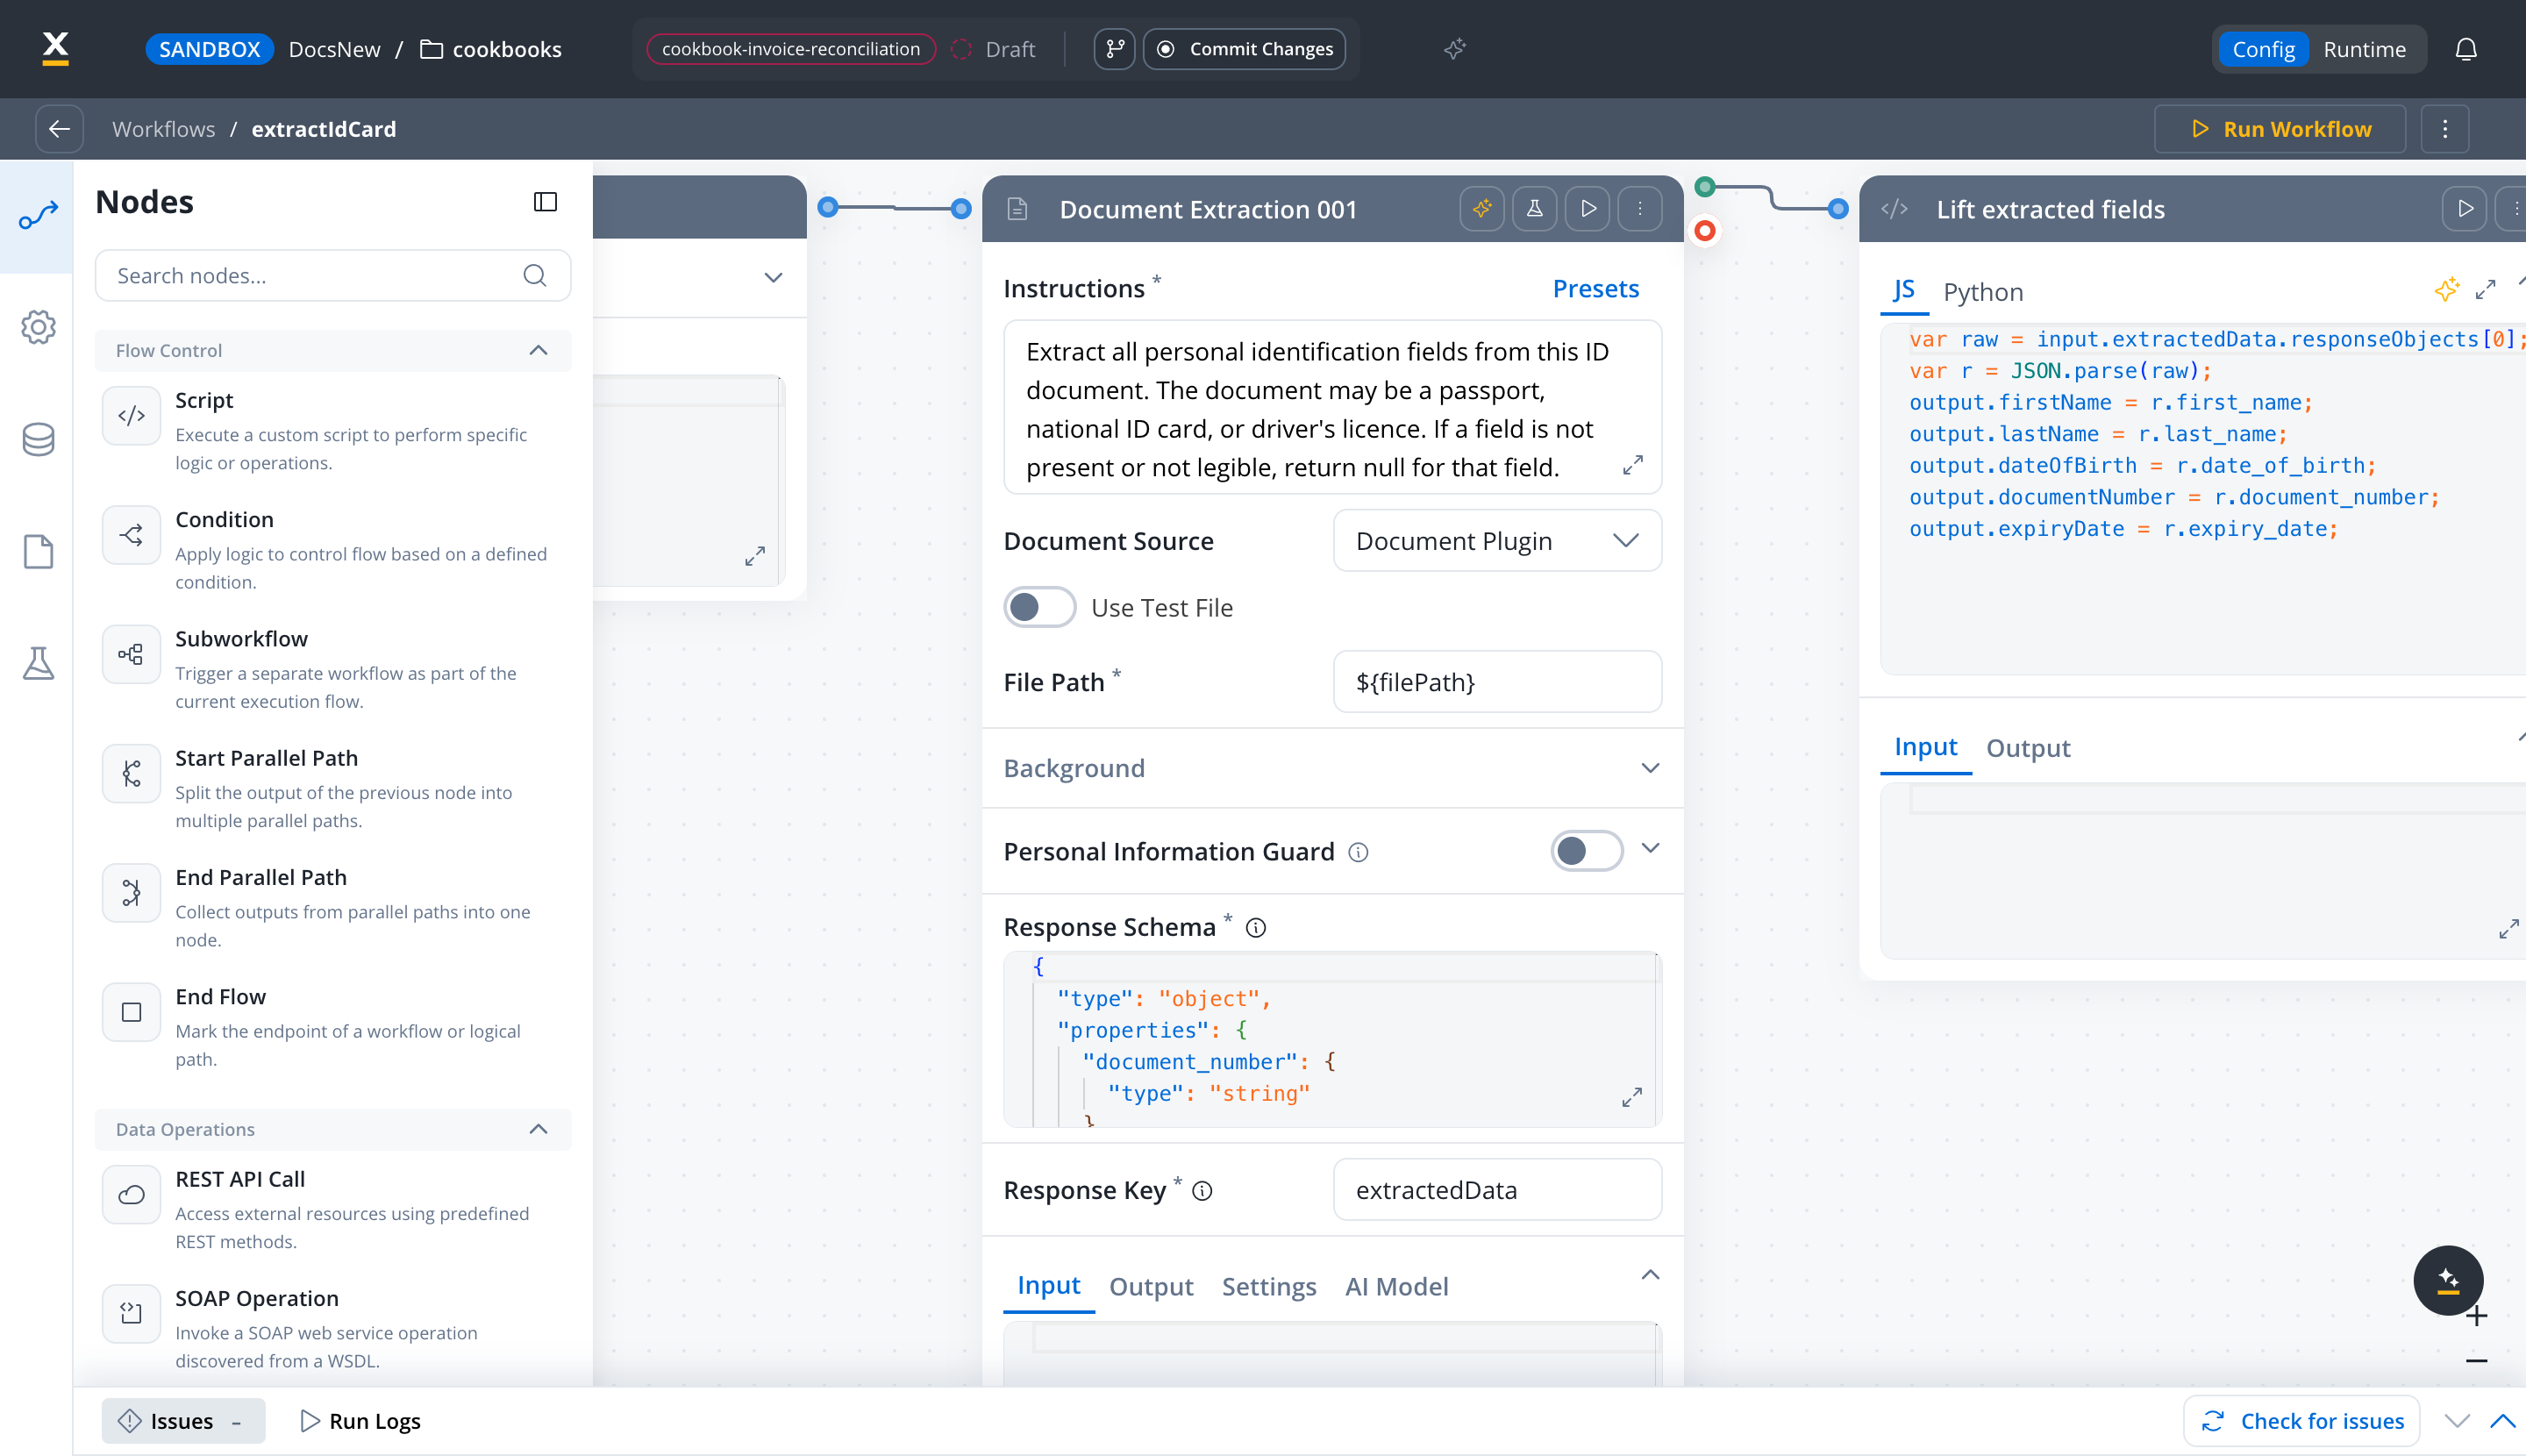
responseObjects[0] of the Response Key. The Script node parses it and maps each field to an output parameter.
- ID card
- Proof of address
- Salary slip
Description: Response schema:Response Key:
Extract identity fields from an ID document (passport, national ID, driver's licence). Exposed to the verification agent as a tool.Instructions:extractedDataOutput parameters: firstName, lastName, dateOfBirth, documentNumber, expiryDate (all STRING)Script:Both Document Extraction and Extract Data from File support the Personal Information Guard, which detects and replaces personal data before it reaches the model. Consider turning it on for this pipeline: ID documents, addresses, and payslips all carry personal data. See Personal Information Guard.
Step 2: Configure the verification agent
Create a workflow namedverifyDocuments. It receives one document and the applicant’s declared data, and a single Custom Agent node does the classification, the extraction tool call, and the reconciliation.
Input parameters: filePath, declaredFirstName, declaredLastName, declaredCity (STRING) and declaredMonthlyIncome (FLOAT)
Output parameters: documentType, overallStatus, exceptionSummary (STRING) and matchRate (FLOAT)
Add a Custom Agent node after the Start node.
Instructions (static; dynamic values go in Context):
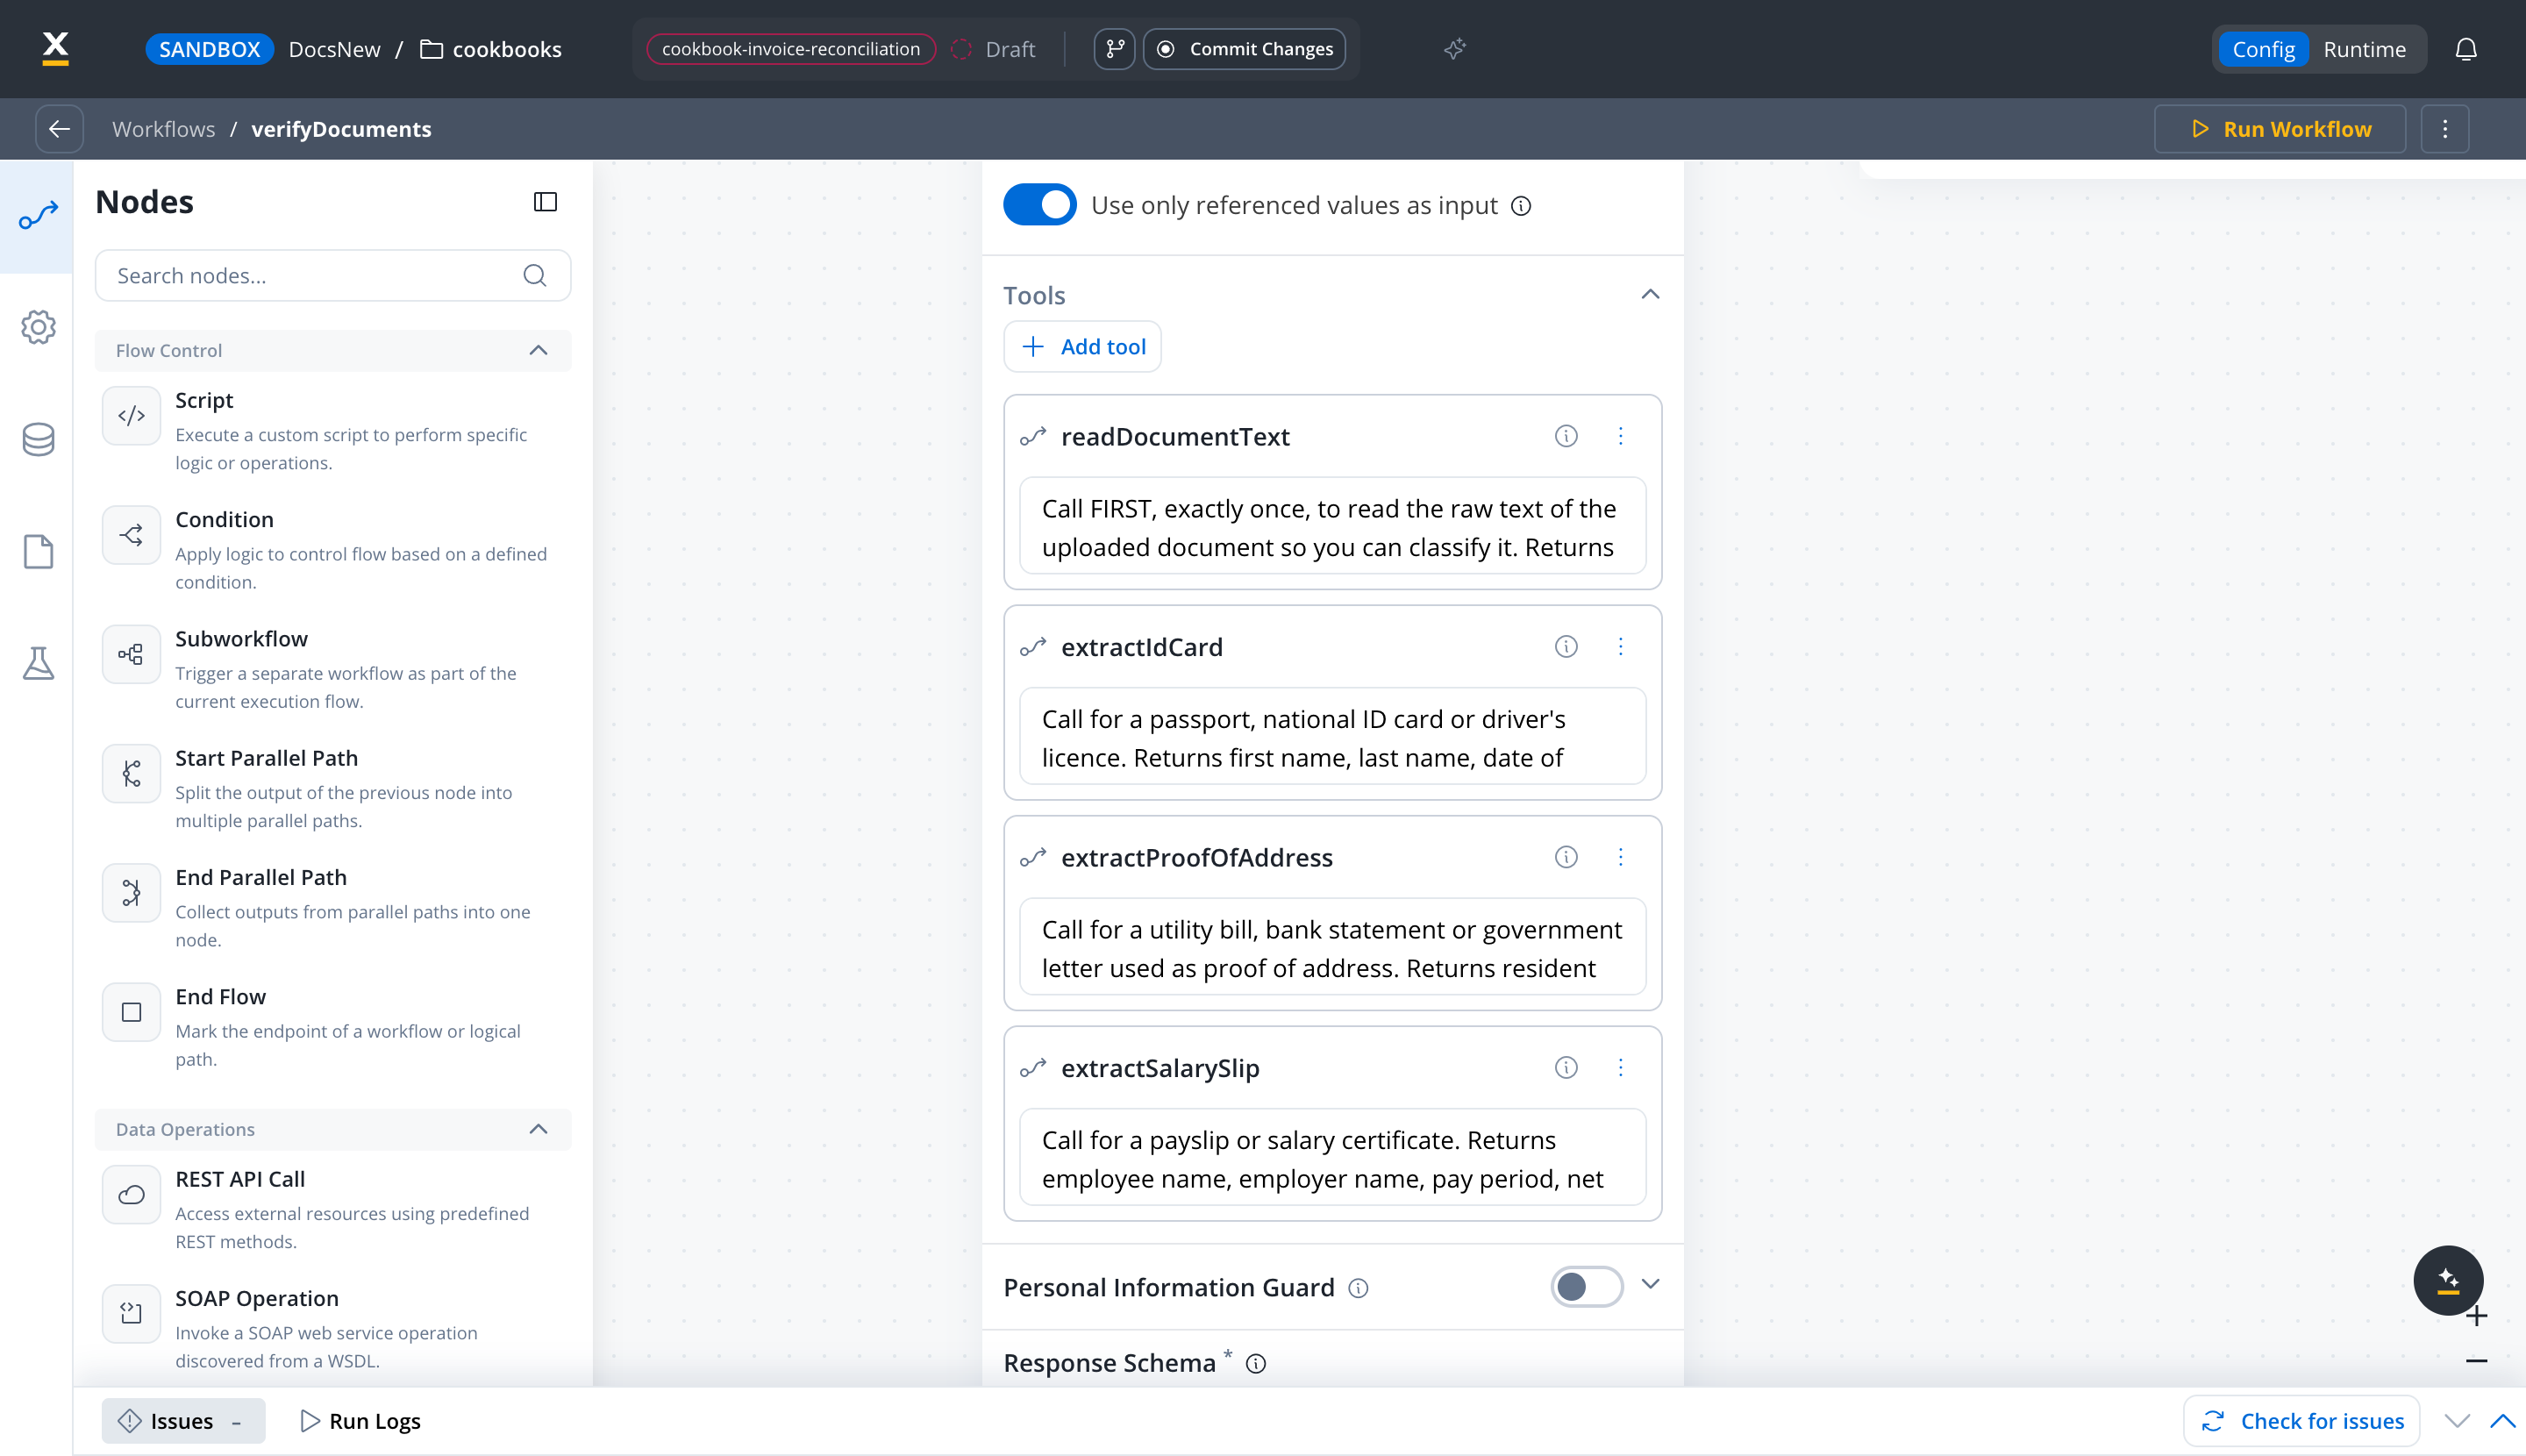
verification
The agent’s answer lands under the Response Key, so lift it into the output parameters with a Script node before the End Flow:
Agents are capped at 20 tool calls per run, 10 of them to workflow tools, and an agent can have at most 10 workflow tools attached. A verification run stays far below the caps: it makes exactly two calls.
Verified run
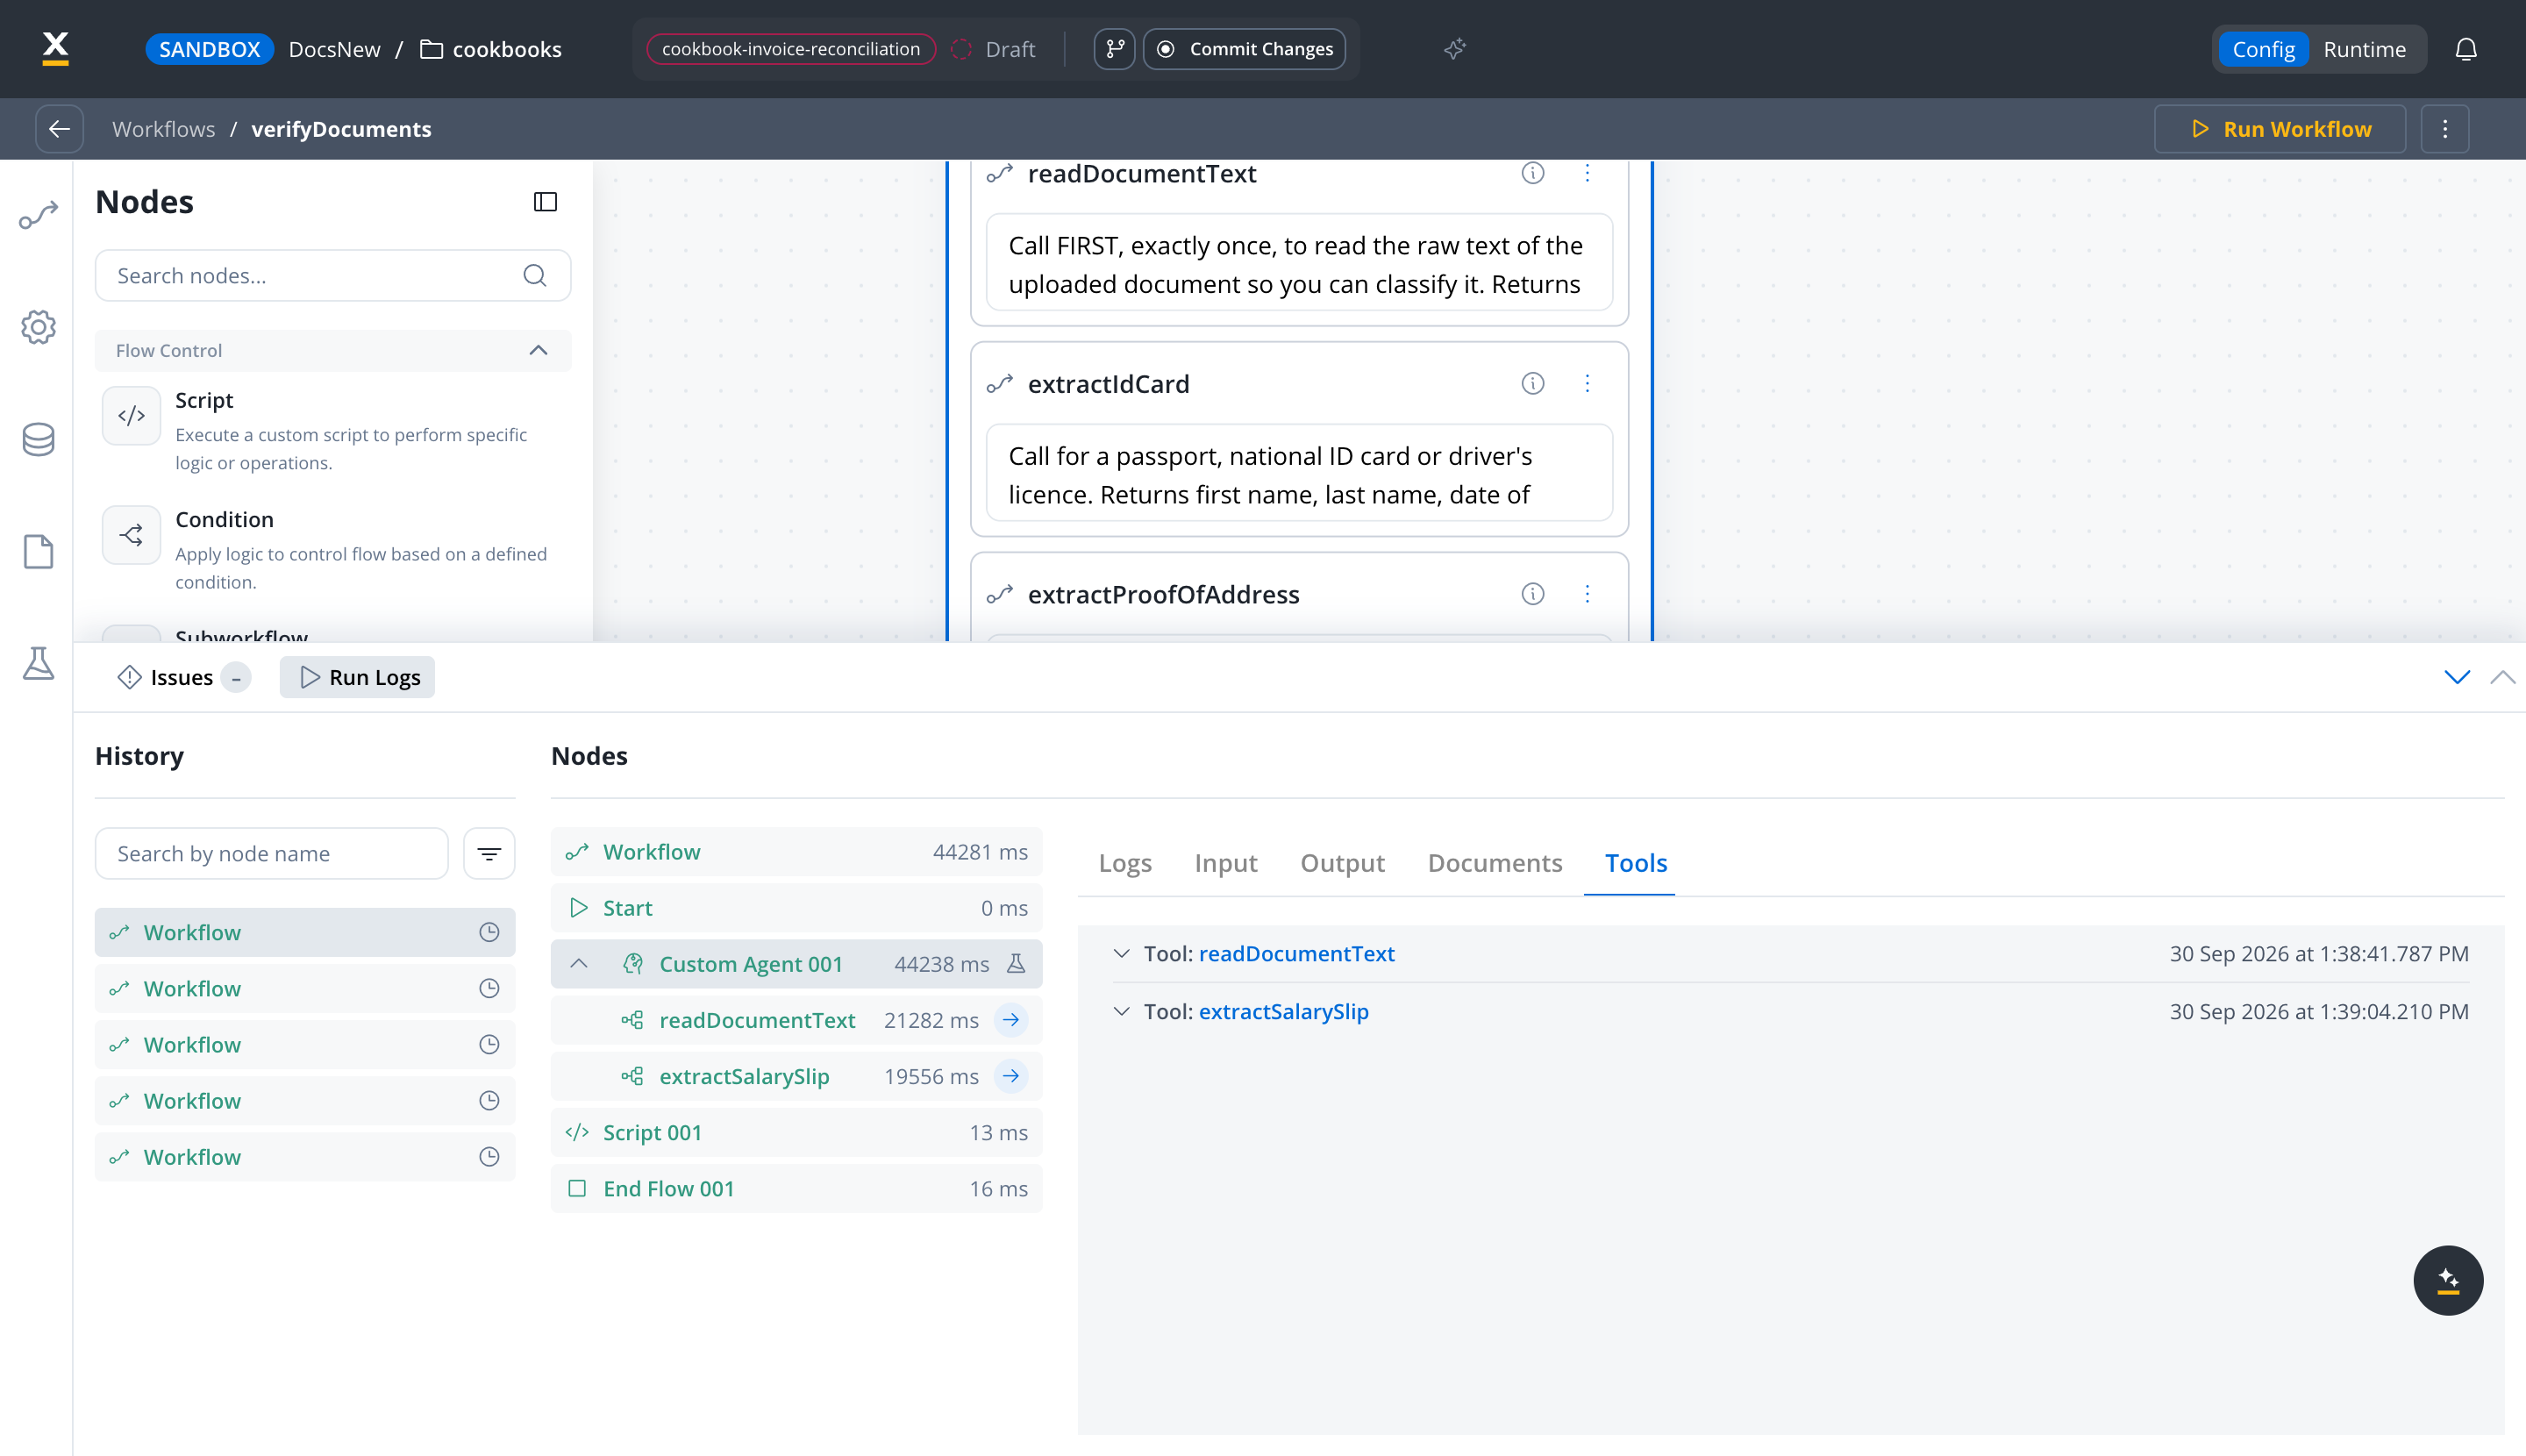
With declared dataJohn Smith, monthly income 5000 and a payslip showing employee Jonathan Smith and net salary 4,200 (the mismatch case from Testing), the agent returns:
readDocumentText first, classified the document as SALARY_SLIP, called extractSalarySlip exactly once, and produced the reconciliation verdict.
Step 3: Build the summary generation workflow
Create a workflow namedgenerateSummary. It receives the aggregated findings from the process and writes the verification report with a single Text Generation node.
Input parameters: applicantName, decision, findings (STRING) and reviewerNotes (STRING, optional)
Output parameters: report (STRING)
Add a Text Generation node after the Start node.
Instructions:
summaryReport
Add a Script node before the End Flow to lift the report into the output parameter:
Step 4: Build the BPMN process
Create a process nameddocumentVerify that orchestrates the full pipeline using the workflows you built.
The mappings below use the data mapping modals, the default. If you turn on Legacy Mapping, the Start Integration Workflow action takes a JSON input body and the Receive Message Task’s data stream takes a single Key Name instead. See Legacy mapping vs data mappers.
1
Add a User Task for file upload
Add a User Task node after the Start Event. This task presents the file upload UI to the user.Configure the task with:
- Task name:
Upload documents - Assignment: Assigned to the initiating user
2
Verify each uploaded document
Call 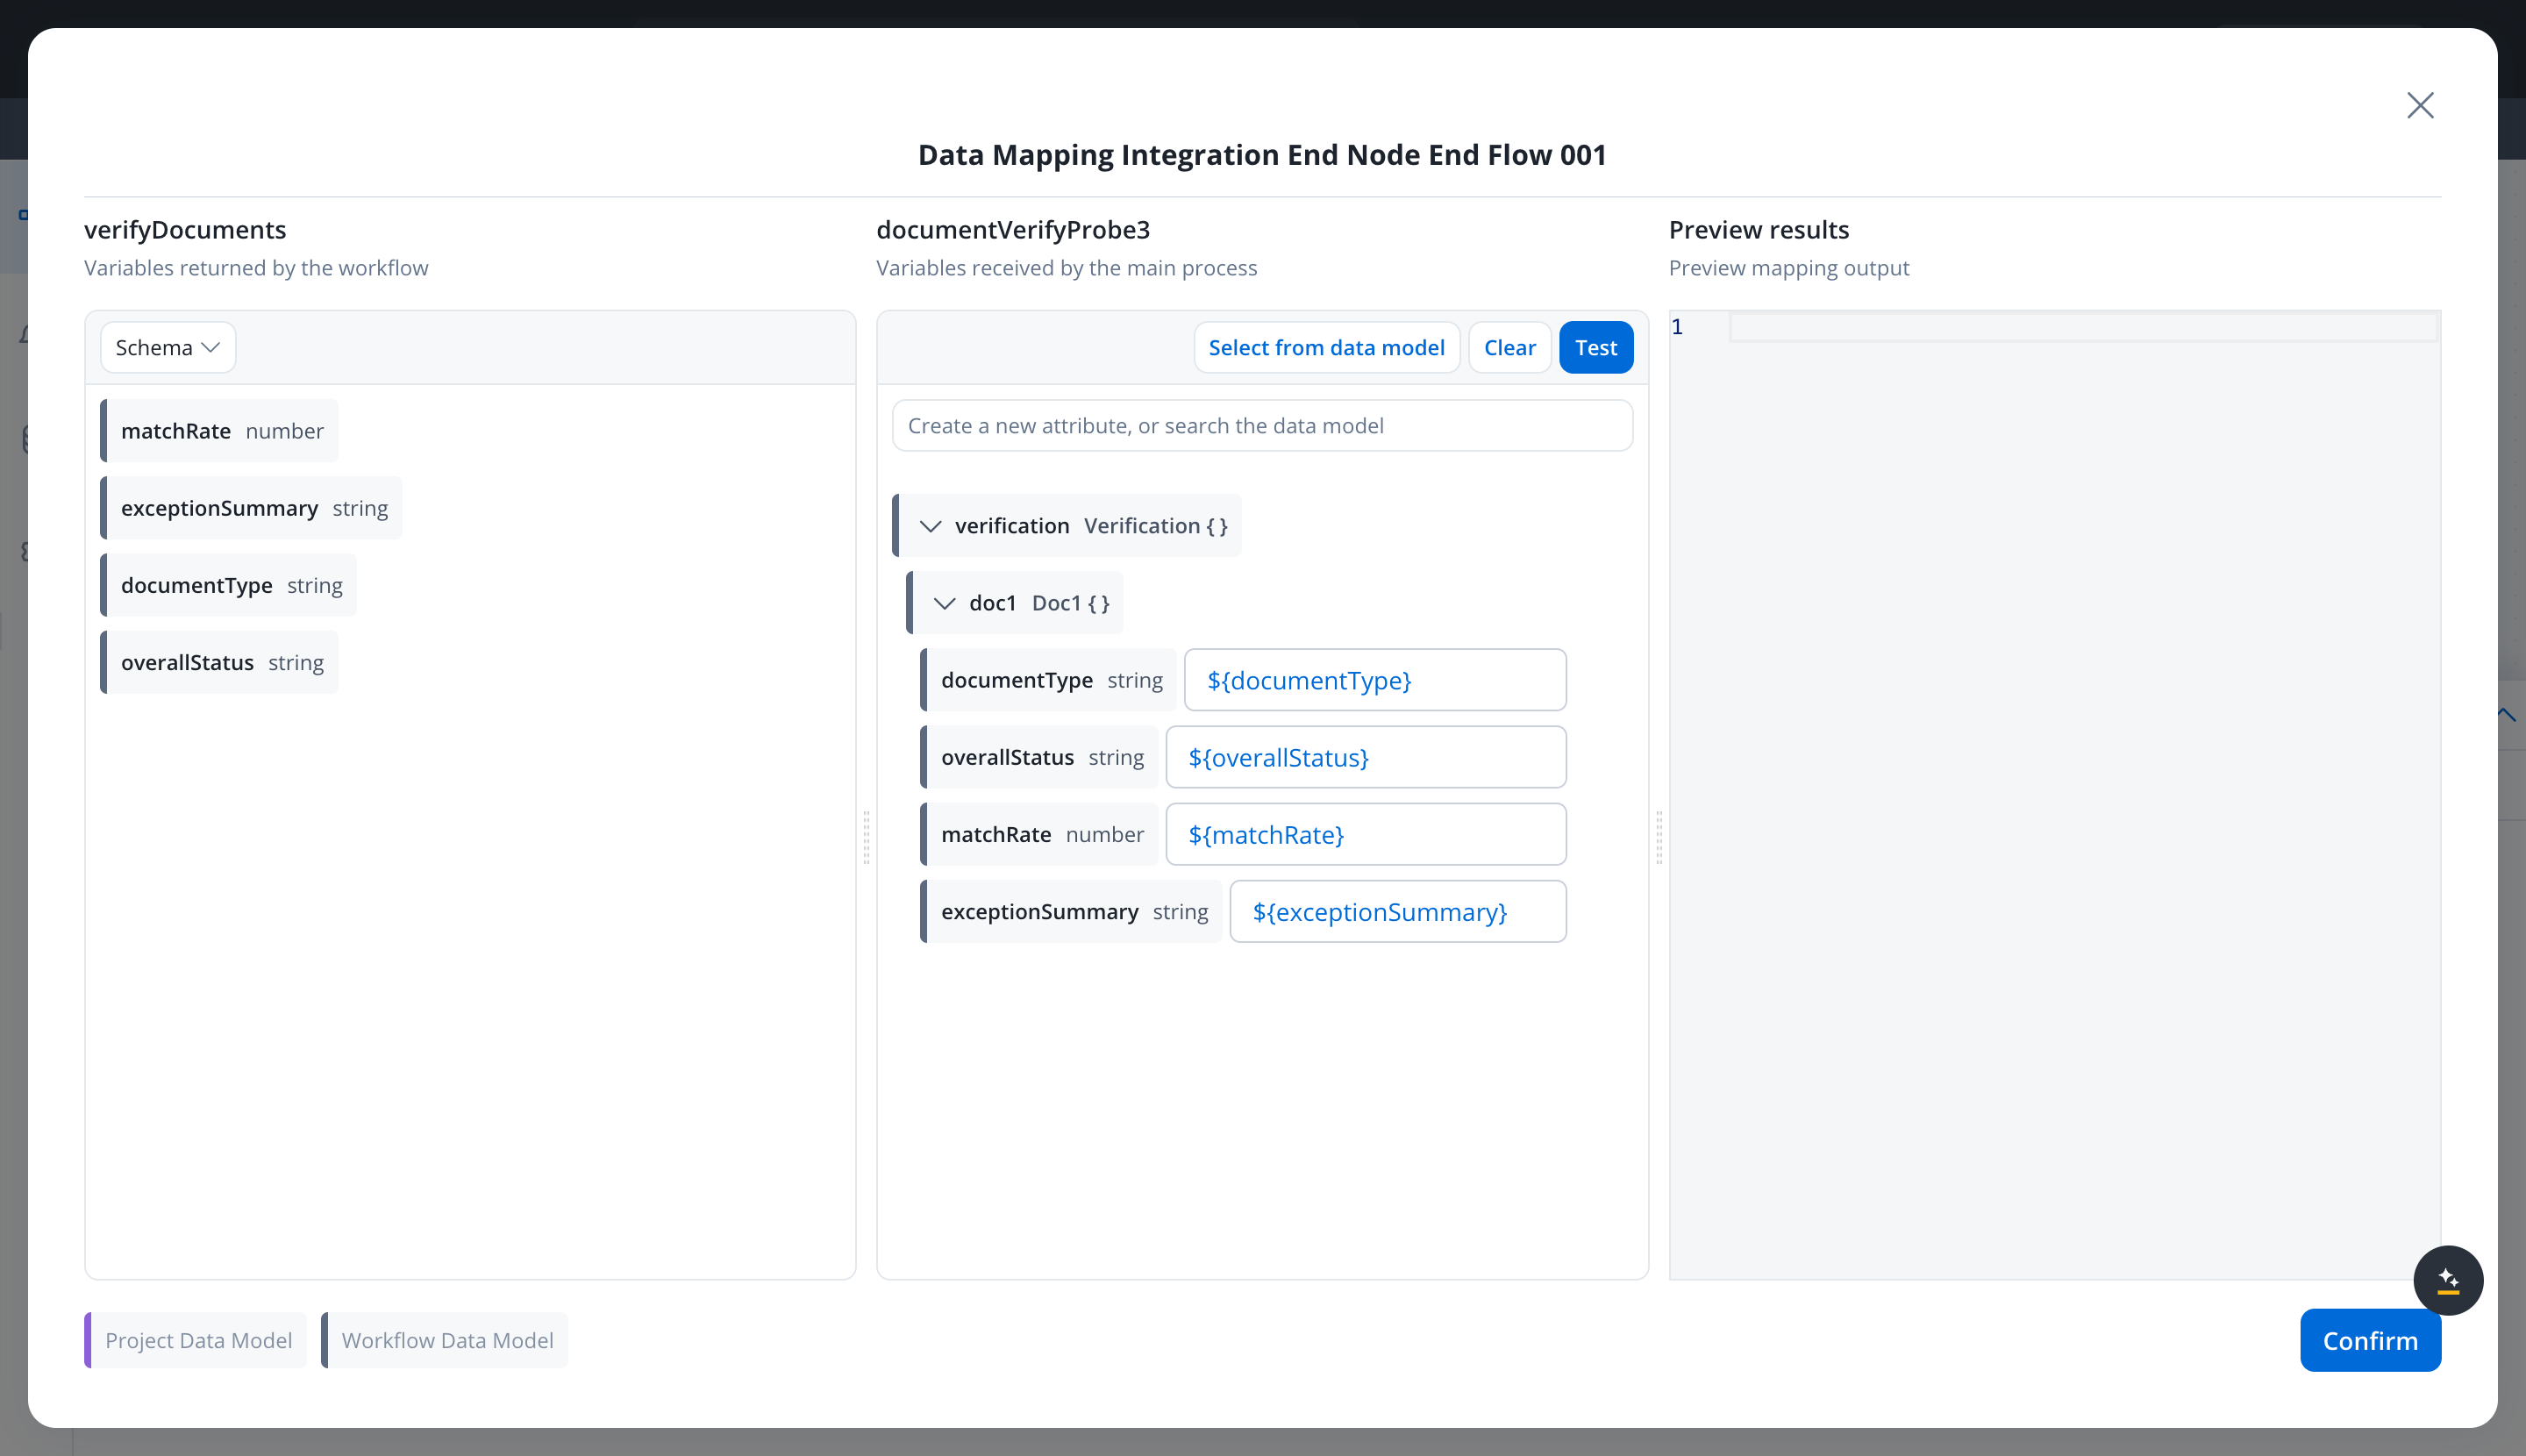
Repeat the three nodes for the second and third file (
verifyDocuments once per uploaded file. Array-indexed ${...} expressions do not resolve in data mappings, so first copy the current file into a named object: add a Service Task with a Business Rule action that sets output.currentFile = input.documents.uploadedFiles[0];. See Referencing workflow data in node configurations.Then add a Send Message Task with a Start Integration Workflow action pointing to verifyDocuments, and map its input parameters:Add a Receive Message Task node to capture the agent’s verdict. Add a data stream with Source set to Workflow, select
verifyDocuments, and in the Output Mapping of its End node map documentType, overallStatus, matchRate, and exceptionSummary to the fields of the same name under verification.doc1. Click Confirm, then save the node.Legacy mapping equivalent
Legacy mapping equivalent
With Legacy Mapping turned on, the action’s JSON input body is:On the Receive Message Task, set the data stream’s Key Name to
verification.doc1.uploadedFiles[1] into verification.doc2, uploadedFiles[2] into verification.doc3).3
Add a business rule to aggregate the verdicts
Add a Service Task with a Business Rule action (JavaScript). The agent already checked each document against the declared data; this rule combines the three verdicts, checks that every required document type is present, and prepares the input for the summary. Business rules read process data through
input. and write results through output..4
Add the routing gateway
Add an Exclusive Gateway after the business rule. Configure two branches:
5
Add the human review task
Add a User Task node for manual review. The reviewer sees:
- Uploaded documents (viewable in a File Preview component)
- The agent’s verdict for each document, with its exception summary
- Validation flags from the business rule
- Approve — continue to summary
- Reject — end process with rejection status
- Request re-upload — loop back to the upload step
review.reviewerDecision and any notes in review.reviewerNotes.6
Route on the reviewer's decision
Add a second Exclusive Gateway after the review task - the three reviewer outcomes each need a branch:
7
Trigger the summary generation workflow
After both the auto-approve and human-review-approve paths converge, add a Send Message Task with a Start Integration Workflow action pointing to
generateSummary, and map its input parameters:Add a Receive Message Task with a Workflow data stream for
generateSummary, and in the Output Mapping of its End node map report to summary.report. Click Confirm, then save the node.Legacy mapping equivalent
Legacy mapping equivalent
With Legacy Mapping turned on, the action’s JSON input body is:On the Receive Message Task, set the data stream’s Key Name to
summary.8
Add the End Event
Add an End Event after the summary is received. The process instance now contains the full verification report at
summary.report.Step 5: Build the upload UI
Design the upload page directly on the Upload documents User Task: select the node and open its UI Designer. A User Task’s UI lives on the node - a standalone UI Flow cannot be attached to a BPMN task.1
Add an upload component
Add a File Upload component to the node’s UI and restrict the accepted file types to PDF, JPG, and PNG.
2
Add the Upload file action
On a User Task, the File Upload component does not come with an action - create an Upload file action on the node and link the component to it. The action posts the file to the Documents Plugin over Kafka; configure the Address (the document-persist topic) and the Document Type. For the full parameter list and the multi-file behavior, see the Upload file action guide.The AI document nodes read uploaded files with Document Source set to Document Plugin, which resolves paths produced by this upload.
3
Add applicant data display
Add form fields (read-only) that display the applicant’s declared data from
applicant. This gives context to the person uploading documents.4
Add a submit button
Add a Button component labeled Submit documents. Configure it to save the data and advance the User Task.
In a standalone UI Flow (for example, a chat-driven app that triggers workflows directly), the File Upload component behaves differently: it arrives with an Upload action already attached, and the upload result lands under that action’s Response Key - not under the component’s data key. With the default key of Pass 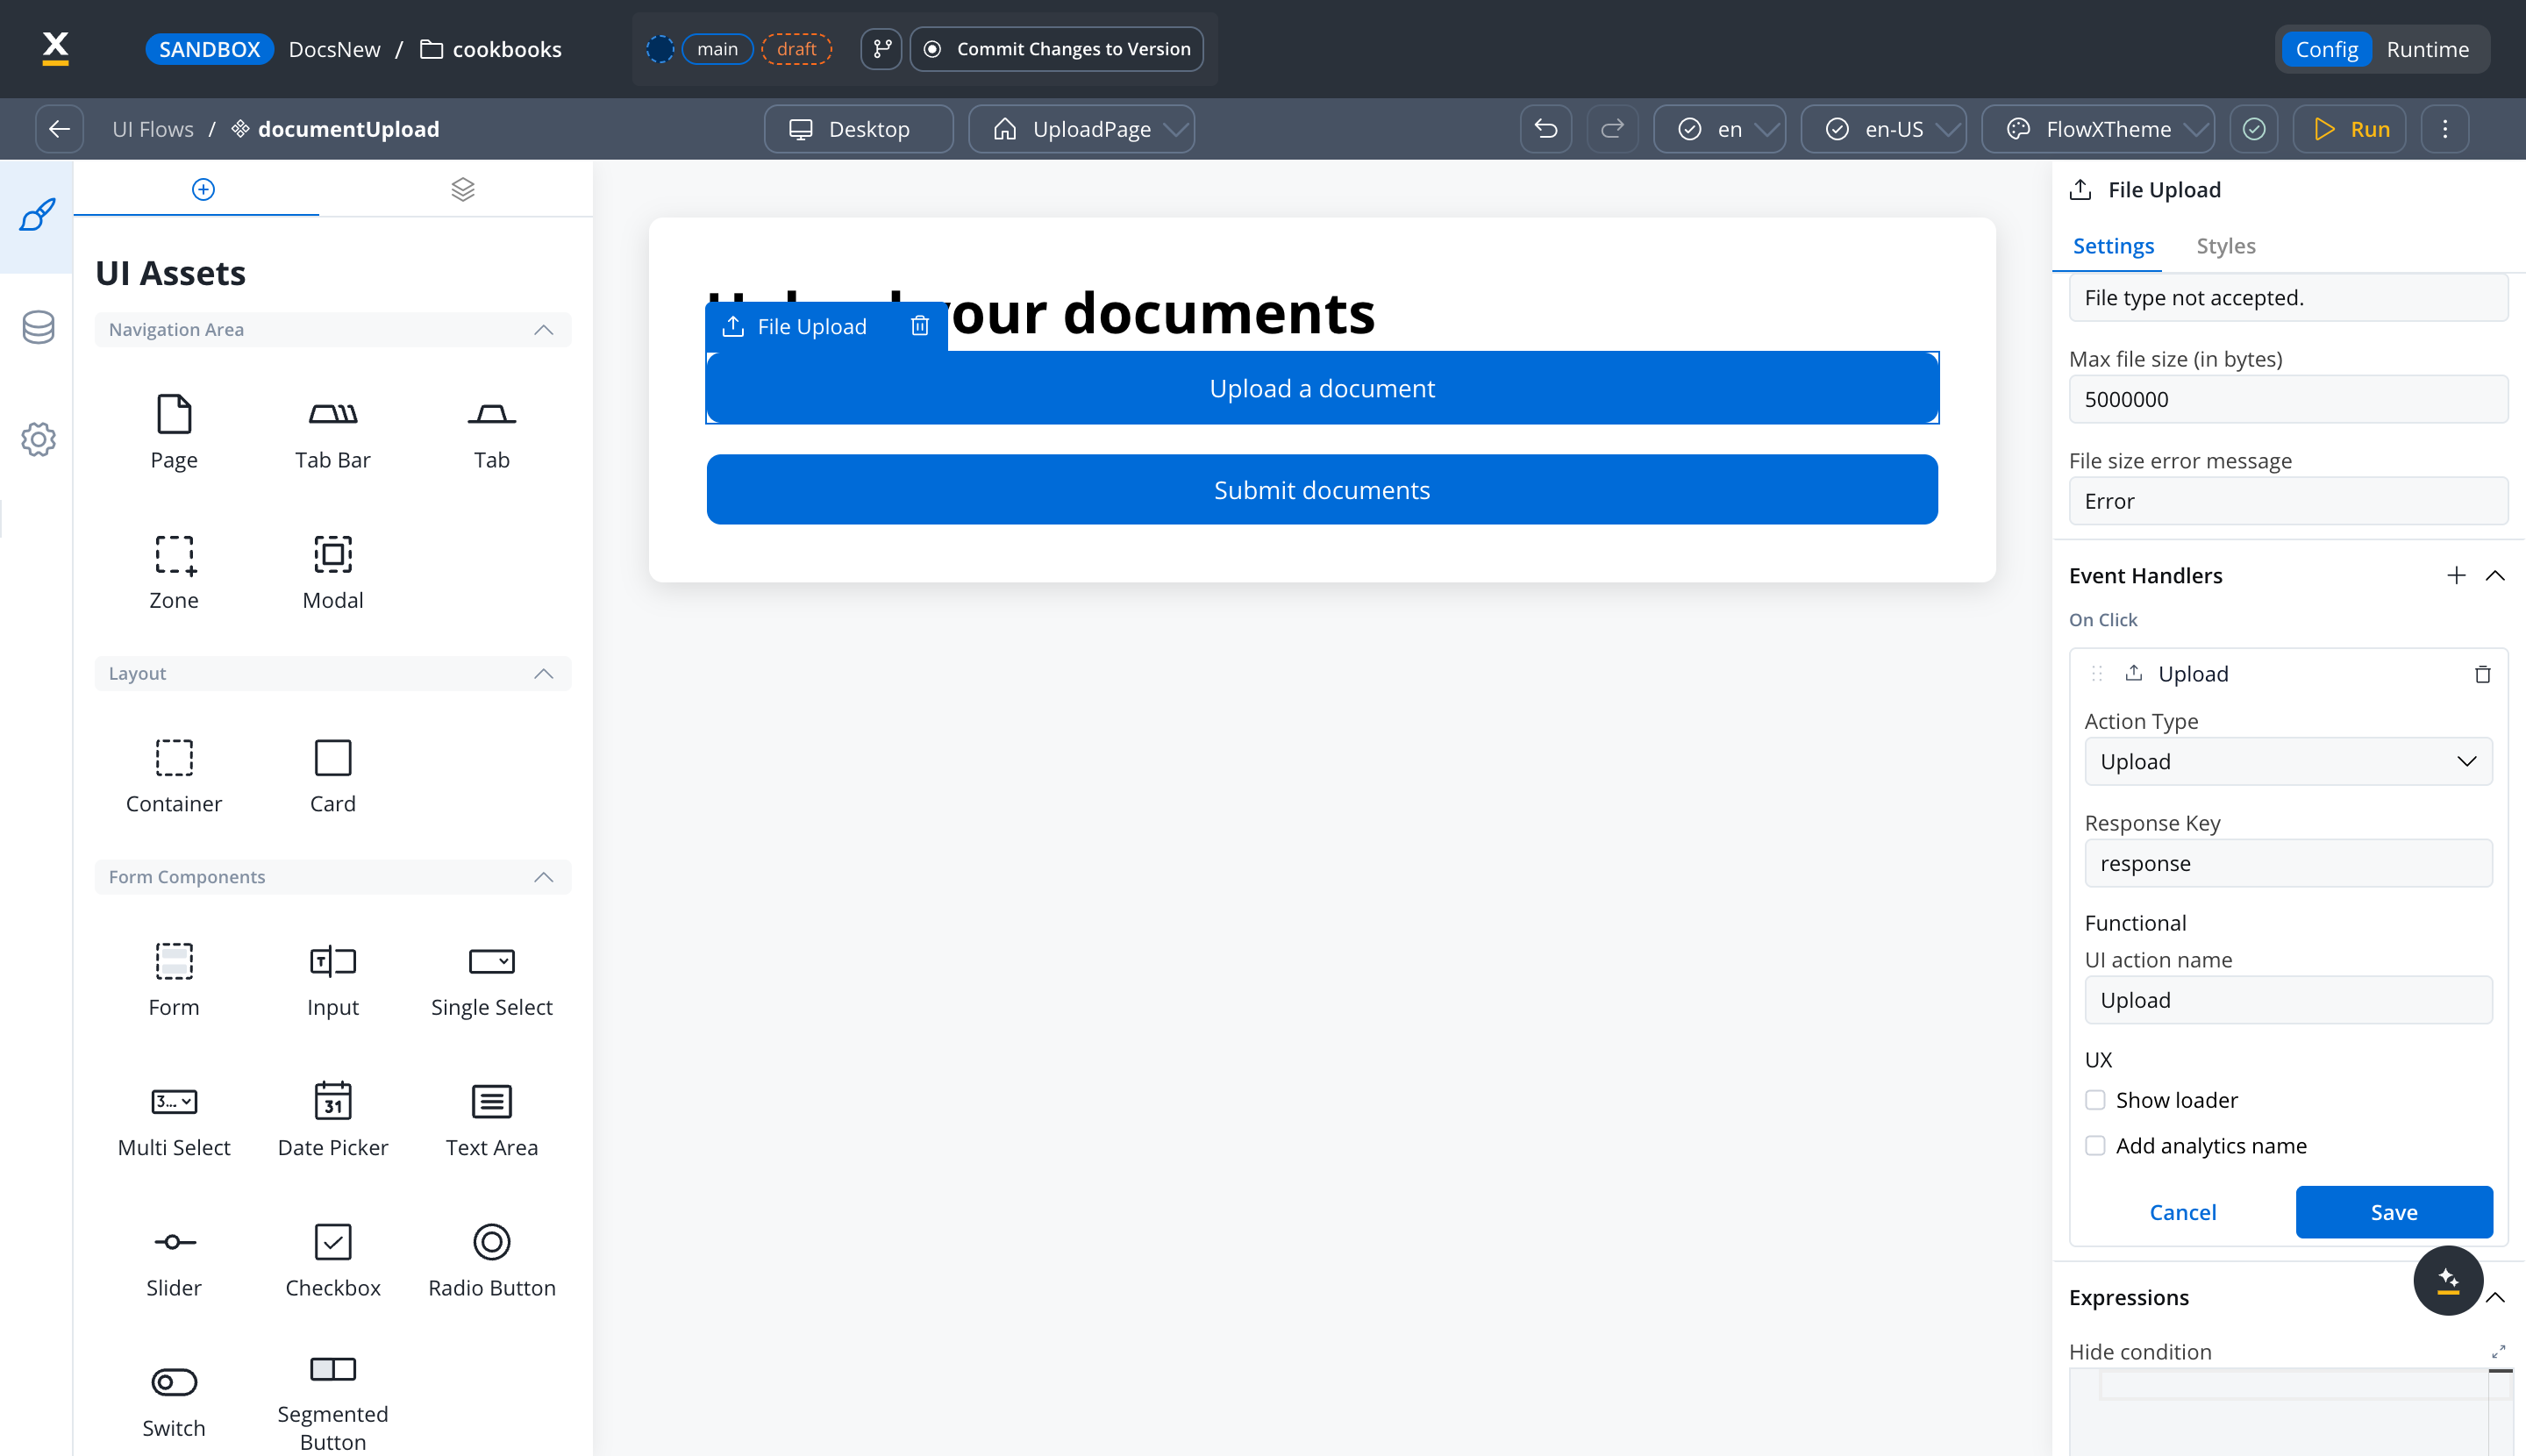
response, a successful upload produces:response.filePath to the workflow in that setup.For the human review step, design a second page the same way - on the Human review User Task node - displaying the agent’s verdict and exception summary for each document alongside the original documents. Use a side-by-side layout so the reviewer can compare easily.
Step 6: Build the review UI
Design the review page on the Human review User Task node, the same way you built the upload page in Step 5. The review page should include:A File Preview shows one file, and its Process Data source uses the key’s value as-is, so the value must be a complete, absolute URL. Don’t bind it to
documents.uploadedFiles: that key holds a list, and each entry’s filePath is a storage object path, not a URL. For each document, build the URL from the upload reply’s downloadPath in a business rule and bind the File Preview to the result, as shown in Preview an uploaded file.Testing
1
Test classification through the agent
The
verifyDocuments workflow has no file node of its own, so the sample documents go on the tool workflows. Upload them as test files on the AI nodes, turn on Use Test File, and select the document under test on readDocumentText and the matching sample on each extractor. Then open verifyDocuments, use Run Workflow with sample declared data, and check the documentType in the output and the tool calls in the run trace.2
Test extraction accuracy
For each document type, compare the extracted fields in the run trace against the actual document content. Check that:
- Names are captured correctly (including accented characters)
- Dates are in the expected
YYYY-MM-DDformat - Numeric values (salary, postal code) are accurate
- Null is returned for missing fields (not hallucinated values)
3
Test reconciliation with known mismatches
Run
verifyDocuments with deliberate mismatches: declared John Smith with monthly income 5000, and a salary slip showing Jonathan Smith with net salary 4200. Expect:documentType:SALARY_SLIPoverallStatus:REVIEW_REQUIREDexceptionSummarynaming both the name variation and the income discrepancy (16%)
readDocumentText, then extractSalarySlip.4
Test the business rule
Verify the JavaScript business rule catches:
- Missing required document types
- Any document the agent marked
REJECTEDorREVIEW_REQUIRED - A lowest match rate below the auto-approve threshold
5
Test the full end-to-end flow
Run the complete
documentVerify process:- Upload three documents (ID, proof of address, salary slip)
- Verify that
verification.doc1toverification.doc3are filled in - Check the
validationflags andsummaryInput.findings - If routed to review, complete the reviewer task
- Verify the summary report is generated at
summary.report
Explicit pipeline alternative
The verification agent decides at run time which extraction tool to call. If you need every routing decision to be visible on the canvas, or your deployment doesn’t have workflow tools yet, build the same verification as explicit steps instead:- Classify and extract: classify each document, then branch to a type-specific Document Extraction node with a Condition node. The instructions and response schemas from Step 1 carry over unchanged. See Fan-out extraction.
- Reconcile: compare the extracted fields against the applicant data in a separate comparison step with a structured exception report. See AI comparison and reconciliation.
verification.doc1 to verification.doc3.
What you learned
In this tutorial, you built a document processing pipeline that demonstrates several key patterns:- Agentic tool-calling: a Custom Agent that classifies each document and chooses the right extraction workflow at run time
- Fan-out extraction: a specialized extraction workflow per document type, with tailored instructions and schemas
- AI reconciliation: comparing AI-extracted data against application data and returning a structured verdict
- Hybrid AI + business rules: combining the agent’s verdicts with deterministic checks (missing document types, match-rate threshold)
- Human-in-the-loop: routing edge cases to a reviewer while auto-approving clean results
- Workflow composition: building small, typed workflows for tools, verification, and summary generation, then orchestrating them from a BPMN process
Next steps
Fan-out extraction pattern
Scale the classification and extraction pattern to dozens of document types
AI comparison and reconciliation
Deep-dive into the reconciliation pattern with threshold tuning
Extract Data from File
Configure extraction strategies, image extraction, and signature detection
AI node types
Reference for all AI node types available in Agent Builder