Easily track and manage your project’s evolution with comprehensive versioning features.
Versioning enables you to manage changes, track progress, and collaborate effectively by capturing snapshots of your project’s state at any point in time. The versioning system ensures that resources are grouped and tracked as part of the project, providing a comprehensive and structured approach to development.
A Project Version is an editable snapshot of your project at a specific moment. It contains all resources (e.g., processes, integrations, templates) and configurations grouped under the project.
Project: The main project entity that contains all your resources (processes, integrations, templates, etc.)
Project Branch: Branches within a project (similar to Git branches) that allow parallel development
Project Version: Individual versions within branches that track the state of your project
Each version can have one of the following statuses:
WIP (Work In Progress): Draft versions that are actively being edited
COMMITTED: Finalized versions that have been submitted with a commit message
MERGE_IN_PROGRESS: Versions currently being merged between branches
The tab above provides a summary of all accessible project versions and branches available in the current environment.
Resources within a project (e.g., processes, integrations, templates) are versioned as part of the project, not individually.
Certain resources are considered global and are not included in project-specific versioning. These resources are shared across projects and environments to maintain consistency and simplify their management. Examples of such global resources include:
Themes: Predefined design themes used across multiple projects.
Fonts: A library of fonts accessible globally.
Global Media Files: Shared media assets.
Out of Office Settings: Configurations for user availability and auto-responses that are managed at the platform level.
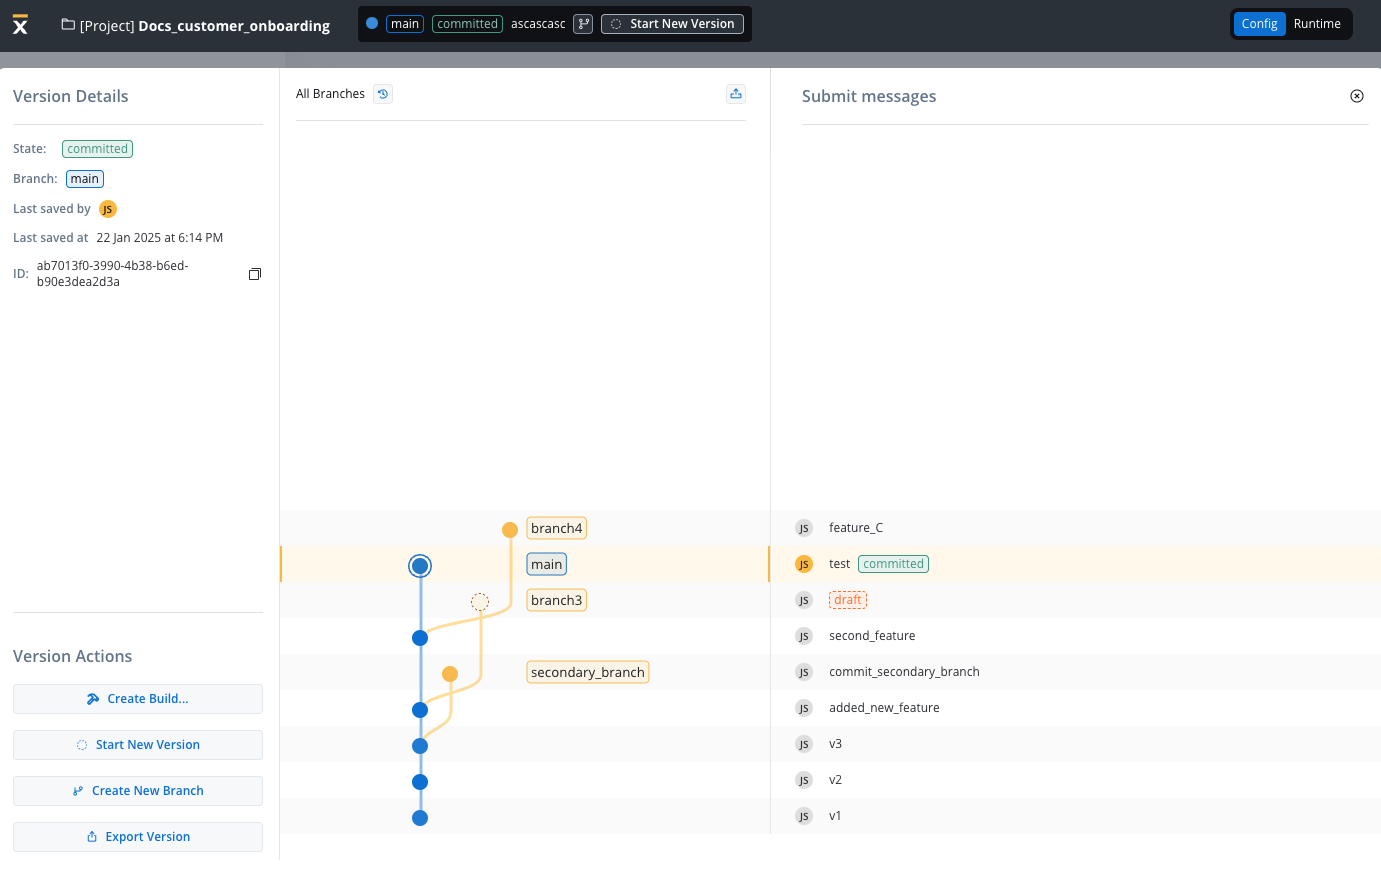
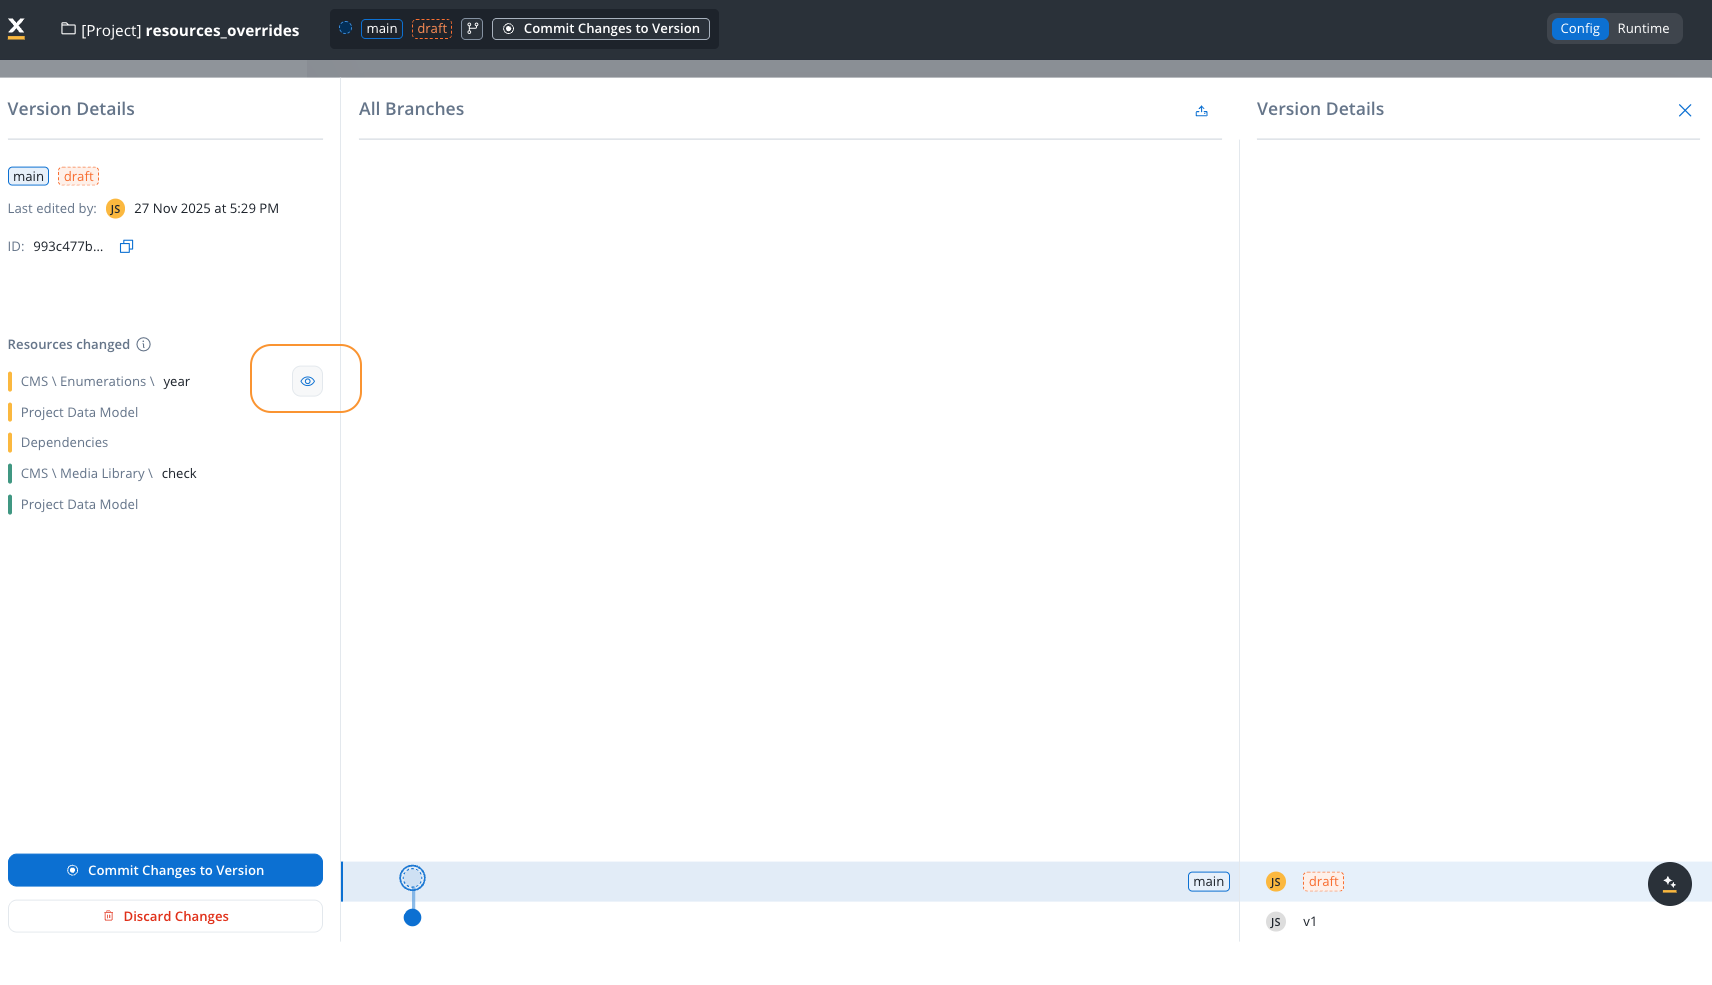
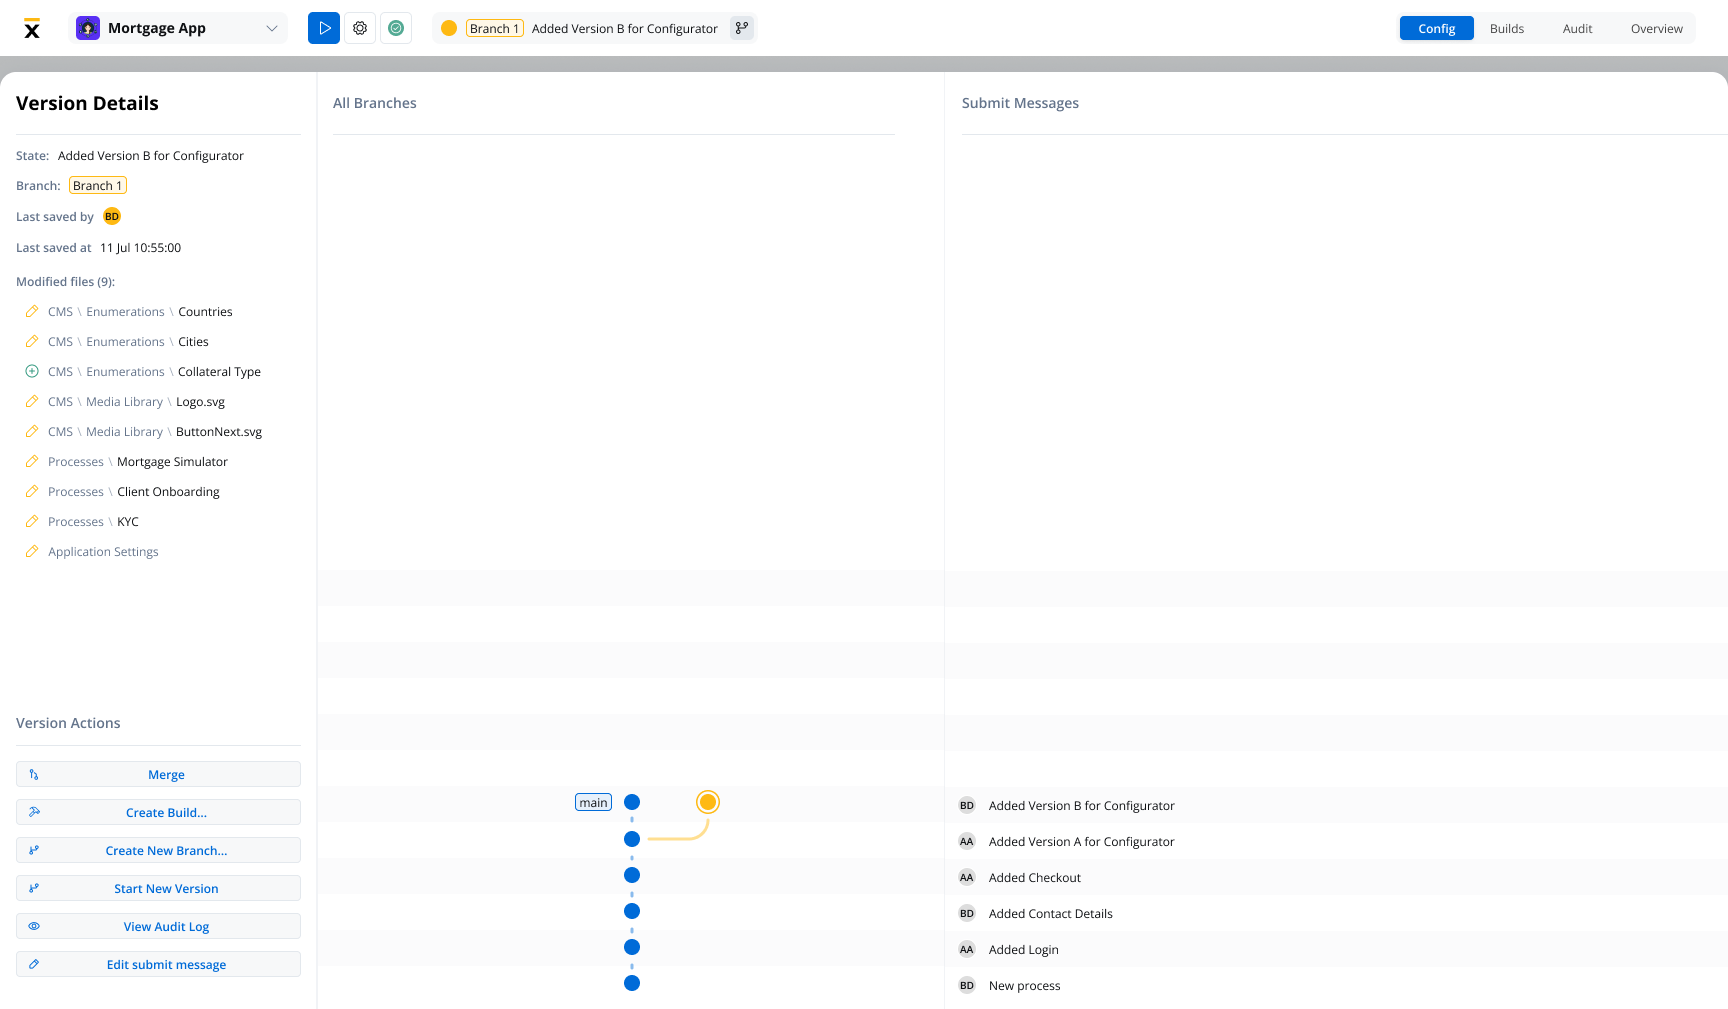
State: Displays the current state of the version (e.g., draft, committed).
Branch: Indicates the currently selected branch (e.g., main).
Last Saved By: Shows the username of the person who last saved changes (e.g., “JS”).
Last Saved At: Displays the timestamp of the most recent save (e.g., “23 Jan 2025 at 10:11 AM”).
ID: A unique identifier for the version, with a copy button for convenience.
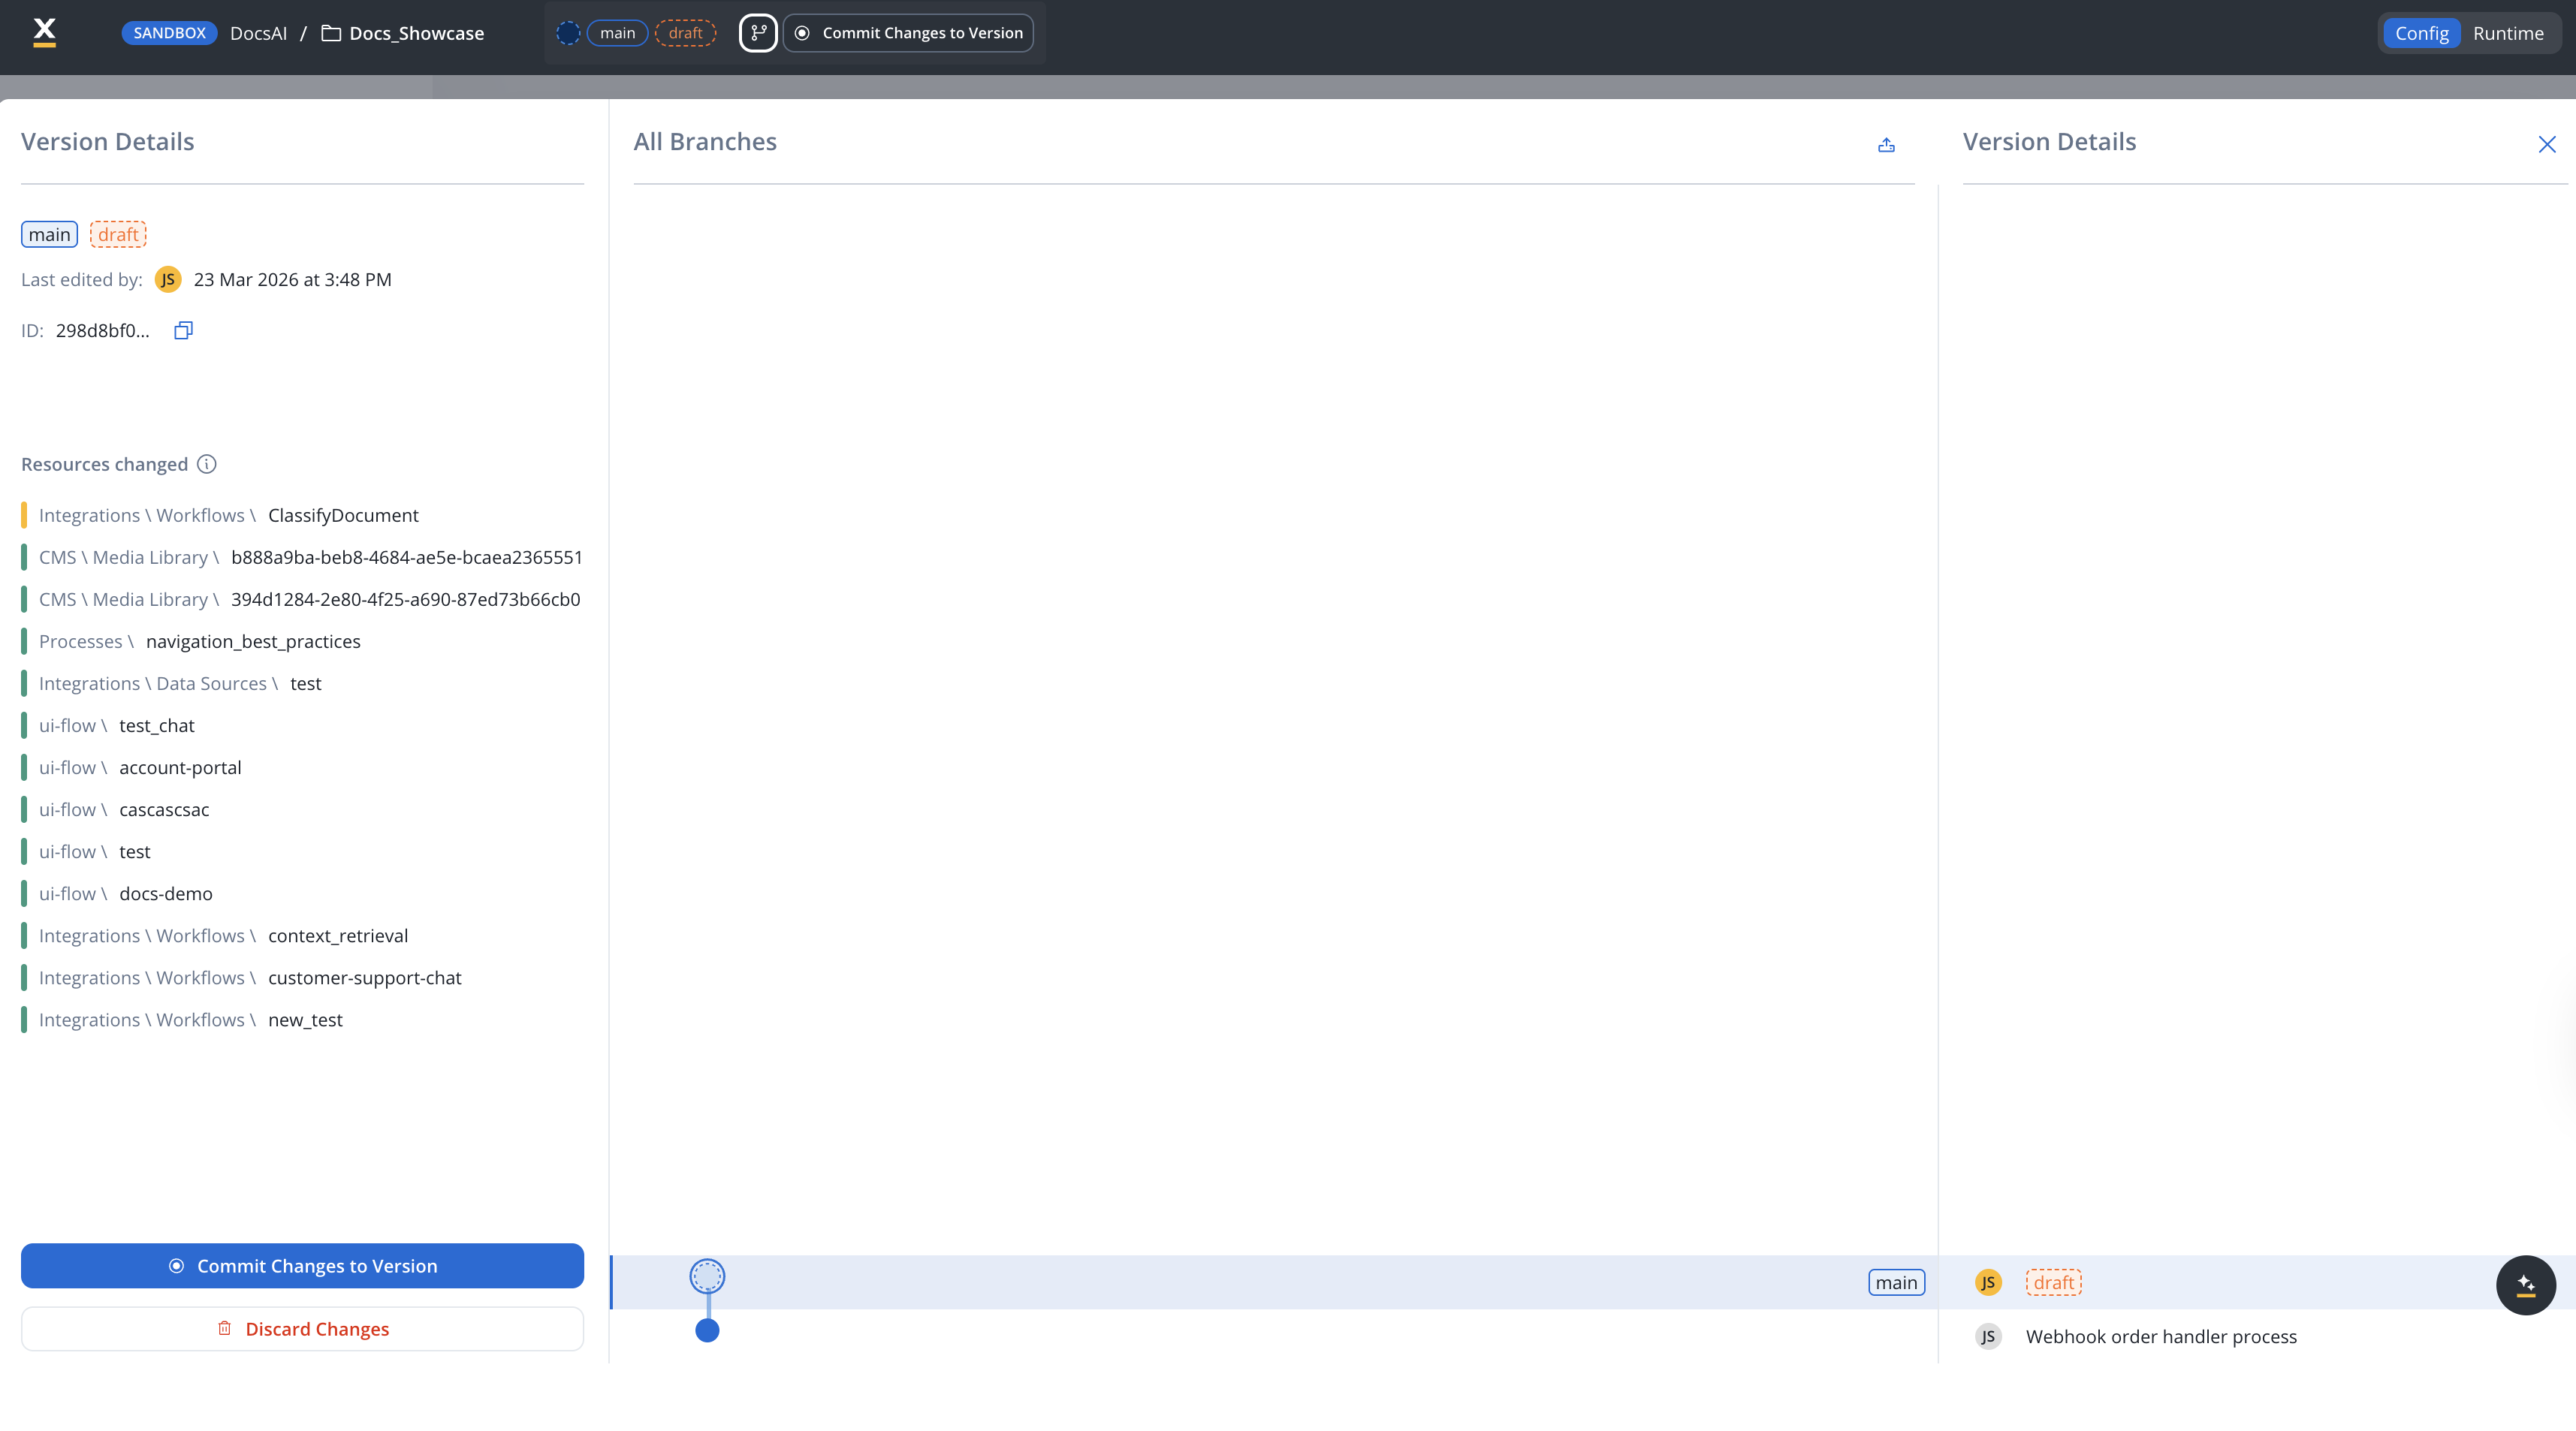
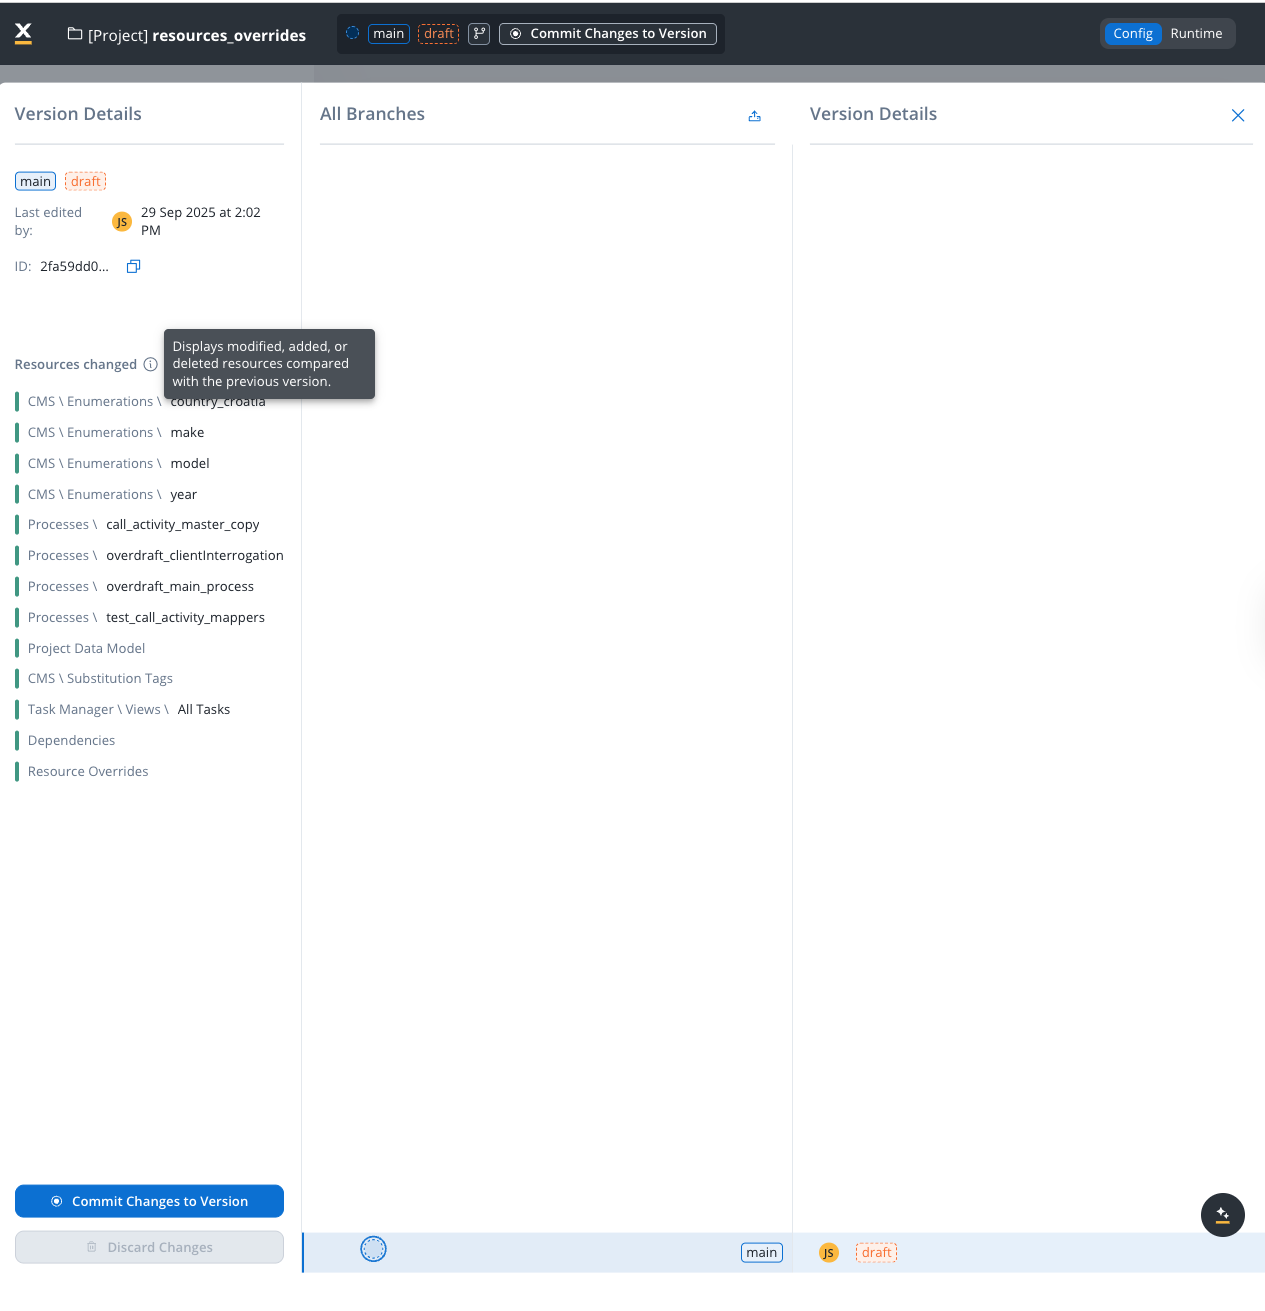
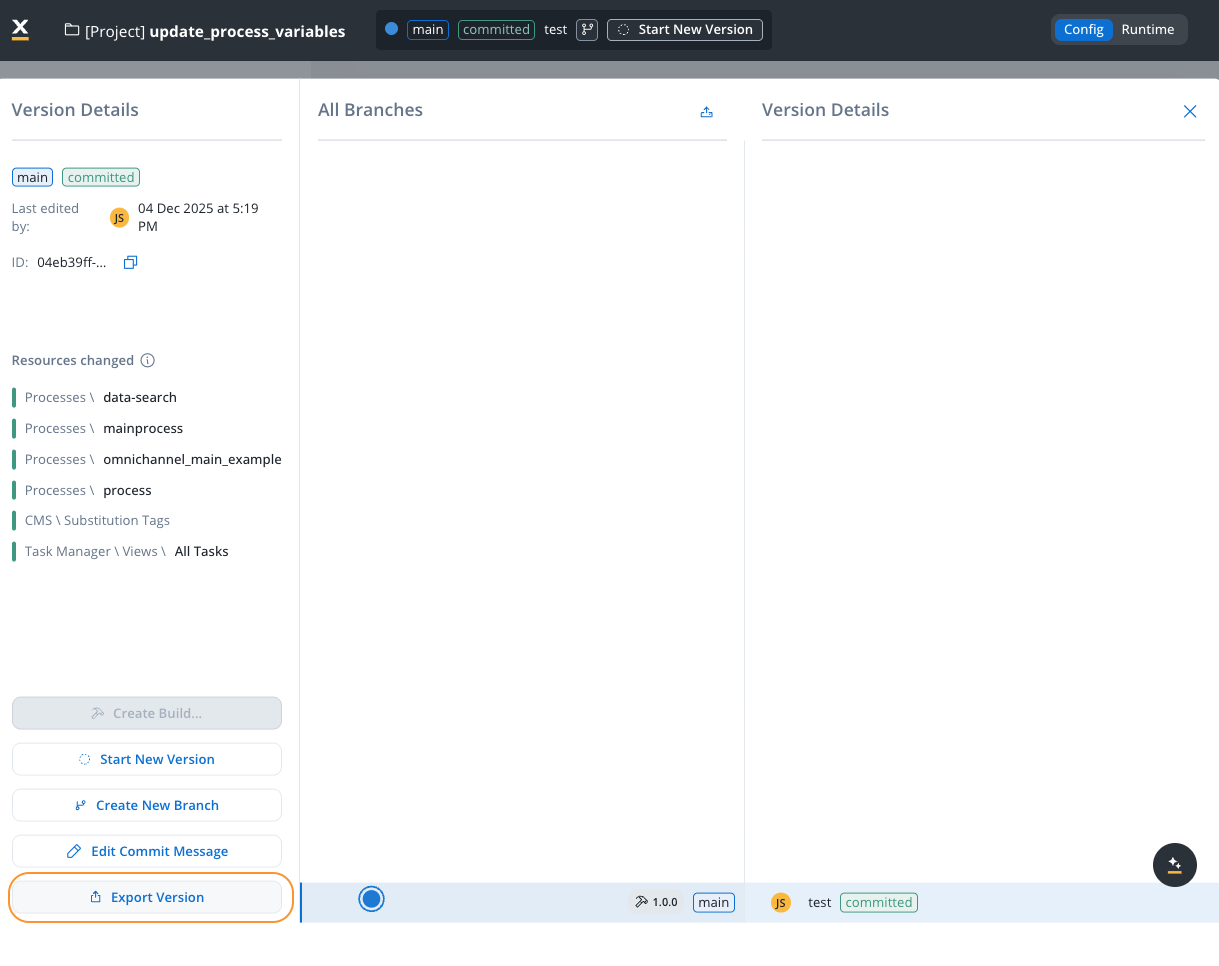
Resources Changed: Displays a summary of modified, added, or deleted resources compared with the previous version (visible only for draft versions with changes).
The Resources Changed section provides a clear overview of all modifications made in the current draft version compared to the last committed version. This helps you track exactly what has been modified before committing your changes.
The list groups changes by resource type, including:
CMS \ Enumerations: Modified enumeration values (for example, country lists, dropdown options)
Processes: Changed process definitions
Project Data Model: Updates to the data model structure
Each resource is color-coded to indicate the type of change:
Color
Meaning
Yellow
Modified resource
Green
Added resource
Red
Deleted resource
Use the Resources Changed list to review all pending modifications before committing. This ensures you have a complete understanding of what will be included in the commit.
The Compare Versions feature allows you to select two versions and view the differences between them. This is useful for understanding what changes were made between any two points in your project’s history.To compare versions:
Select a version in the branch graph
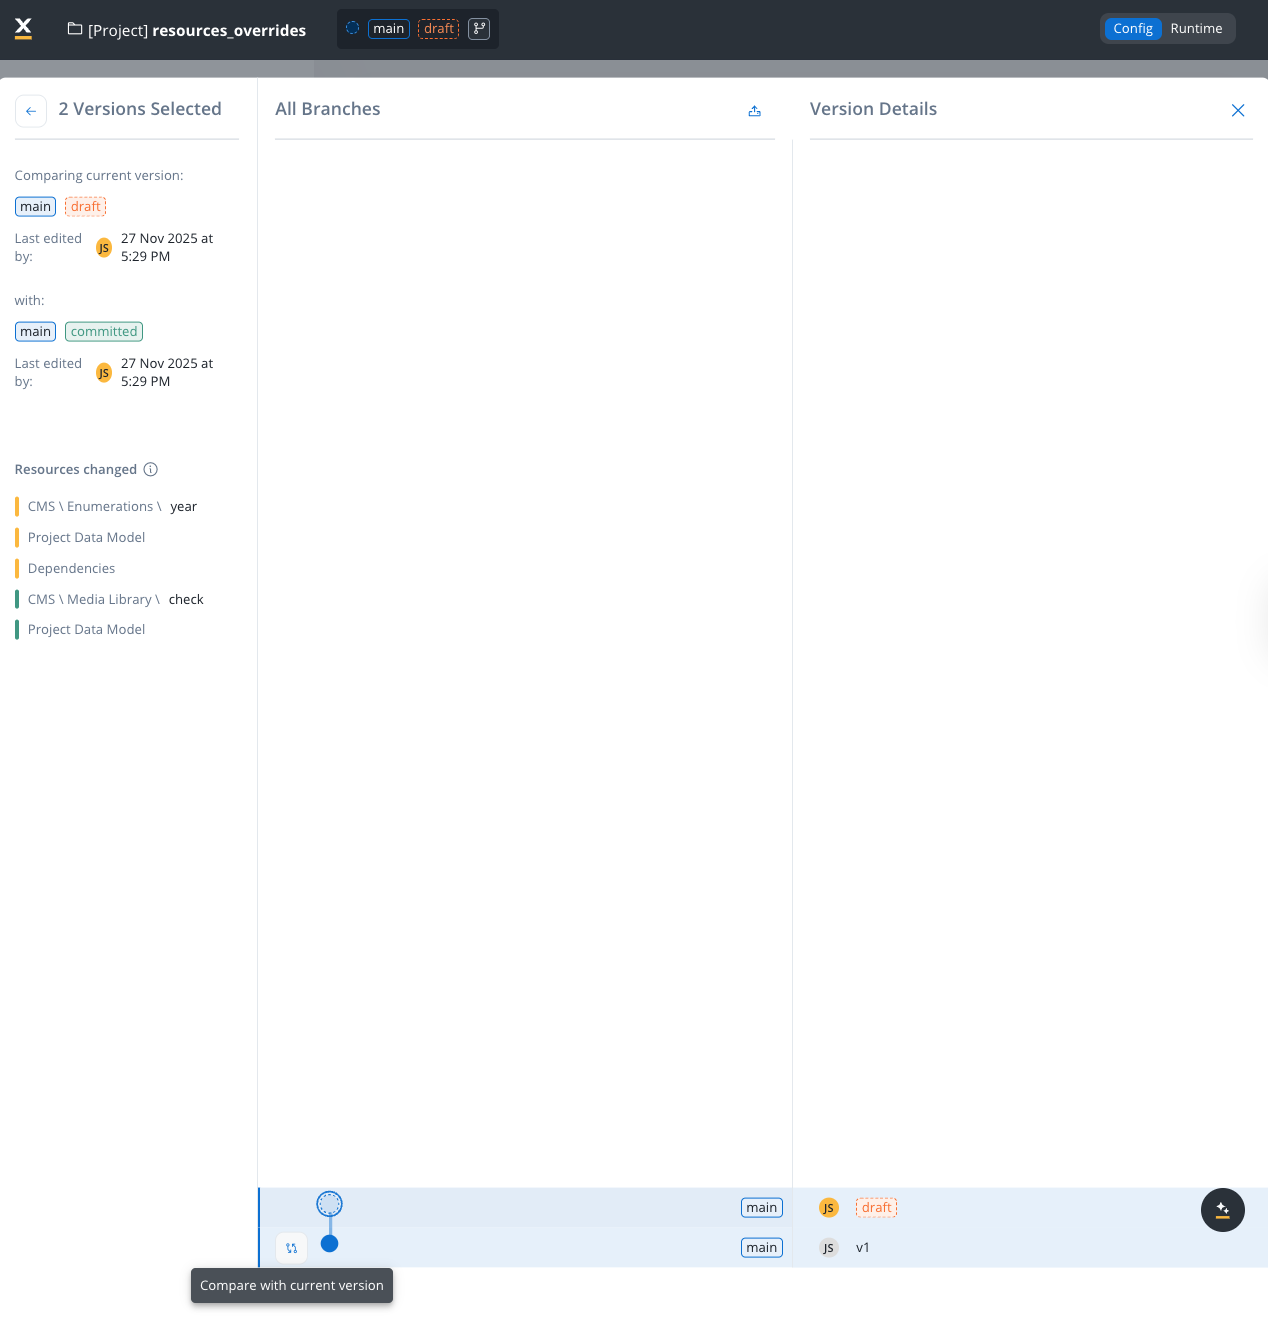
Click on the Compare with current version button at the bottom of the graph to quickly compare any committed version with the current draft version.
The comparison view displays:
Comparing current version: Shows the first selected version with its branch, state, and last edited timestamp
with: Shows the second selected version being compared against
Resources changed: Lists all resources that differ between the two versions
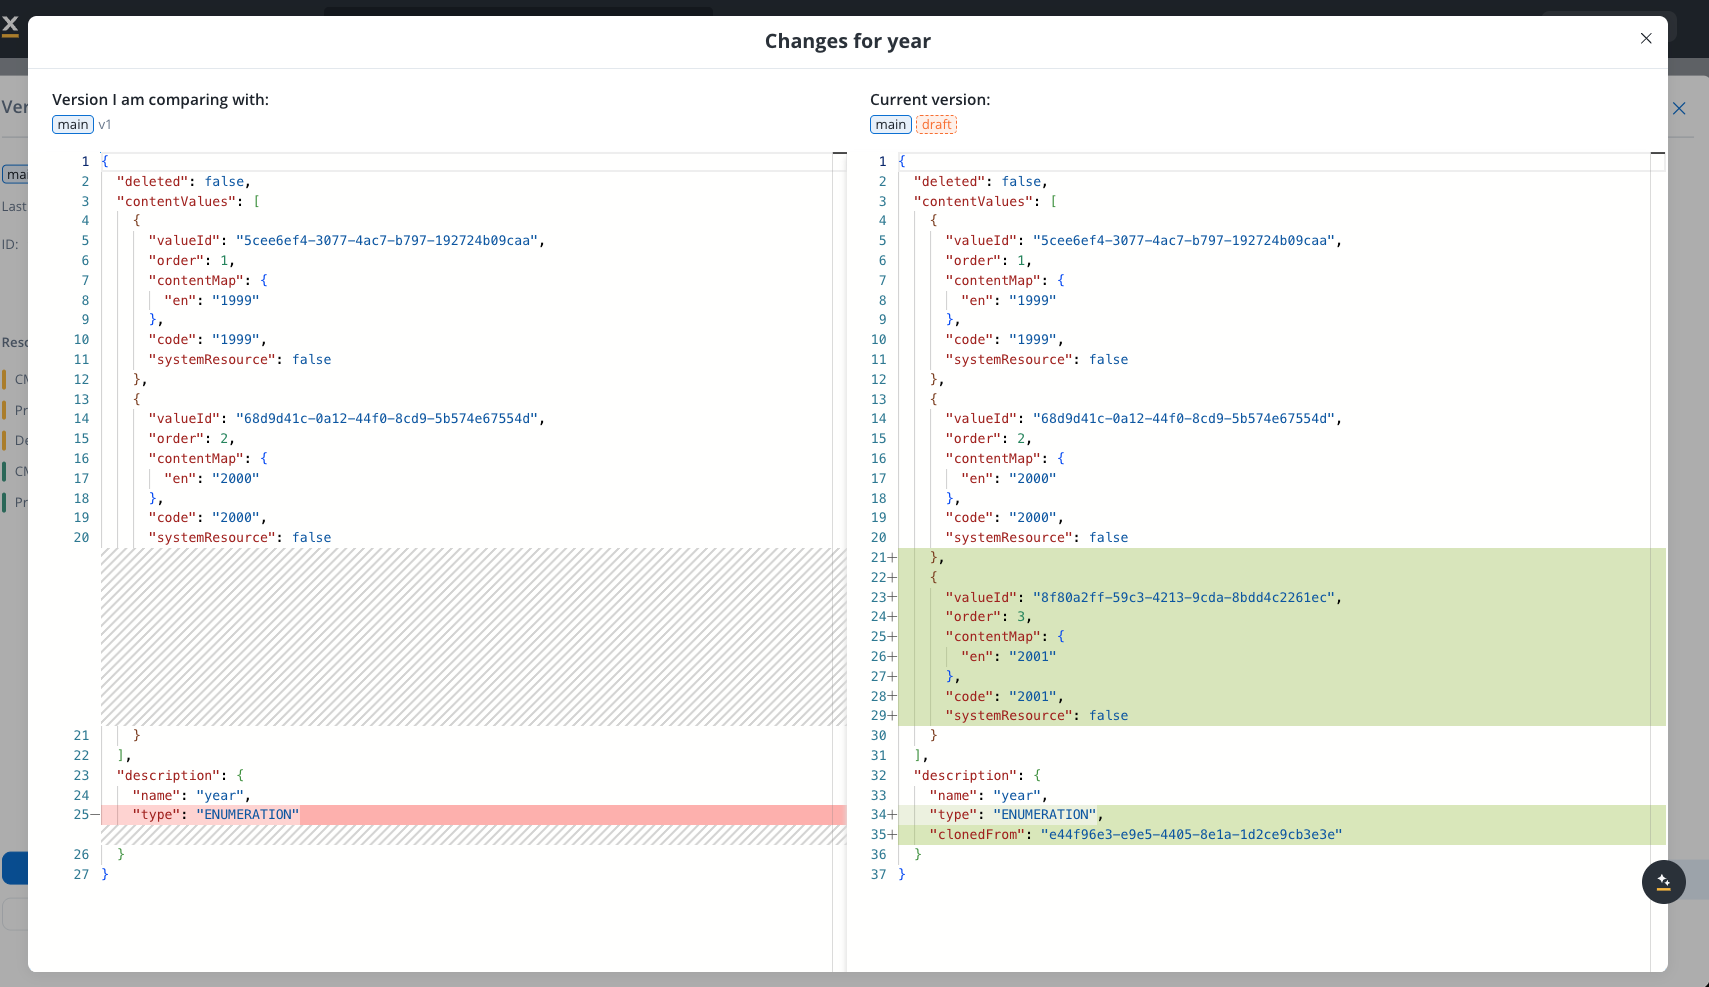
To inspect the specific changes made to a resource, hover over any item in the Resources changed list and click the eye icon that appears. This opens a detailed comparison modal.
The Changes modal provides a side-by-side JSON comparison:
Left panel: Shows the version you are comparing with (the previous/committed version)
Right panel: Shows the current draft version
Highlighted lines: Added or modified content is highlighted in green, making it easy to identify what changed
This feature helps you track changes across multiple commits, review what was modified before a specific release, or understand the evolution of your project over time.
The Resource History feature lets you view the version history for a specific resource, showing which project versions included changes to that resource.To access it, right-click any resource (process, enumeration, substitution tag, media asset, integration, etc.) and select View History. This opens the Resource History modal.The modal displays a table with the following columns:
Column
Description
Version
The project version that included a change to this resource
Last edited by
The user who last modified the resource in that version
Last edited at
The timestamp of the last modification
For each version in the list, you can:
See changes — Opens a comparison view showing what changed in this resource between the selected version and the previous one
Open version in new tab — Navigates to the full project version in a new browser tab
Resource history tracks changes at the project version level. Individual resources do not have their own independent version history — they are always versioned as part of the project.
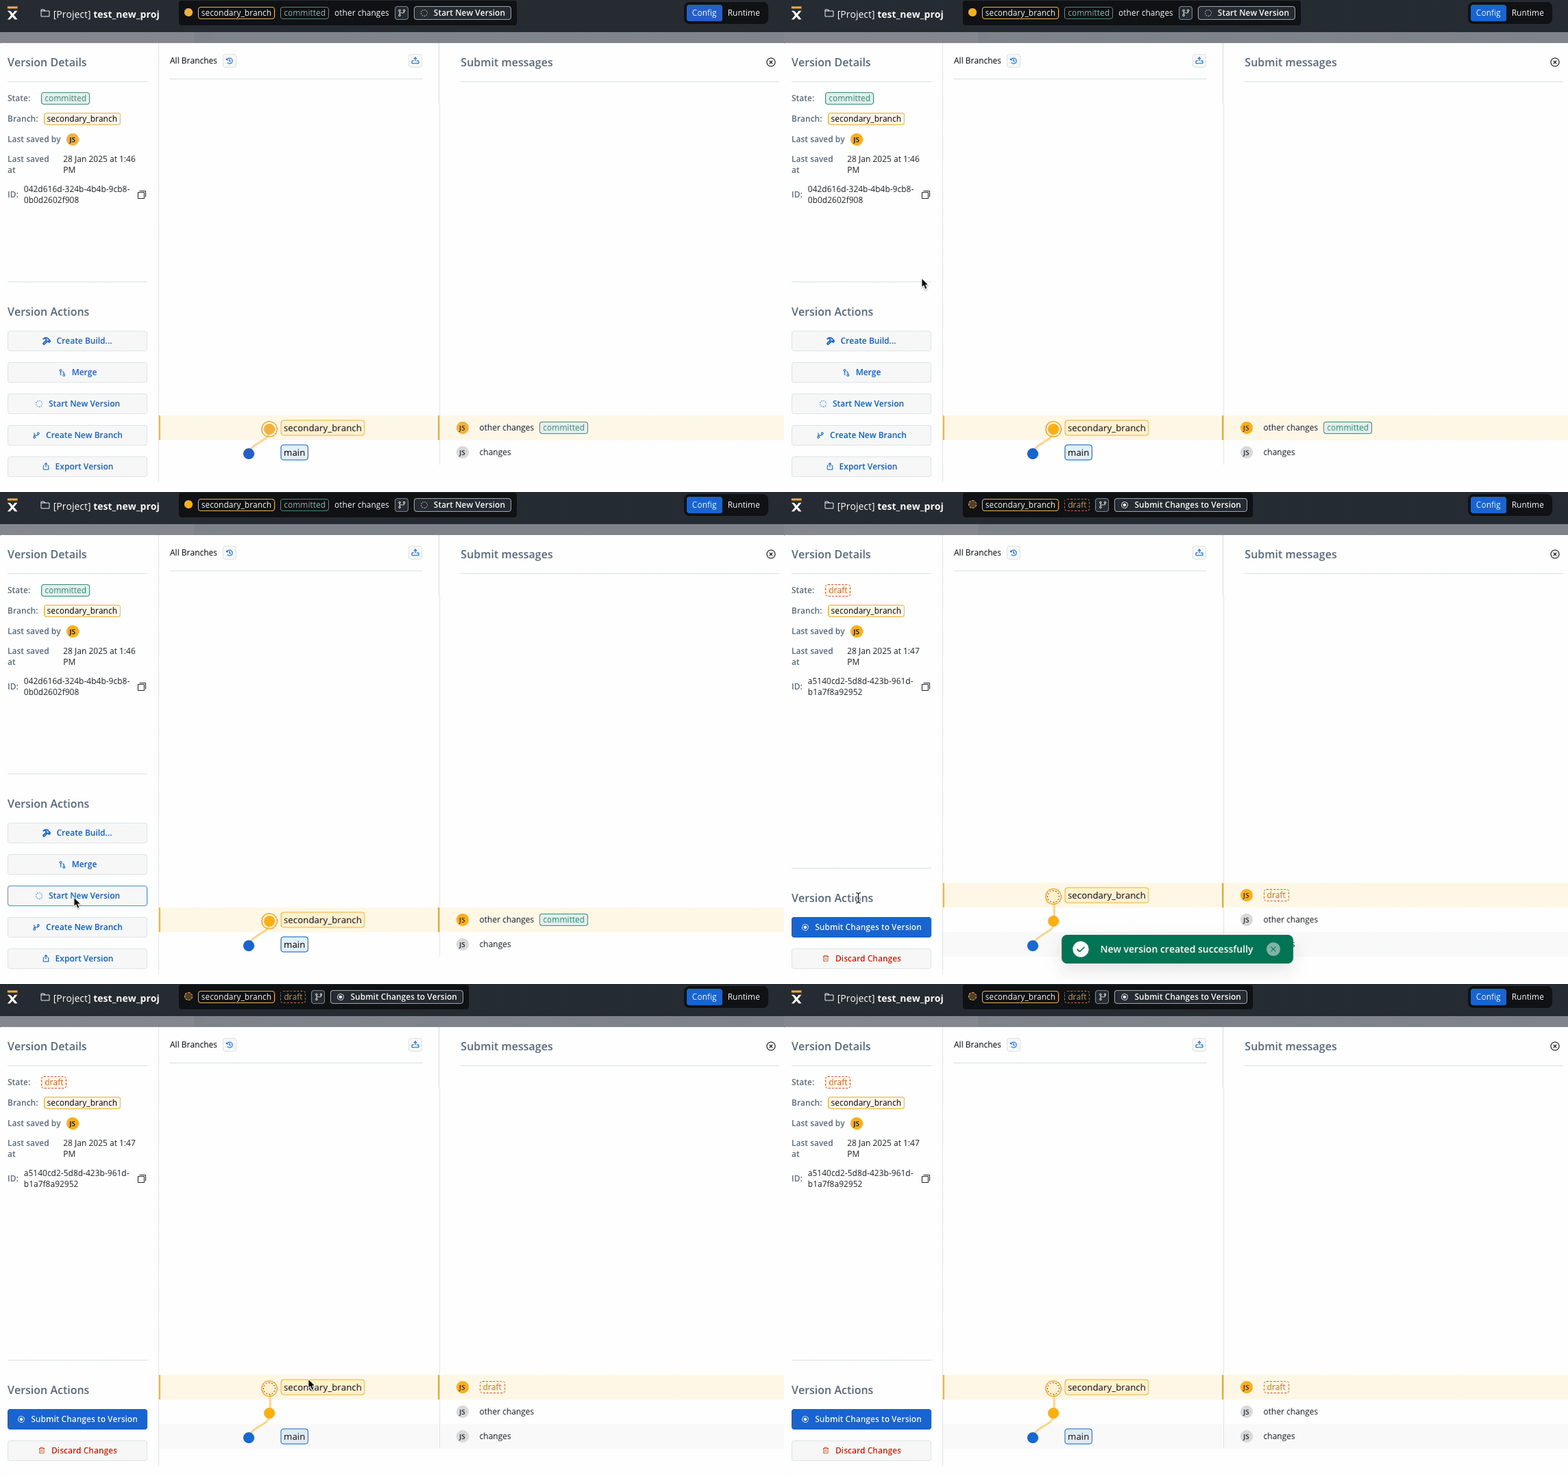
You can initiate a new draft (work-in-progress) version while keeping the committed version intact. A draft version is automatically created under the following circumstances:
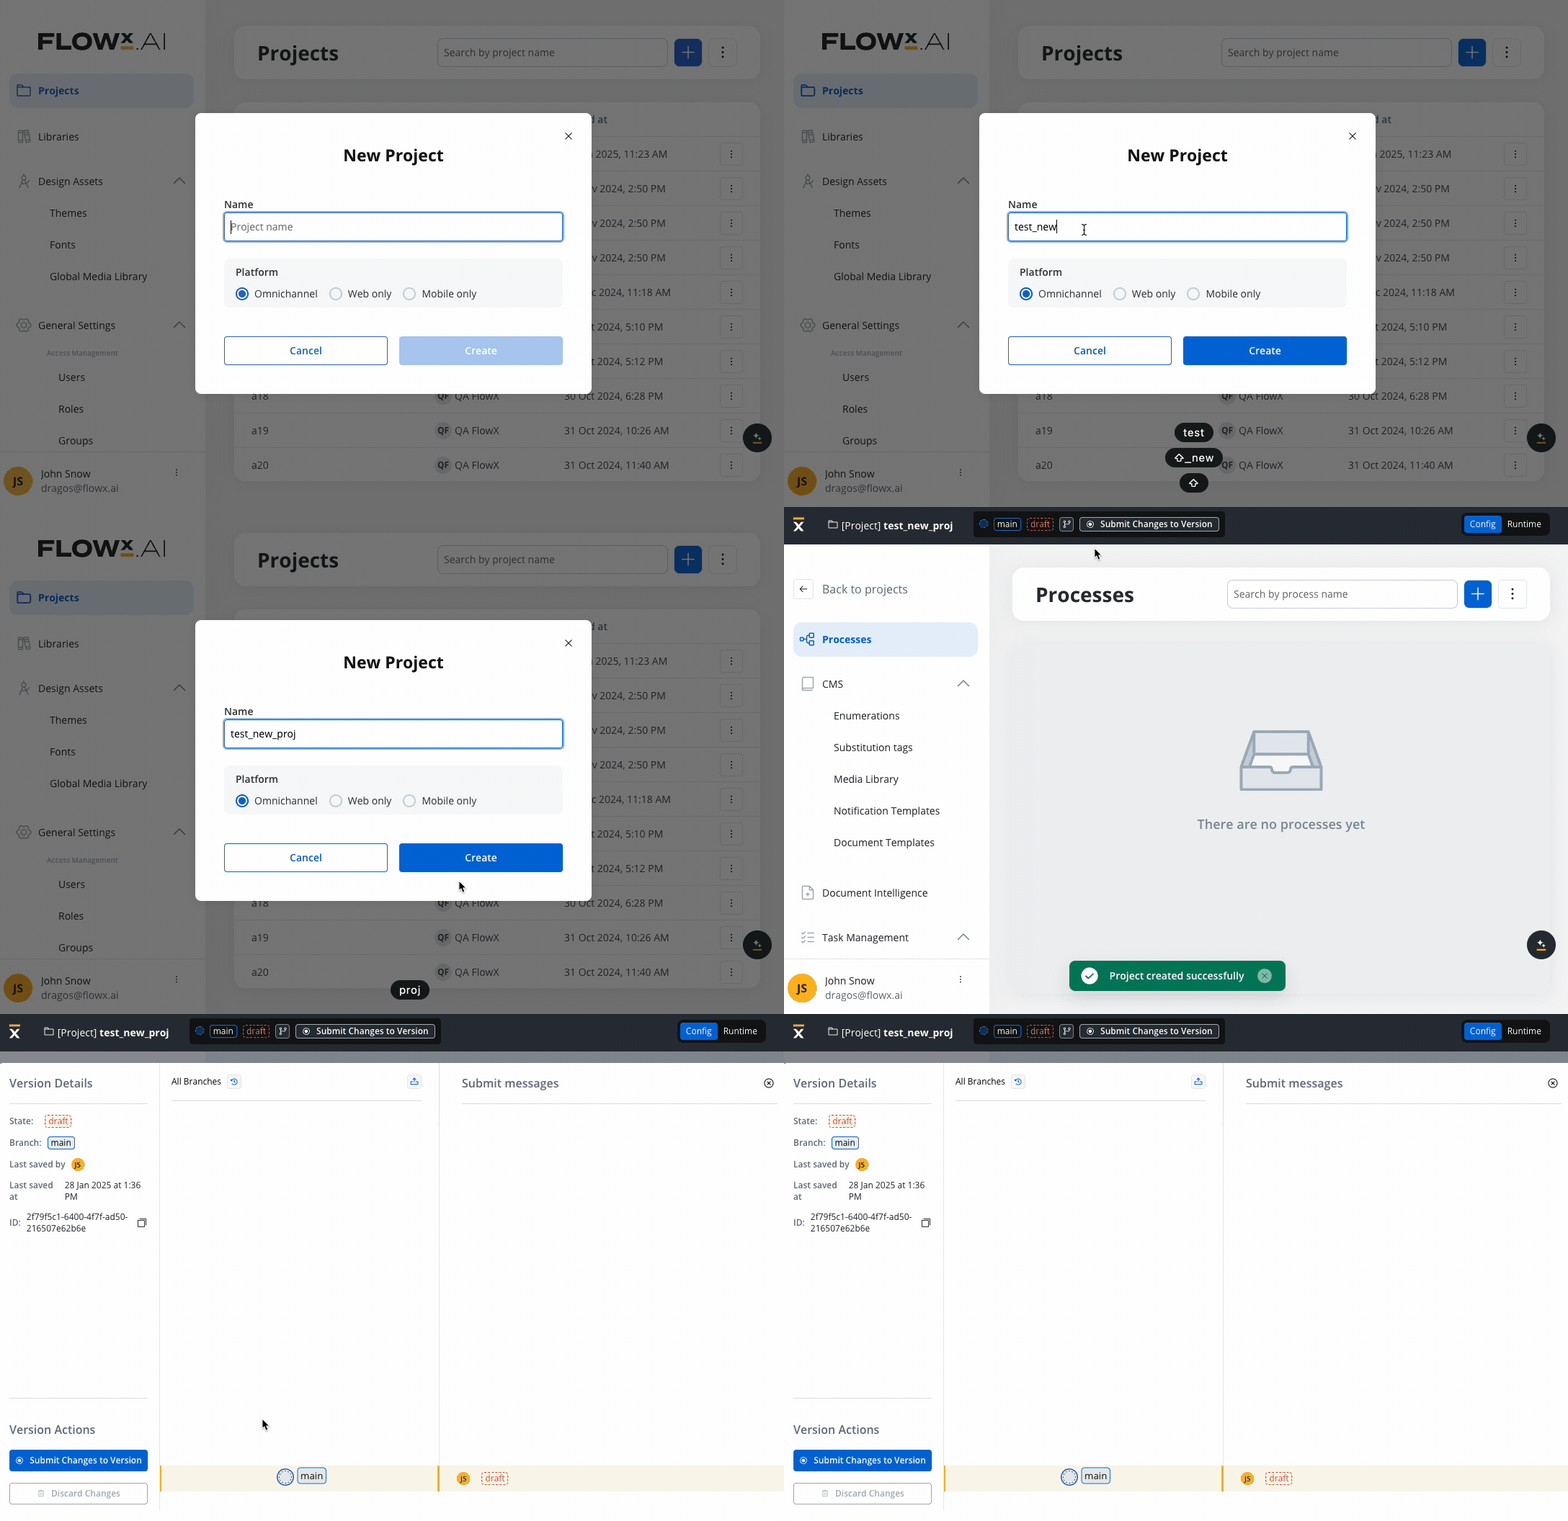
New Project: When you create a new project, a corresponding draft version is initiated. This ensures that ongoing changes are tracked separately from the committed version.
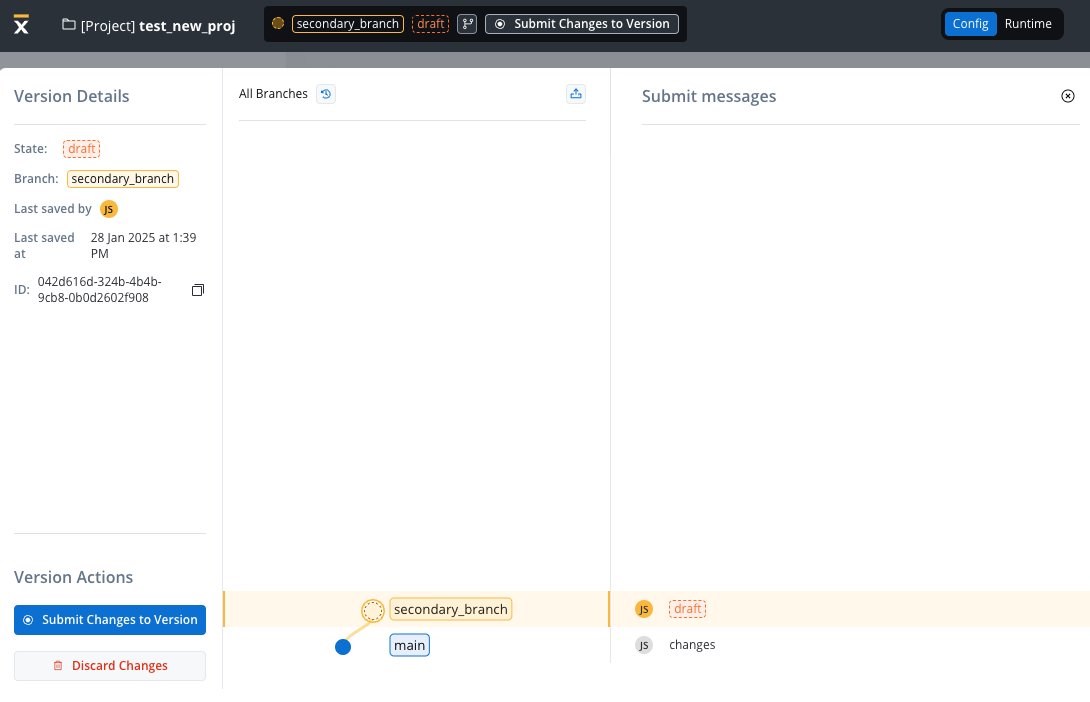
New Branch Creation: The creation of a new branch in the system also triggers the creation of a draft version (from a committed version only). This simplifies the process of branching and development, allowing for parallel progress without impacting the main committed version.
Manual Draft Version Creation: You have the flexibility to initiate a new draft version manually. This is particularly useful when building upon the latest version available on a branch.
You can commit changes exclusively on work-in-progress (WIP) versions. Changes can be committed using the designated action within the version menu. Upon triggering the commit action, a modal window appears, prompting you to provide a commit message.
A string of maximum 50 characters, mandatory for commit. Only letters, numbers, and characters [] () . _ - / are allowed.
The placeholder indicating work-in-progress is replaced with a “committed” state within the graph view.SaaS · 5.12
Available on SaaS with FlowX.AI 5.12. This feature is live on managed (SaaS) deployments now. Self-hosted deployments will receive it with the next LTS release family.
The commit modal also checks the version for problems and shows what it found next to each changed resource. The findings do not block the commit. See Checking a version for issues.
You have the flexibility to modify commit messages after changes are committed. This can be accomplished using the action available in the version menu.
Available on SaaS with FlowX.AI 5.13. This feature is live on managed (SaaS) deployments now. Self-hosted deployments will receive it with the next LTS release family.
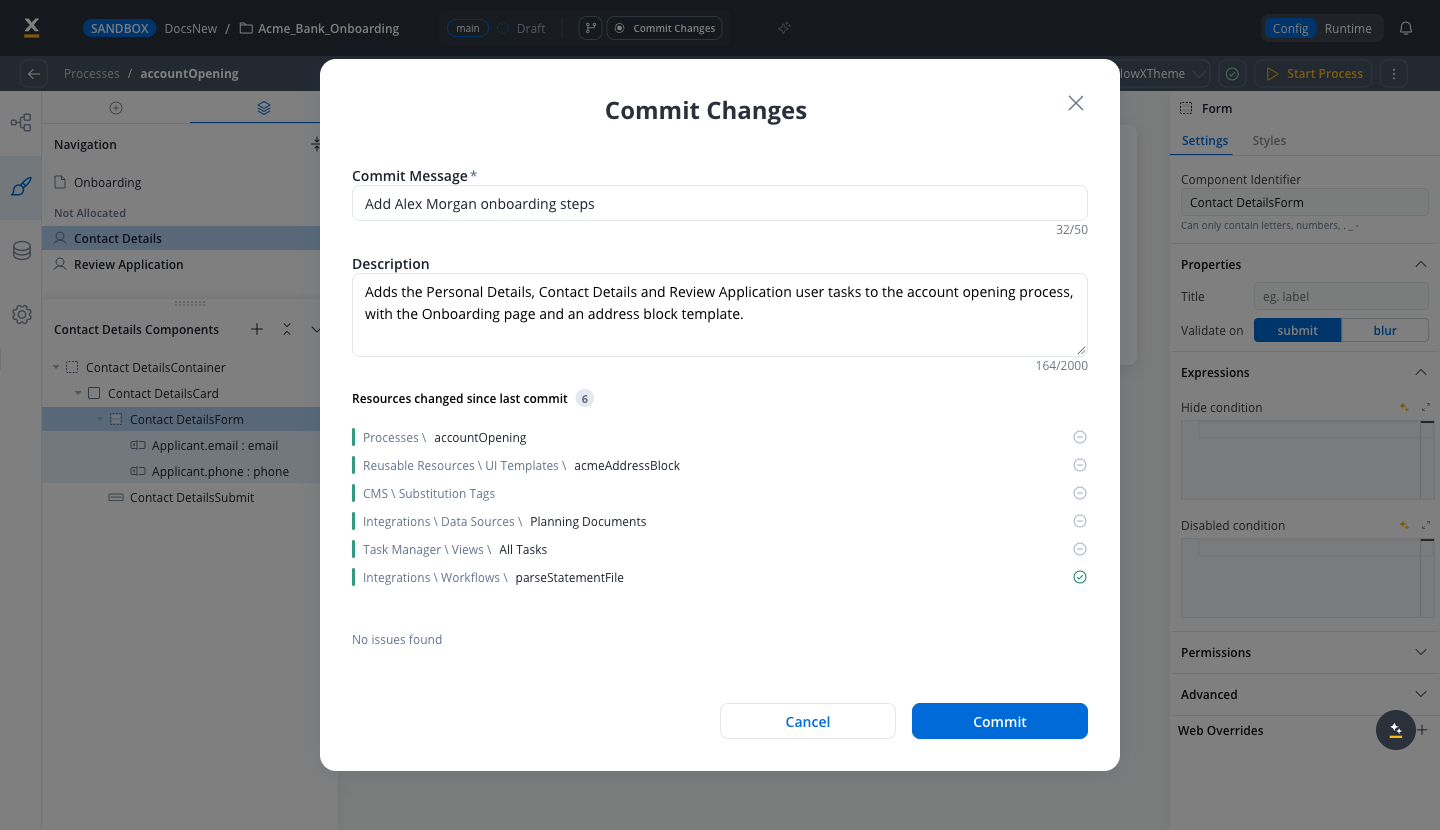
A commit can carry a longer description next to its short commit message. The commit message stays the short label you see in the branch graph and commit history, and the description records what changed and why.When you commit, the Commit Changes modal has two fields:
Commit Message: required, between 2 and 50 characters. Punctuation such as commas is accepted.
Description: optional, up to 2000 characters. A counter under the field shows how many characters you have used.
Click Commit to create the version. Spaces at the start and end of both fields are trimmed, and a description left empty is not saved.The Merge Branch modal has the same optional Description field under Merge Message, with the same 2000-character limit, so a merge can explain what it brings in.To read the message and description of a committed version:
1
Select a committed version
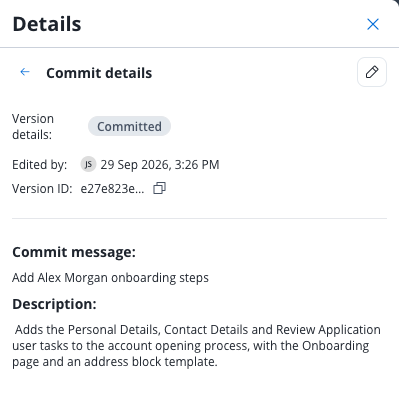
In the branching overlay, select a committed version. Its commit message appears as a button in the Details panel.
2
Open the commit details
Click the commit message button. The Commit details view opens and shows the version state, Edited by, Version ID, the full Commit message, and the Description. When a version has no description, a dash is shown instead.
3
Go back to the version details
Click the back arrow in the Commit details header to return to the Details panel and its list of changed resources.
To change the message or description of a committed version, open its Commit details view and click the pencil icon (Rename Commit Message) in the header. The Edit Commit Message modal opens with the same Commit Message and Description fields. Click Save to apply the change. The icon is shown only if you can edit the project.
Using versioning you can work on a stable copy of the project, isolated from ongoing updates by other users. You can create a new branch starting from a specific commit point.
The initiation of new branches is achieved using the dedicated action located in the left menu of the chosen commit point (used as the starting point for the branch).
A string of maximum 16 characters, mandatory for branch creation.
You can incorporate updates made on a secondary branch into the main branch or another secondary branch. To ensure successful merging of changes, adhere to the following criteria:
You can merge the latest version from a secondary branch into either its direct or indirect parent branch.
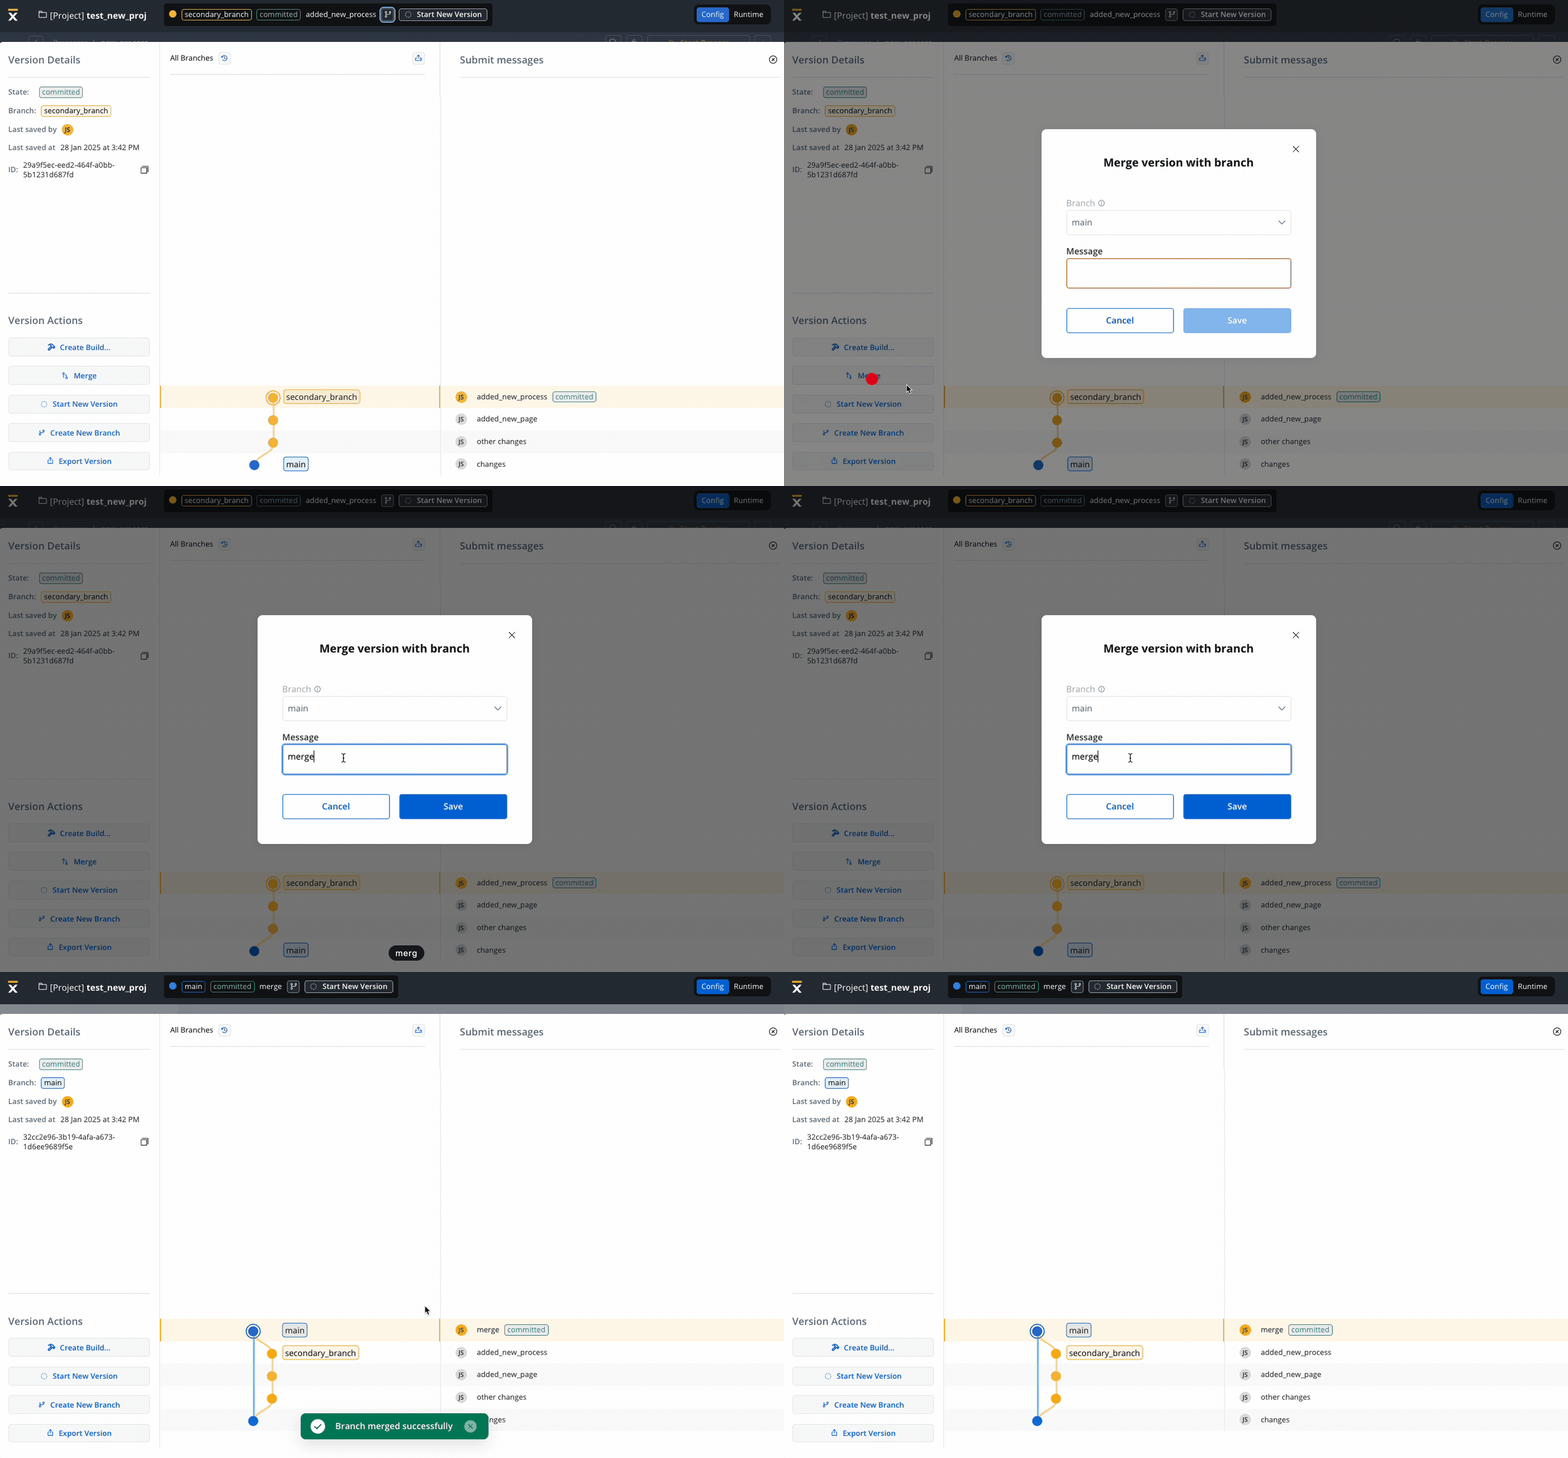
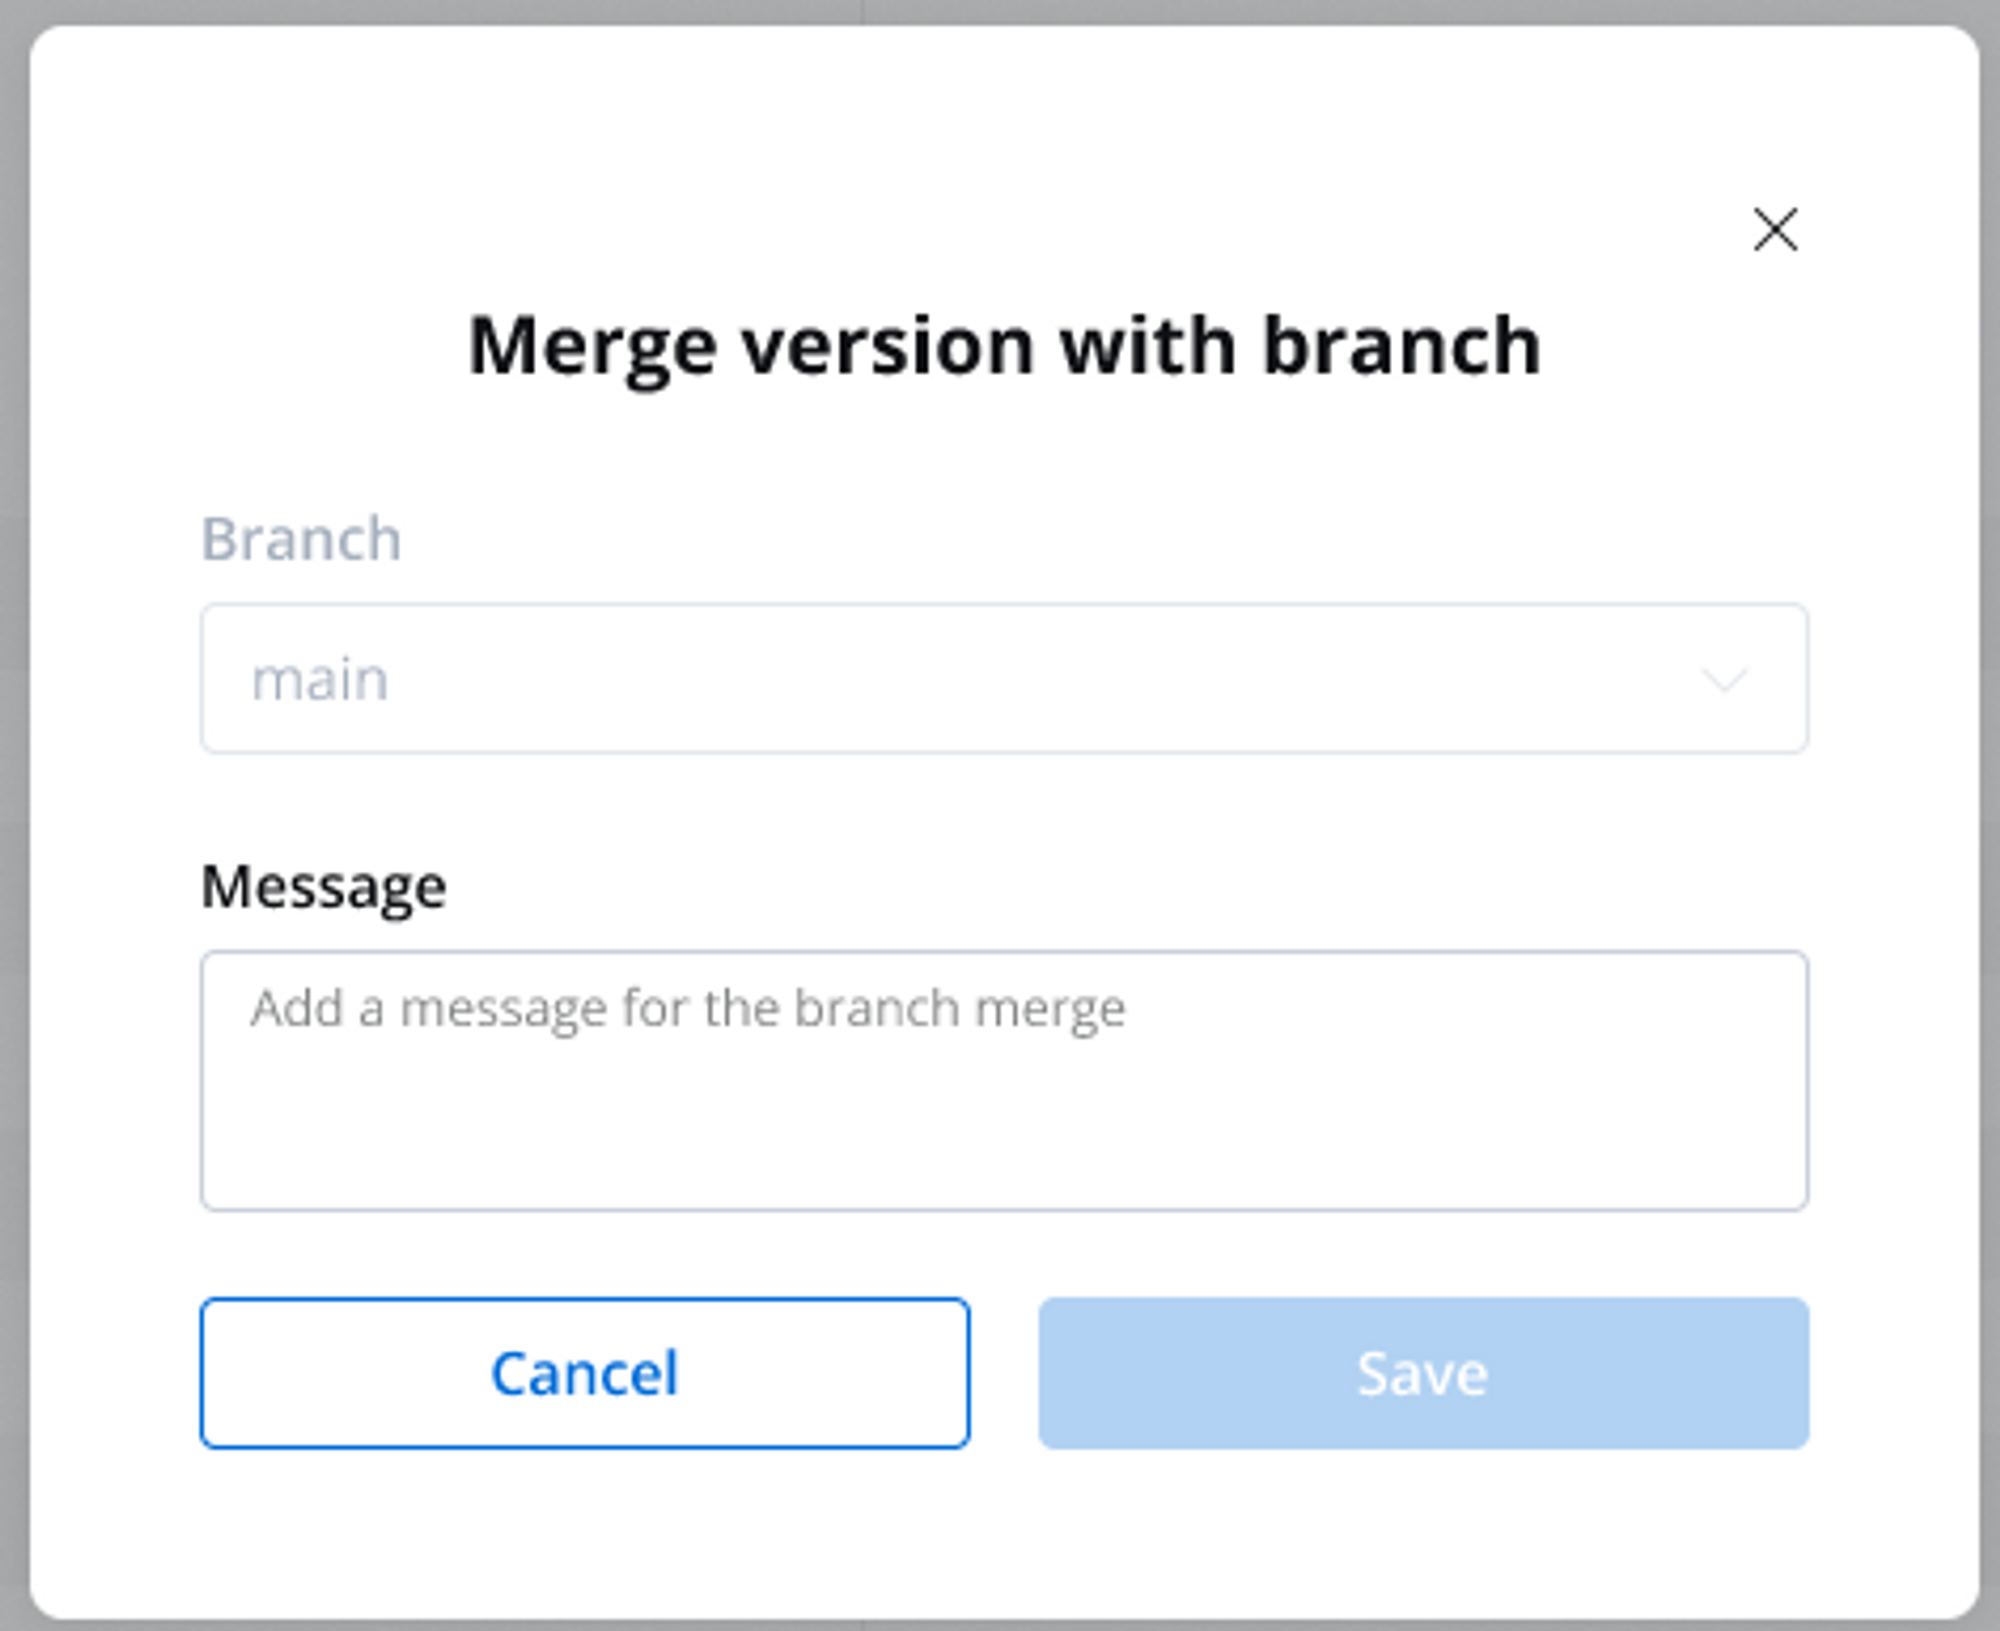
Upon triggering the merge action, a modal window appears, giving the possibility to make the following selection:
Branch: Displays the branches to which the current branch is a child (direct or indirect).
Message: A string of maximum 50 characters (limited to letters), numbers and the following characters: [] () . _ - /.
The graph representation is updated to display the new version on the selected parent branch and the merged version is automatically selected, facilitating further development and tracking.
Available on SaaS with FlowX.AI 5.12. This feature is live on managed (SaaS) deployments now. Self-hosted deployments will receive it with the next LTS release family.
Branch management grew a set of operations of its own, available from the branching overlay and the branch info panel:
Merge to any branch: the merge modal’s Branch list now offers every branch the current branch can merge into, not only its direct or indirect parents.
Archive Branch: retire a branch you are done with. A Reason is required (“Why is this being archived?”), and the branch’s info panel then shows who archived it and why. Versions already merged into other branches are kept there. An archived branch can be restored with Unarchive Branch.
Delete Branch: permanently remove a branch from the branching overlay. Deleting is blocked while the branch has child branches, an uncommitted draft, or a merge in progress, and if unmerged commits would be lost you must type the branch name to confirm. It requires its own permission, so not everyone who can edit a project can delete its branches.
Branch info panels: selecting a branch or a version in the branching overlay opens an info panel with its Branch Summary, and versions merged from another branch show where they came from, including whether that source branch has since been archived.
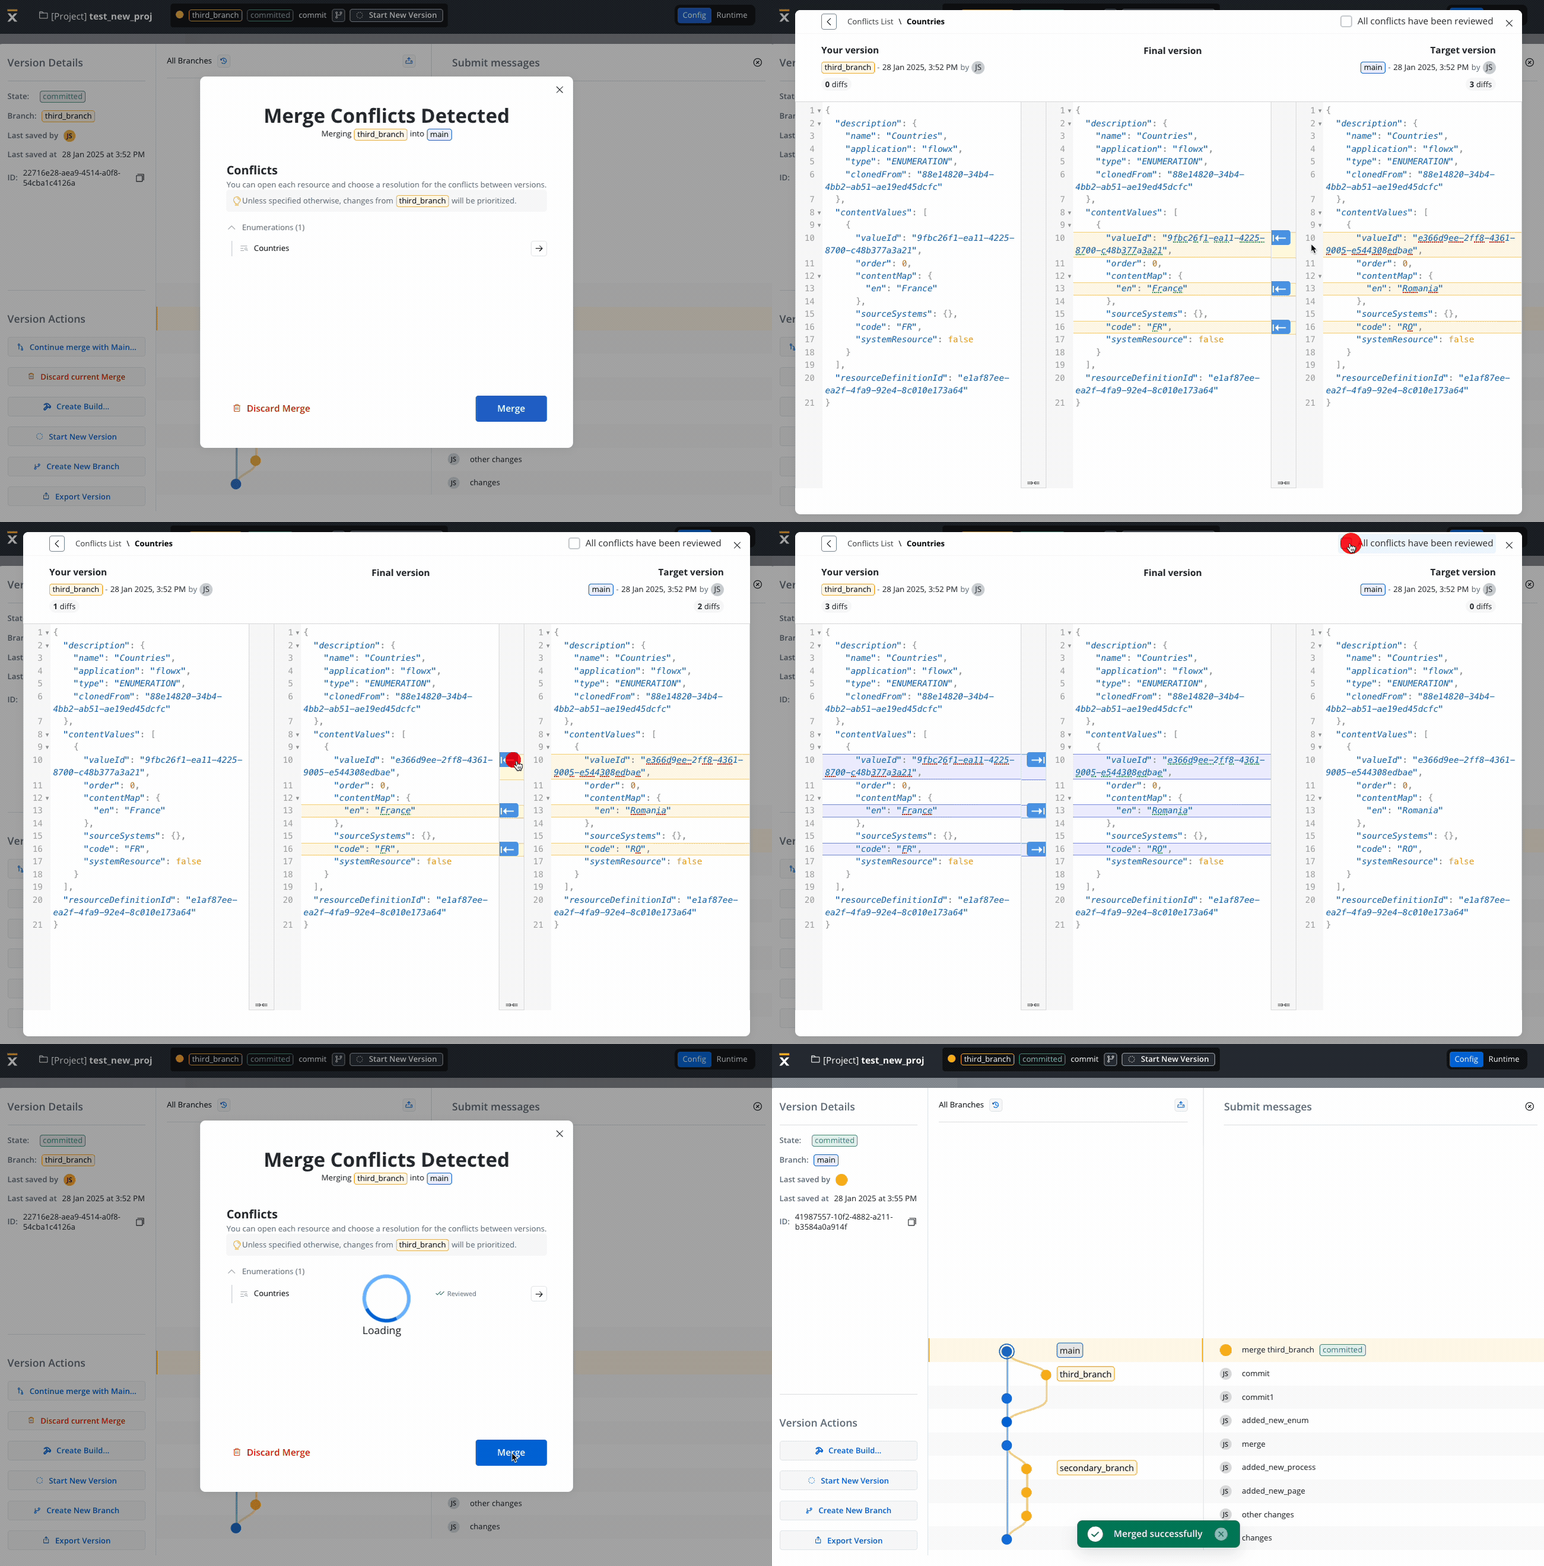
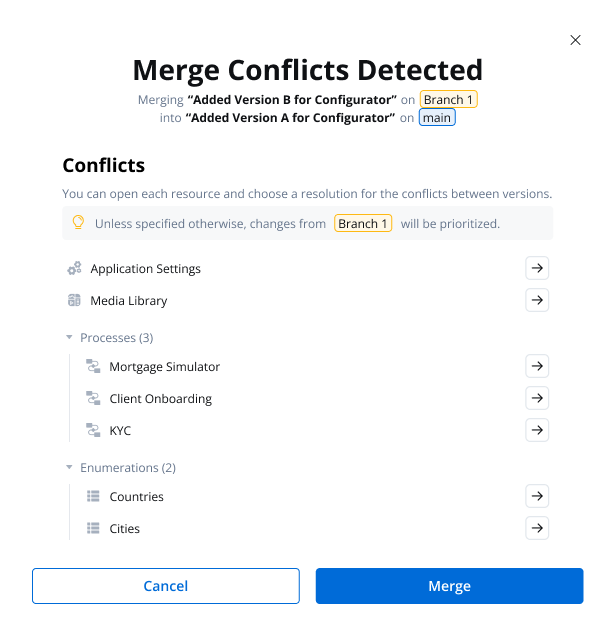
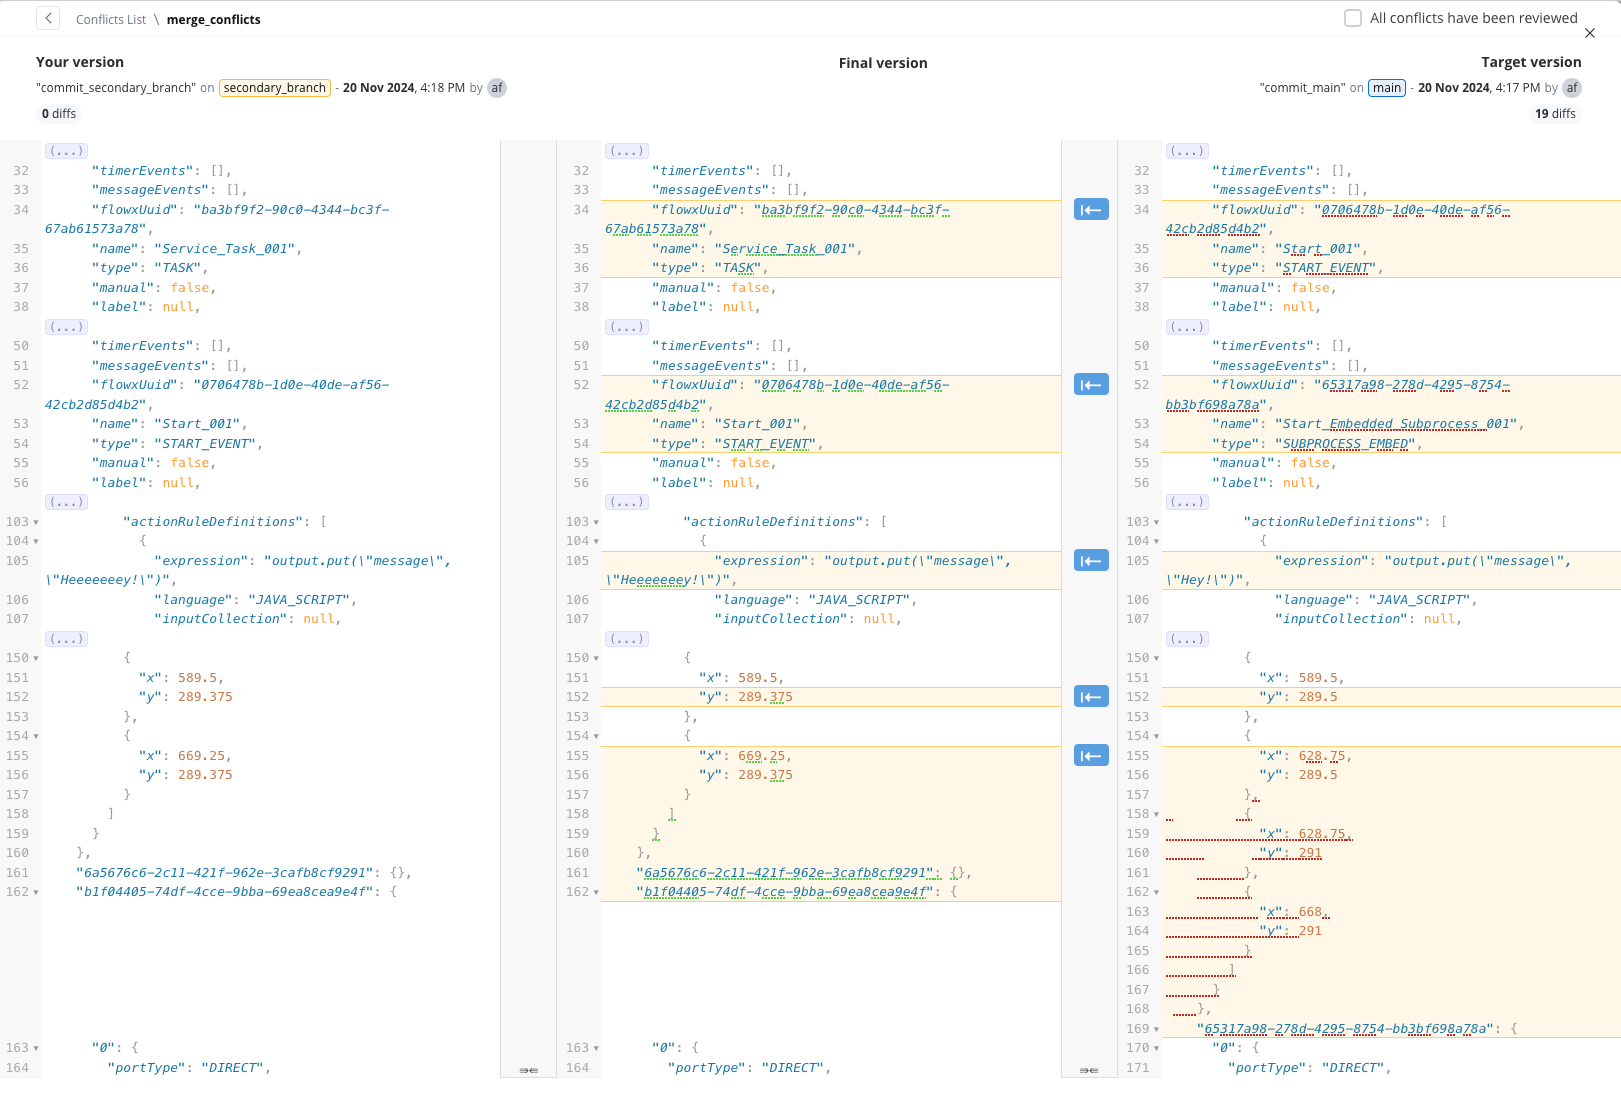
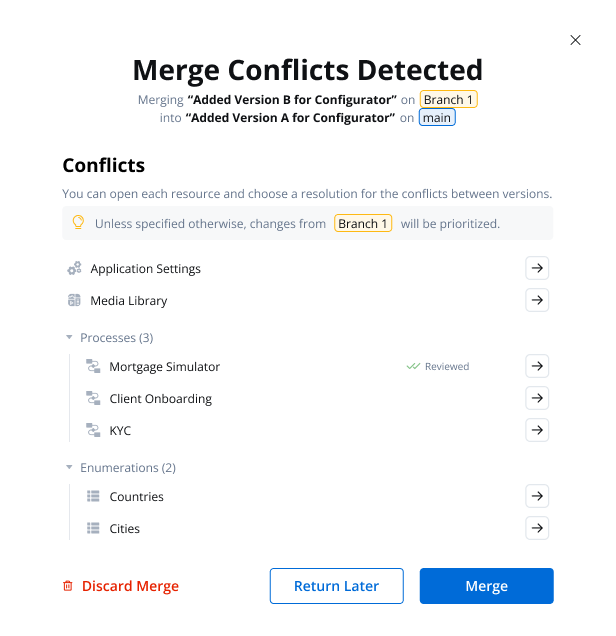
The Conflict Resolution and Version Comparison feature provides a mechanism to identify and address conflicts between two process versions that, if merged, could potentially disrupt the integrity of a project.The system displays both the version to be merged and the current version on a single screen, providing a clear visual representation of the differences. Conflicts and variations between the two versions are highlighted, enabling users to readily identify areas requiring attention.
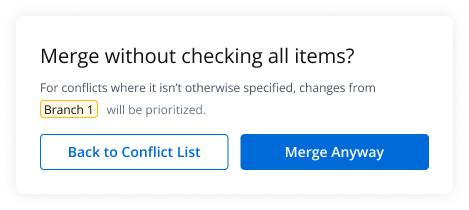
Unless specified otherwise, changes from the source branch will be prioritized.
Not all changes are considered conflicts, changes in node positions are not treated as conflicts. Primary causes lie in identifying differences within business rules, expressions, and other scripts. For how the merge decides which layout to keep, see Node layout after merging.
Easily merge secondary branches into the main branch or other branches when no conflicts are detected. The updated merge modal includes:
A clean interface for branch selection.
A mandatory, validated commit message field (max 50 characters).
Real-time feedback for successful merges and updates to the branching graph.
SaaS · 5.13
Available on SaaS with FlowX.AI 5.13. This feature is live on managed (SaaS) deployments now. Self-hosted deployments will receive it with the next LTS release family.
The merge modal also takes an optional Description of up to 2000 characters next to the merge message. See Commit descriptions and details.
Adding components to the same User Task node on two parallel branches, when that node was empty at the point the branches diverged, is a special case the merge can’t resolve as a conflict. Each branch creates its own root container with a distinct ID, so there is no shared resource to compare and the system doesn’t flag a conflict.Starting with FlowX.AI 5.9.2, when this happens the merge keeps the source branch container together with all of its content and removes any other root containers. To review or recover removed content, open the previous version from the Resource history.
As a best practice, avoid this pattern: add at least one component to a User Task node before branching, so both branches modify the same container instead of creating separate root containers. In releases before 5.9.2, merging two branches that each added a root container to the same empty User Task node can leave the merged screen unable to render, and starting the process returns an error.
Node positions and swimlane sizes are not part of conflict detection. A merge never flags layout differences, and it reports success even when the resulting diagram needs manual cleanup.Which layout the merge keeps depends on whether the process also changed on the target branch after the branch was created:
Process unchanged on the target branch: the merge applies the source branch layout as is.
Process changed on both branches: the merge keeps the node positions and swimlane size of the target branch. Nodes that were repositioned on the source branch return to their target-branch positions (a node moved to a different swimlane keeps its source-branch position), while nodes added on the source branch keep their source-branch coordinates. New nodes can therefore end up on top of existing nodes or outside the swimlane, shown in a red error state.
Any committed change to the process on the target branch counts as a change here, including a layout-only rearrangement. If a node has a genuine conflict and you resolve it by keeping the source version, that node also takes its source-branch position, so a merged diagram can mix positions from both branches.Only the placement is affected: sequences, node configuration, and the other merged changes are applied correctly, and the process still commits and runs.
After merging a branch where the same process changed on both sides, review the diagram and rearrange any overlapping nodes. If new nodes ended up outside the swimlane, resize the swimlane in a single drag that makes it large enough to contain every node at once; a resize that still leaves nodes outside its bounds is rejected.
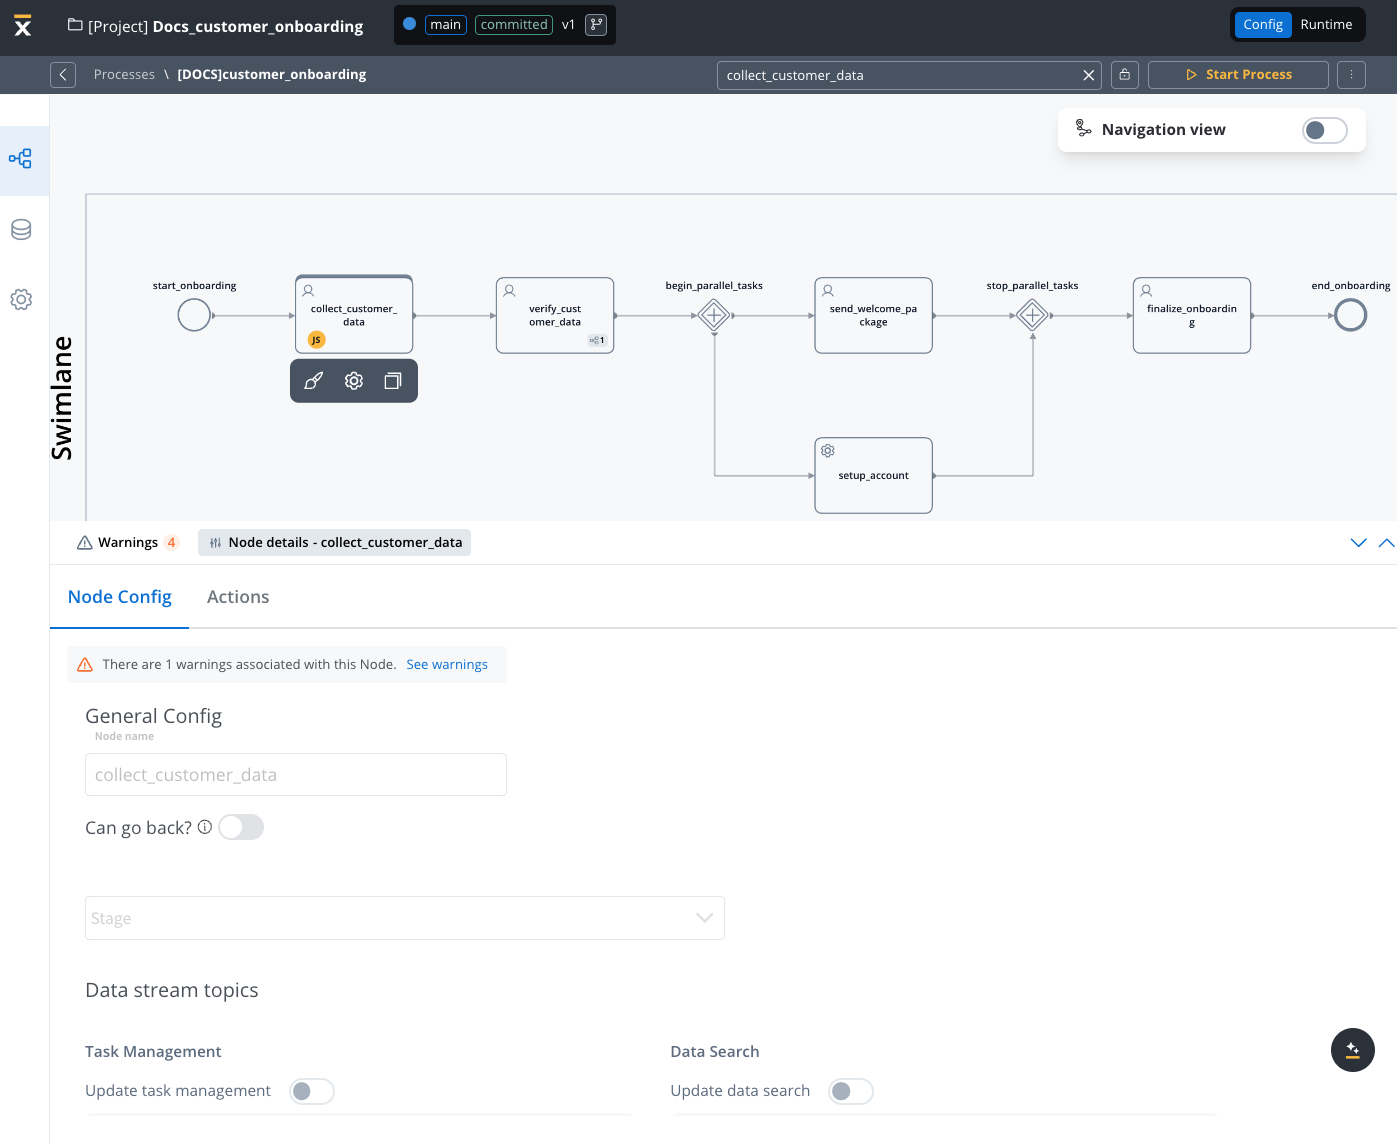
The Read-Only State feature allows you to access and view committed versions of your projects while safeguarding the configuration from unintended modifications. By recognizing the visual indicators of the read-only state, you can confidently work within a controlled environment, ensuring the integrity of project’s process definitions.
A build is a deployable snapshot of a committed project version, packaged and prepared for deployment to a runtime environment. Builds enable you to create immutable, versioned packages that can be deployed consistently across different environments.
You can create multiple versions of a project before creating a build. You can create a build for any committed project version. Once created, a build cannot be edited—you’ll need to create a new project version and generate a new build to incorporate changes.
To create a build from a committed project version:
1
Navigate to Version Details
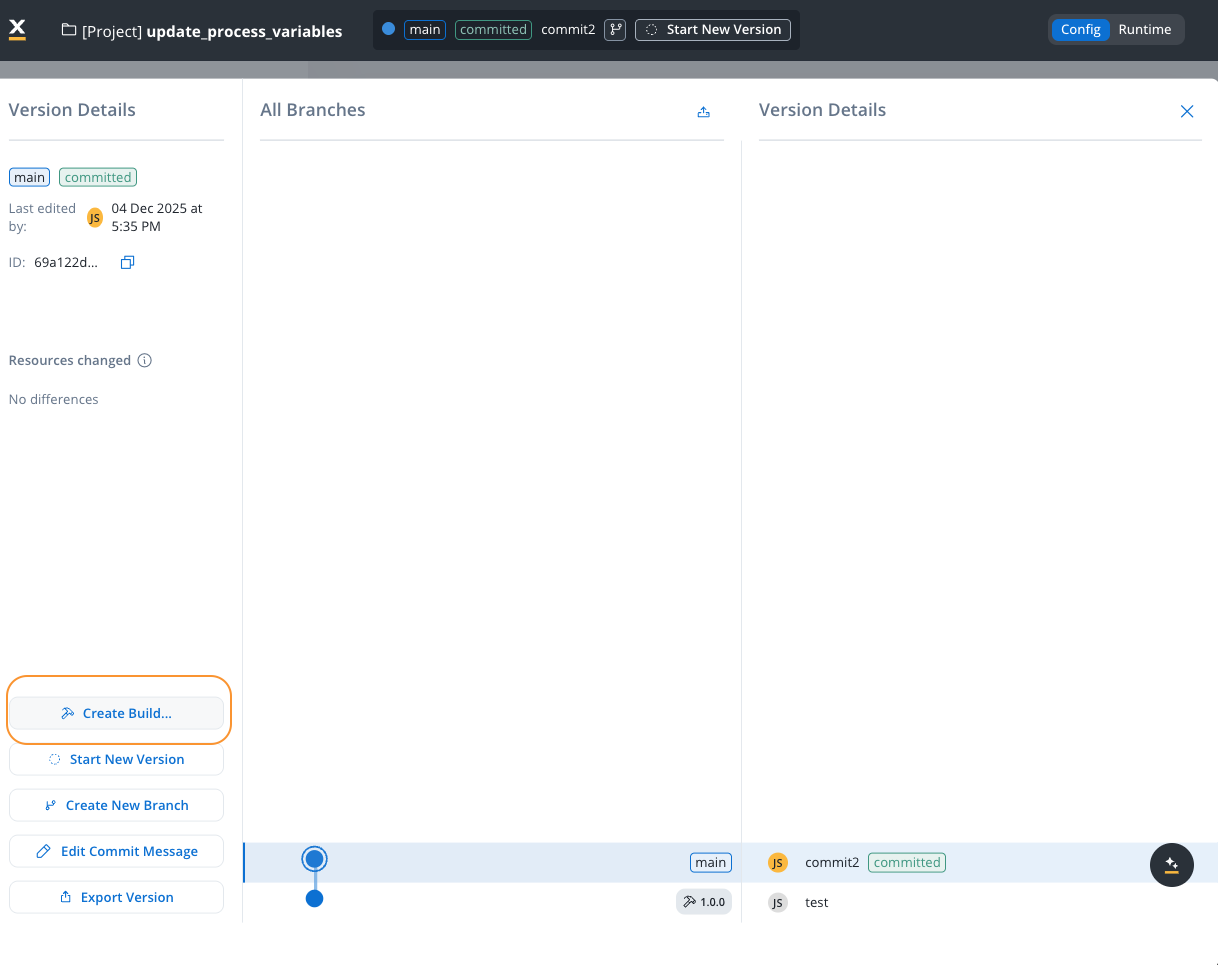
Access the version details panel for the committed version you want to build. You can only create builds from committed versions, not from draft (WIP) versions.
2
Open Create Build Dialog
Click the Create Build… button in the version details panel. This opens the build creation modal.
Create Build
3
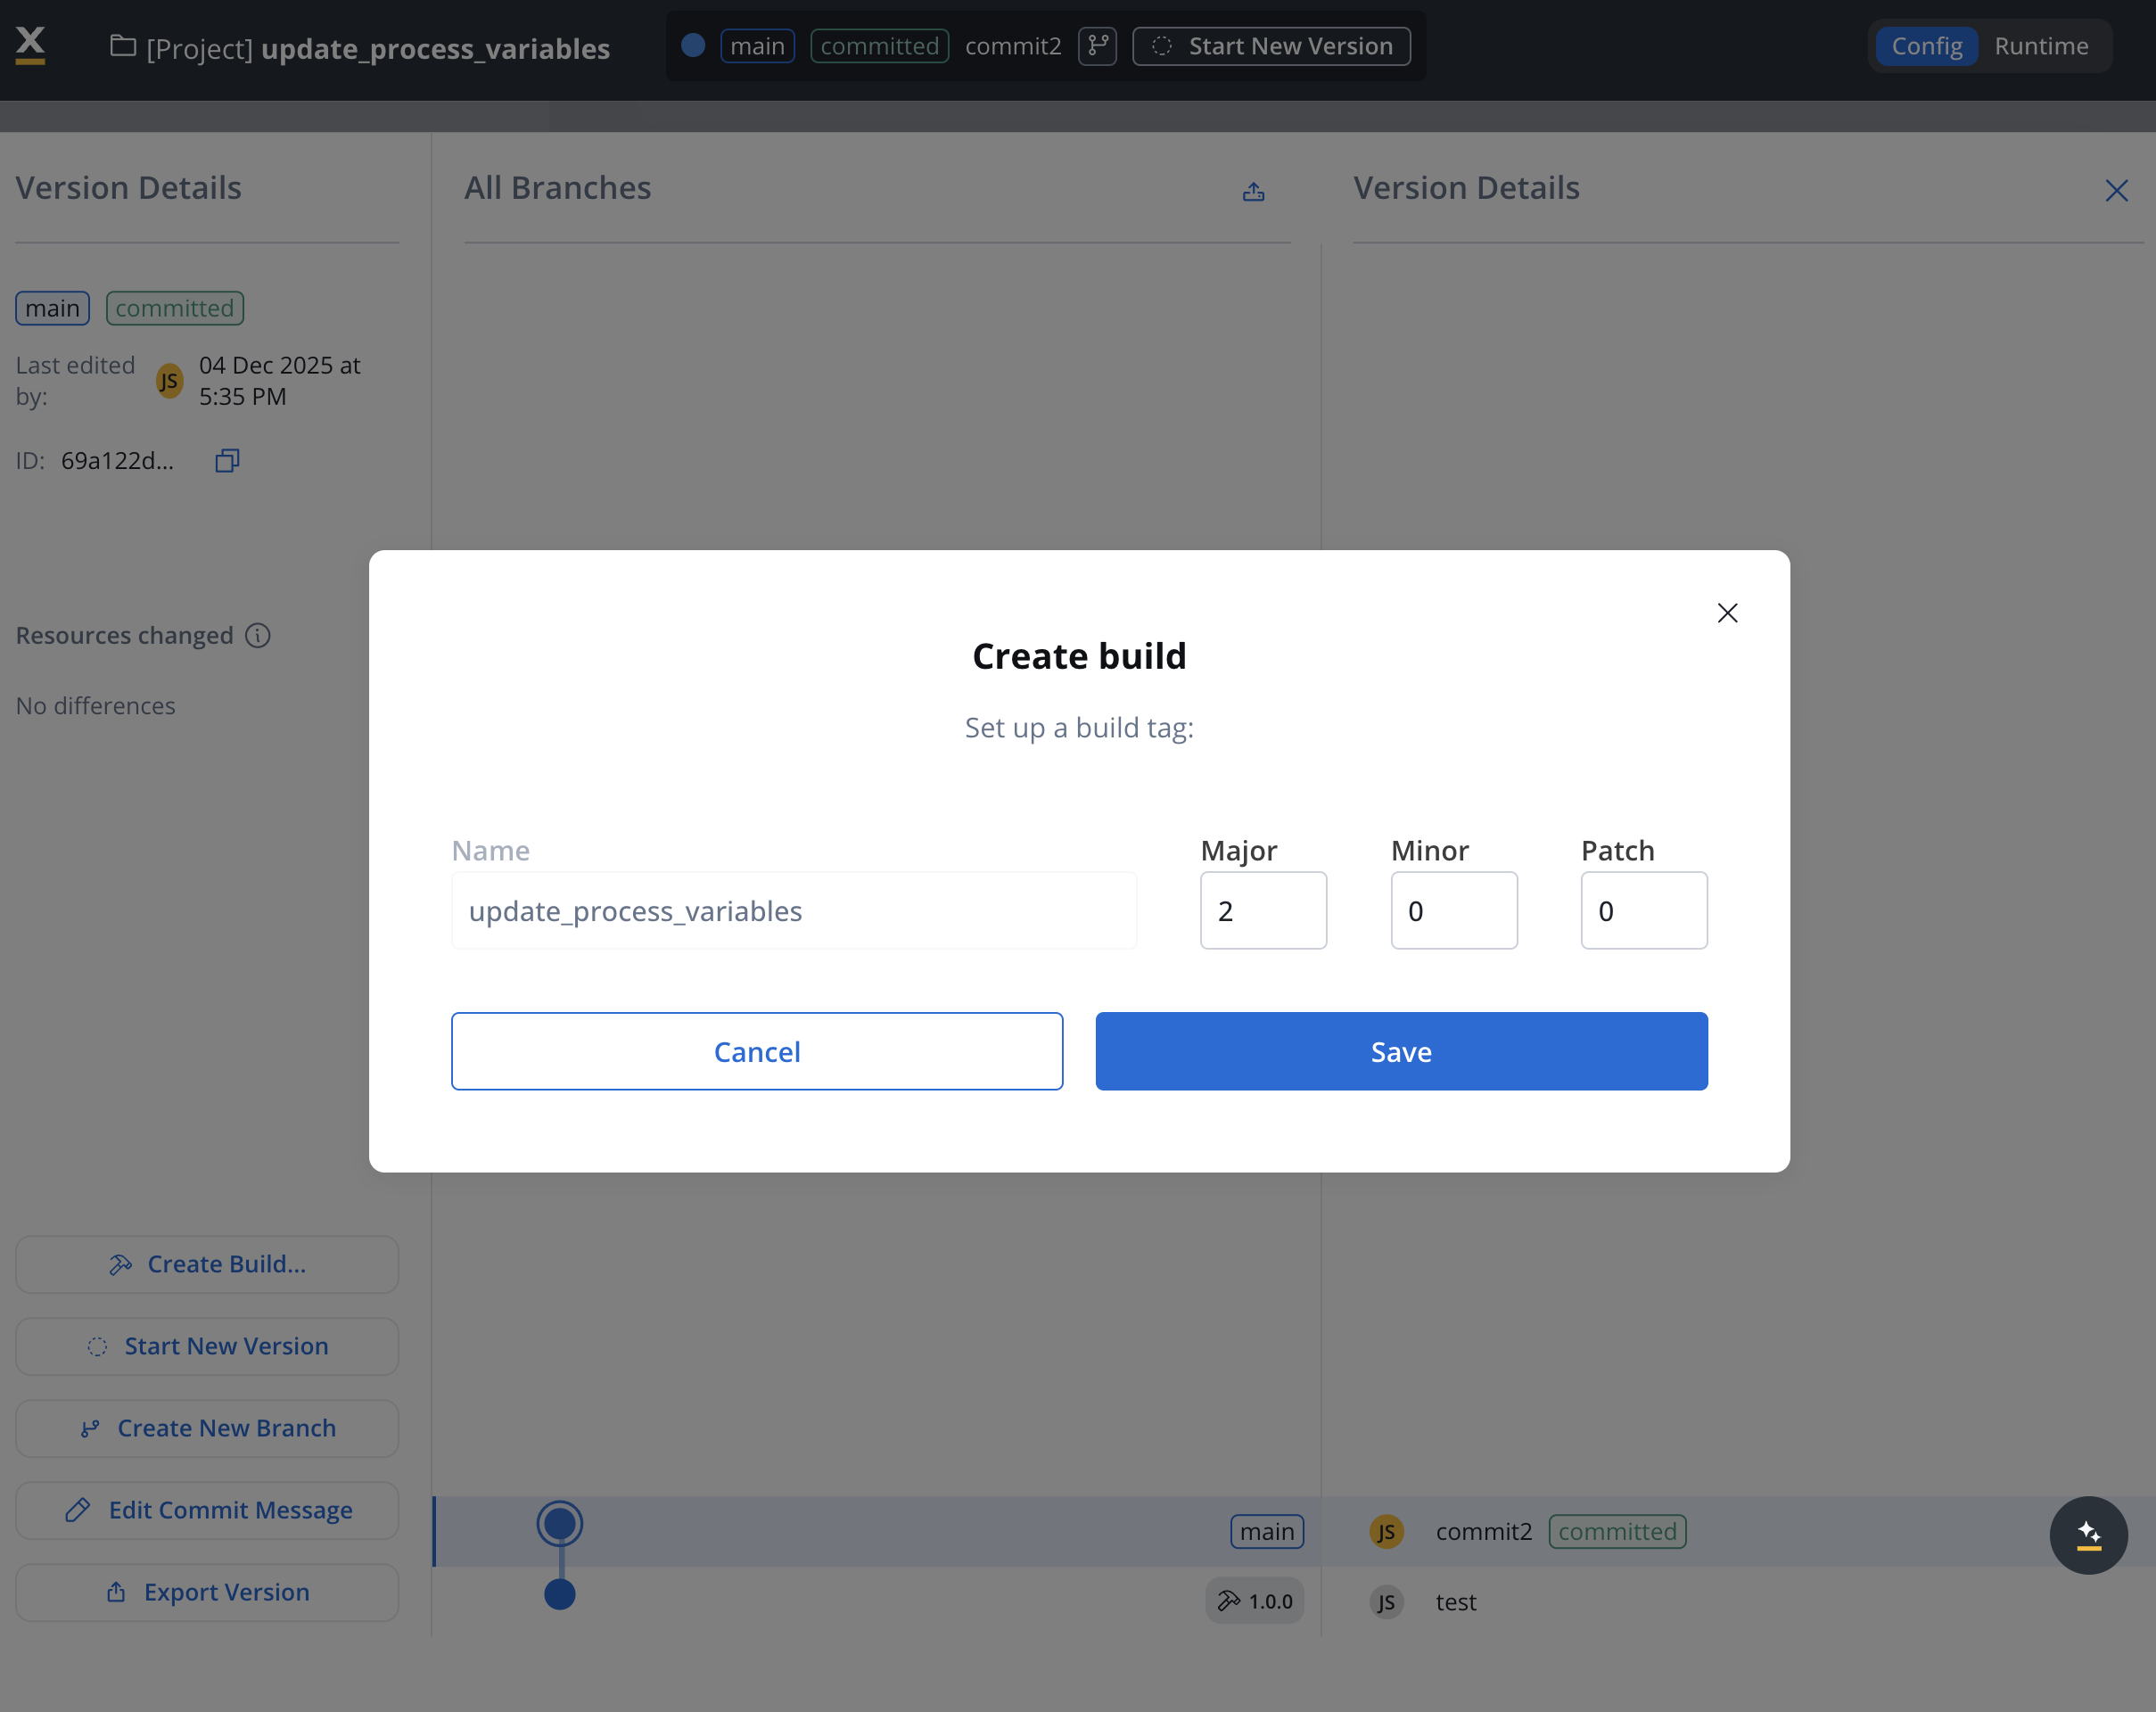
Configure Build Settings
In the Create build modal, configure the following settings:
Name: The build name (defaults to the project name). This helps identify the build in the builds list.
Build Tag Version: Set the semantic version for this build:
Major: Major version number (e.g., 1)
Minor: Minor version number (e.g., 0)
Patch: Patch version number (e.g., 0)
The build tag follows semantic versioning format (e.g., 1.0.0) and helps track different builds of the same project version.
4
Save the Build
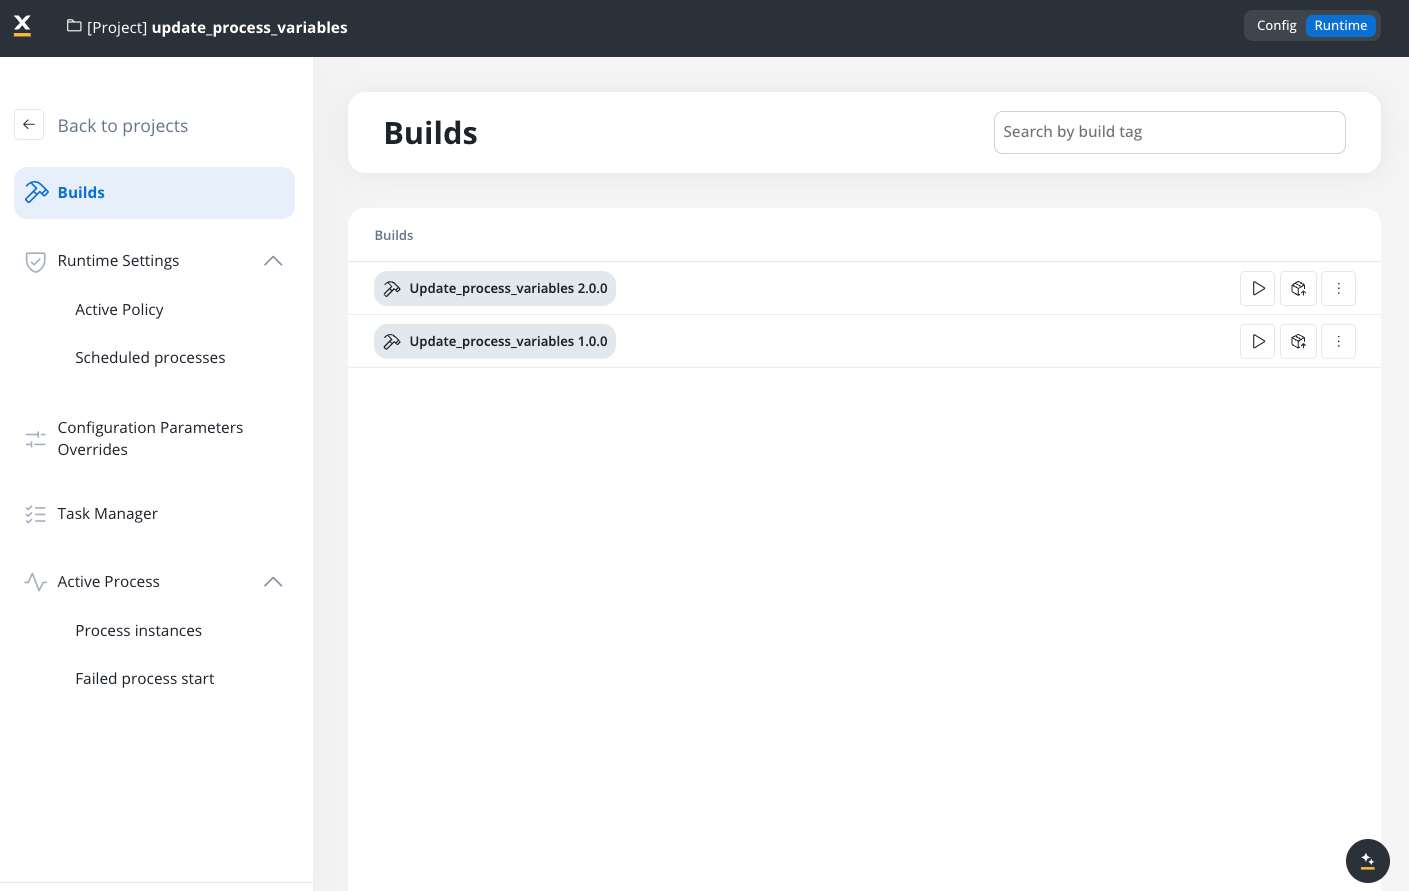
Click Save to create the build. The build is now available in the Builds section and can be deployed to runtime environments.
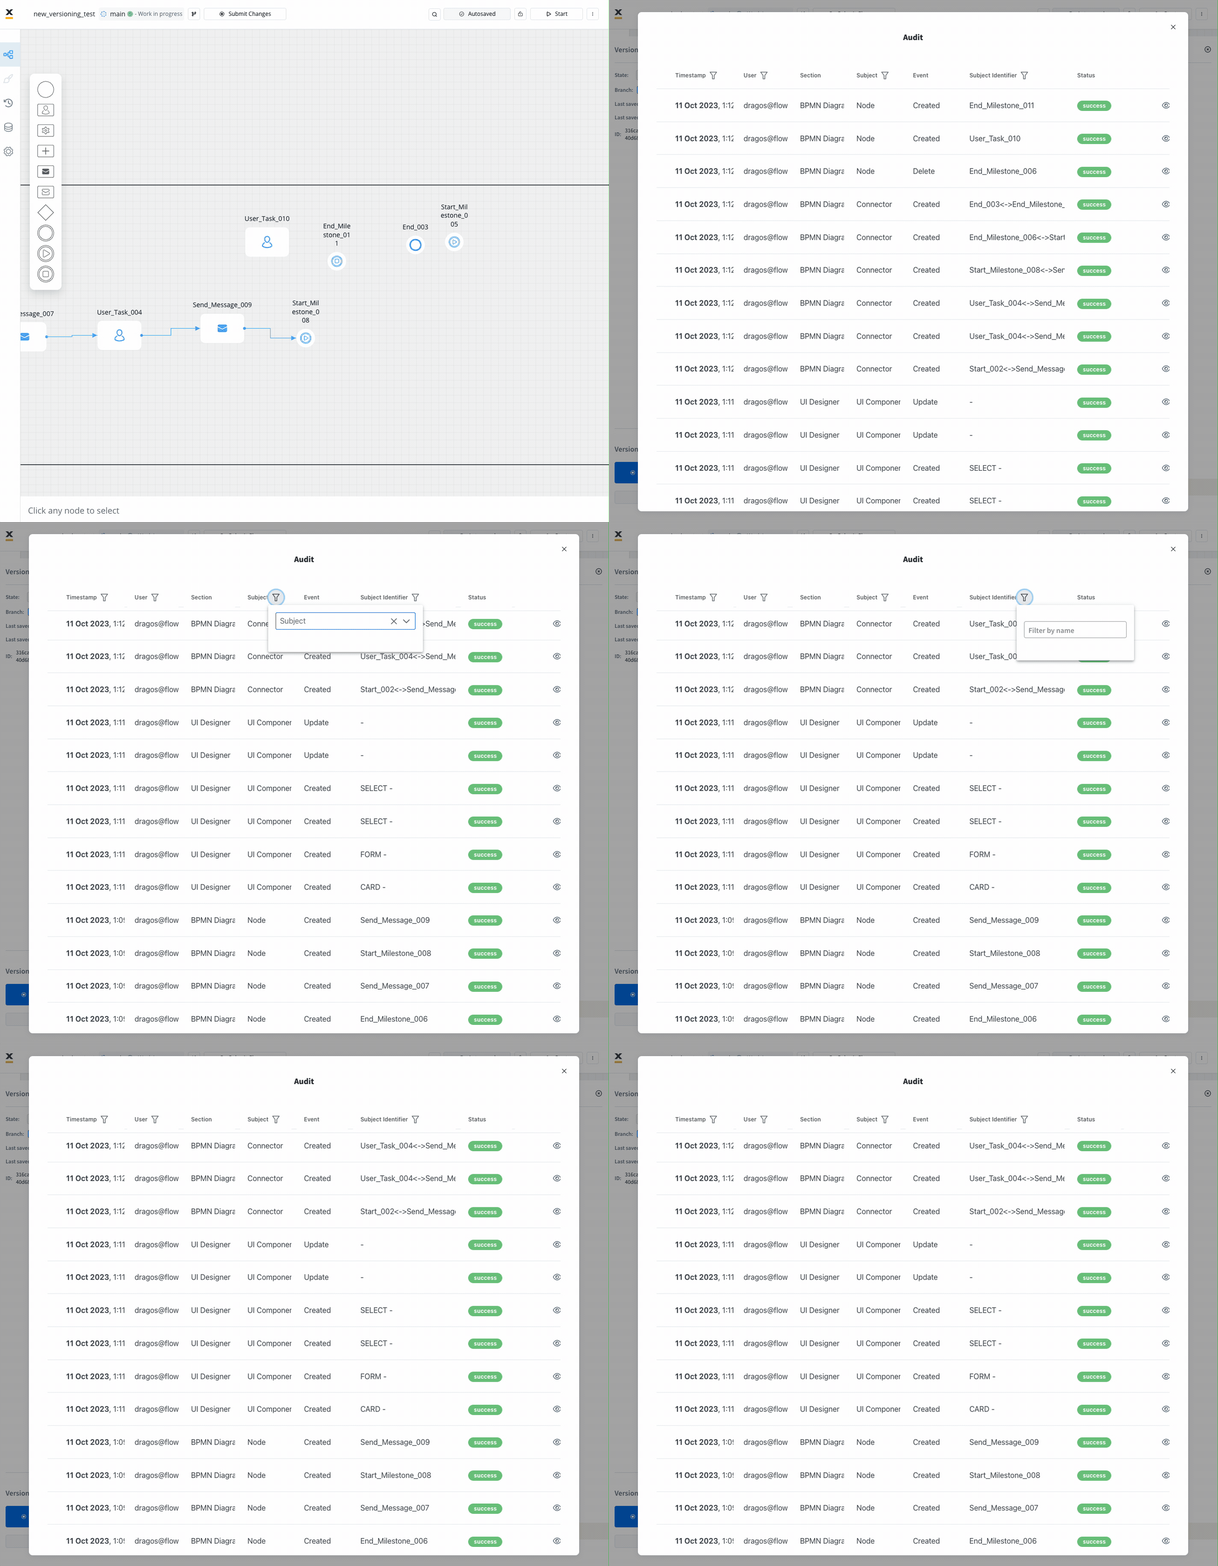
The “Open Audit View” provides you with a detailed audit log of actions related to work-in-progress (WIP) versions of a process. The primary goal is to ensure transparency and accountability for actions taken before the commit or save process.You can quickly access and review the history of WIP versions, facilitating efficient decision-making and collaboration.
Last modified on September 29, 2026
Assistant
Responses are generated using AI and may contain mistakes.